In my previous article, I tried to show how we can build a simple but practical AI Agent using Microsoft Agent Framework (MAF) with deterministic routing and intelligent search.
I also mentioned that I kept things simple on purpose and that in a production scenario there are other concerns that need to be addressed. Building the agent itself is really just the beginning. Once we start thinking about putting an agentic system in front of real users, one of these concerns is governance.
By governance I mean things like controlling which tools an agent is allowed to call, enforcing access policies based on user roles and having a centralized and auditable way to manage these rules. With growing regulatory attention around AI, frameworks like the EU AI Act, I think having a predictable and auditable way to enforce these policies is going to become more and more important, especially when agents access data or perform actions on behalf of users.
One approach to enforce these rules is embedding them in the system prompt, telling the agent what it should or should not do. But this relies on the LLM interpreting those instructions correctly every time and prompts on their own are too fragile to rely on in production systems. Prompts can suggest behavior but they cannot enforce governance.
So in scope of this article, I wanted to explore a more deterministic approach using Open Policy Agent (OPA), where rules are enforced outside the LLM and evaluated reliably every time.
In one of my previous articles on supply chain security, I had used OPA Gatekeeper to enforce policies at the infrastructure level in Kubernetes. The idea here is very similar. Instead of governing what gets deployed, we focus on what an agent is allowed to do at runtime.
There are several approaches to governance depending on how the agent is built. Enterprise platforms like Microsoft Foundry already provide features such as RBAC and content filters. Developer first frameworks like MAF or LangChain give us full control over the execution flow, which makes it straightforward to integrate OPA as a centralized policy enforcement point.
The nice thing about OPA is that it is platform agnostic by design, so the same policies could potentially apply regardless of how the agent is built. OPA can sit at an API gateway or MCP gateway which makes it a natural fit for enterprises looking to adopt Agentic AI without skipping their existing API security and governance layers.
In this article, I will try to show how we can extend the product search agent from the previous article by integrating OPA as a policy-as-code layer to enforce tool level access control.
As I mentioned in my supply chain security article, OPA is a general purpose policy engine that uses a declarative language called Rego to define policies as code. In that article, I used it at the infrastructure level through OPA Gatekeeper to intercept admission requests in Kubernetes and enforce policies before containerized applications could run.
Here, the idea is also very similar, but the layer is different. Instead of intercepting deployments, we intercept agent actions. When our agent decides to call a tool, we evaluate that decision against an OPA policy before the tool actually executes.
The flow looks something like this:
User request → Agent reasons → Agent decides to call a tool → OPA evaluates policy → Allow or Deny → Tool executes or request is rejectedThe point here is that the LLM has no say in the policy decision. It can reason, it can pick a tool, but whether that tool actually runs is determined by a policy that lives outside the agent, written in Rego, versioned in source control and testable like any other code.
This is what makes it deterministic. The same input will always produce the same policy decision, regardless of what the LLM thinks.
Before we get started with OPA, it helps to quickly recall what we built in the first article. We created a simple but practical product search agent using the MAF. It used predictable routing and a small reasoning loop. Azure AI Search handled the retrieval side. The agent could interpret a user request, decide whether it needed to call the search tool and return structured results in a predictable way. That setup gives us a clear execution flow to build on. Now we can focus on adding a governance layer with OPA.
Now it’s time to bring OPA into our sample AI workflow. The scenario we are going to build is simple. Our current agent already supports product search and now we want to add a second capability that lets users retrieve full product details. But that feature is going to be reserved for premium users. Standard users can search as much as they want but only premium users can ask follow up questions like “tell me more about this product.”
To support that behavior, we will introduce a new tool that returns detailed product information and OPA will sit in front of it since it can govern tool access, guide actions or control and decide who is allowed to call. For this example, we will focus purely on access control.
The plan is straightforward. We will simply add OPA to the project, write a small policy in Rego and connect everything so the agent checks user permissions before calling the tool.
There are a few ways to bring OPA into a system and the choice usually depends on the deployment architecture. In a Kubernetes setup, for example, we might run a central OPA instance that intercepts requests or exposes an API for policy checks at platform level. That approach works well when multiple agents or services share the same governance layer.
For this example, we are going to include the OPA SDK directly in our .NET project and evaluate policies inside the agent’s workflow. This keeps the setup simple and self contained.
Let’s create a “ProductDetailsTool” class and add the following.
using System.ComponentModel;
using Azure.Search.Documents;
using Azure.Search.Documents.Models;

namespace ProductSearchAgent.Tools;

public class ProductDetailsTool
{
    private readonly SearchClient _searchClient;

    public ProductDetailsTool(SearchClient searchClient)
    {
        _searchClient = searchClient;
    }

    [Description("Get detailed information about a specific product by name. Returns full specifications, pricing, and description. Use this when the user asks for more details about a specific product.")]
    public async Task<string> GetProductDetails(
        [Description("The exact or partial name of the product to look up, e.g. 'Dell XPS 15', 'MacBook Pro'.")] string productName)
    {
        var options = new SearchOptions
        {
            Size = 1,
            Select = { "id", "name", "description", "price", "category", "brand", "specifications" }
        };

        Console.WriteLine($"ProductDetailsTool: GetProductDetails called for \"{productName}\"");
        var results = await _searchClient.SearchAsync<SearchDocument>(productName, options);

        await foreach (var result in results.Value.GetResultsAsync())
        {
            var doc = result.Document;
            string Get(string key) => doc.TryGetValue(key, out var v) ? v?.ToString() ?? "" : "";

            return $"""
                Product: {Get("name")}
                Brand: {Get("brand")}
                Category: {Get("category")}
                Price: ${Get("price")}
                Description: {Get("description")}
                Specifications: {Get("specifications")}
                """;
        }

        return $"No product found matching '{productName}'.";
    }
}
Here we have a simple tool that looks up a product by name and returns full details of it. So, nothing fancy. The tool stays focused on retrieving data and we will let OPA decide who is permitted to invoke it.
Now that the tool is in place, the next step is to plug OPA into the agent pipeline. This is where we add our “OpaAuthorizationMiddleware” which will act as the gatekeeper and decide whether a tool call is allowed before the agent actually executes it.
In the previous article, we used the same pattern to add a logging middleware that captured every tool call the agent made. That’s exactly why OPA fits so well here. We don’t have to change how the agent works or touch any tool implementation. We simply add one more layer to the pipeline.
First, let’s add the OPA SDK to the project and create the middleware class called “OpaAuthorizationMiddleware” under “Tools” folder.
dotnet add package OpenPolicyAgent.Opausing System.Security.Claims;
using Microsoft.Extensions.AI;
using OpenPolicyAgent.Opa;
namespace ProductSearchAgent.Tools;
public class OpaAuthorizationMiddleware(
IChatClient inner,
OpaClient opa,
IHttpContextAccessor httpContextAccessor,
string policyPath) : DelegatingChatClient(inner)
{
public override async Task<ChatResponse> GetResponseAsync(
IEnumerable<ChatMessage> messages,
ChatOptions? options = null,
CancellationToken cancellationToken = default)
{
var response = await base.GetResponseAsync(messages, options, cancellationToken);
var httpContext = httpContextAccessor.HttpContext;
var userRole = httpContext?.User.FindFirst(ClaimTypes.Role)?.Value!;
var userId = httpContext?.User.FindFirst(ClaimTypes.NameIdentifier)?.Value!;
foreach (var msg in response.Messages)
{
foreach (var call in msg.Contents.OfType<FunctionCallContent>())
{
var input = new Dictionary<string, object?>
{
["user"] = new Dictionary<string, object?> { ["role"] = userRole, ["id"] = userId },
["tool"] = call.Name,
["arguments"] = call.Arguments?.ToDictionary(x => x.Key, x => x.Value) ?? []
};
try
{
var result = await opa.Evaluate<Dictionary<string, object?>>(policyPath, input);
var allowed = result["allowed"] is true;
var message = result["message"]?.ToString();
if (!allowed)
{
var denial = message ?? $"Access denied: {call.Name} is not allowed.";
Console.WriteLine($"OpaAuthorizationMiddleware: denied — {denial}");
return new ChatResponse(new ChatMessage(ChatRole.Assistant, denial));
}
Console.WriteLine($"OpaAuthorizationMiddleware: allowed — {call.Name}");
}
catch (Exception ex)
{
Console.WriteLine($"OpaAuthorizationMiddleware: policy evaluation failed — {ex.Message}");
return new ChatResponse(new ChatMessage(ChatRole.Assistant,
$"Access denied: policy evaluation unavailable for {call.Name}."));
}
}
}
return response;
}
}The important point here is what gets sent to OPA as input. We build a simple input object that includes the tool the agent wants to call, the user’s identity and role and any arguments passed to the tool. This is what makes OPA context and user-aware. The policy receives this input and decides what to do with it.
For this example we kept the input minimal, but the structure is open. For example we could include the user’s subscription tier, the request origin, a data classification label and anything our policy needs to make a more informed decision.
The middleware doesn’t care what is in that input. It simply calls OPA with it:
var result = await opa.Evaluate<Dictionary<string, object?>>(policyPath, input);And acts on what OPA says back. If OPA denies the call, we short circuit and return the denial message directly. The tool never runs. If it allows, execution continues as normal. And if OPA is unreachable for any reason, we fail closed and deny the action.
So how does OPA decide whether a tool call is allowed? That is where Rego comes in.
Rego is OPA’s policy language and it is declarative. Instead of writing step by step logic, we describe what is allowed and OPA evaluates it against the input we send.
Policies in Rego are grouped by package declarations. This is not just a naming convention. The package name becomes part of the evaluation path. In our middleware we are going to pass “product/authorize” as the policy path and that maps directly to a package “product” with an “authorize” rule.
This is how different teams can own their domain specific policies independently. A product team manages package product, an orders team manages package orders and so on. In short, each package is isolated.
It’s also worth mentioning that OPA treats policies as versioned artifacts that can be published to a shared OCI registry and updated independently of the application. The agent doesn’t need to be redeployed every time a rule changes. OPA can simply pull the latest policy bundle on a schedule and enforce whatever the current version says. This makes authorization predictable, centralized and easy to evolve over time.
For this demo, we are going to load the policy from a local folder. So let’s create a “product.rego” file under a folder called “Policies” and add the following.
package product

default authorize := {"allowed": false, "message": "upgrade required: this tool is available for premium users only"}

authorize := {"allowed": true, "message": "allowed"} if {
  input.tool == "GetProductDetails"
  input.user.role == "premiumUser"
}

authorize := {"allowed": true, "message": "allowed"} if {
  input.tool == "SearchProducts"
}
The “package product” declaration at the top scopes this policy to the “product” domain and “authorize” is the decision rule that the middleware evaluates.
We start with a default rule that denies access and returns a message telling the user to upgrade. In Rego, defaults act as the fallback when no other rule matches, so everything is denied unless a more specific rule overrides it.
The two rules below handle the allow cases. “SearchProducts” is open to everyone, no conditions on the user. “GetProductDetails” requires the user’s role to be “premiumUser“. If that condition is not met, the default kicks in and the denial message flows all the way back to the user.
The important point here is that the denial message is defined in the policy, not in the middleware code. Whatever OPA returns, the middleware surfaces it directly. No extra logic is needed on the middleware side.
I would say, this is what makes OPA such a practical fit for AI governance. The policy is context-aware because it sees the tool and its arguments. It is user-aware because it gets the role and identity. And all of it lives outside the application code, in a place that can be reviewed, tested and changed without touching the agent itself.
Now that we have the tool and the policy, we also need to update the agent’s prompt. The agent needs to know that it has two tools available and how to choose between them. It also needs to know what to do when a tool call gets denied.
Let’s edit the “AgentPrompts” class under “Prompts” folder and update the “ProductSearch” prompt as follows.
namespace ProductSearchAgent.Prompts;

public static class AgentPrompts
{
    //...

    public const string ProductSearch = """
        You are a product search assistant for an electronics store.
        Your job is to help users find products from our catalog.

        You have two tools:
        - SearchProducts: for general product searches and comparisons
        - GetProductDetails: for detailed information about a specific product

        When you receive a query:
        1. If the user wants to browse or compare products, call SearchProducts with the user's search keywords (e.g. "laptop", "gaming laptop", "dell xps"). Use the words from the query. Do not replace them with generic category names like "electronics".
        2. If the user asks for details about a specific product (e.g. "tell me more about Dell XPS 15"), call GetProductDetails with the product name
        3. Summarize the results focusing on what the user asked for, including price and key specs
        4. If the user mentioned a price constraint, filter results by that price range when summarizing

        Rules:
        - Be concise and focus on facts from the search results
        - Do not make up products that were not returned by the search tool
        - If no results are found, let the user know and suggest broadening their search
        - Always mention price and key specs when presenting products
        - If a tool call is denied by policy, relay the denial message to the user
        """;
}
Here, we simply added “GetProductDetails” as a second tool and described when the agent should use it. If the user asks for details about a specific product, the agent calls “GetProductDetails” with the product name to retrieve more information.
The last rule is the one that matters for OPA. We tell the agent that if a tool call is denied by policy, it should relay the denial message back to the user. Without this, the agent might try to work around the denial or generate its own explanation. We want the message coming from the Rego policy to reach the user unchanged.
At this point, we have the tool, the policy and the middleware. Now we need to connect them in “Program.cs“.
Let’s start with the OPA client and the middleware pipeline.
builder.Services.AddHttpContextAccessor();

var opaUrl = builder.Configuration["OPA:Url"] ?? "http://localhost:8181";
var opaClient = new OpaClient(opaUrl);

var app = builder.Build();

var httpContextAccessor = app.Services.GetRequiredService<IHttpContextAccessor>();

var chatClient = openAiClient.GetChatClient(chatDeployment)
    .AsIChatClient()
    .AsBuilder()
    .Use(inner => new AgentLoggingMiddleware(inner))
    .Use(inner => new OpaAuthorizationMiddleware(inner, opaClient, httpContextAccessor, "product/authorize"))
    .Build();
Here, we simply create an “OpaClient” pointing to an OPA server and pass it into the “OpaAuthorizationMiddleware” along with the “IHttpContextAccessor” and the policy path we defined earlier.
The middleware is added to the same “IChatClient” pipeline we already had from the previous article. So nothing else in the pipeline changes.
We also need to register “GetProductDetails” as a second tool on the search agent.
var detailsTool = new ProductDetailsTool(searchClient);

AIAgent searchAgent = new ChatClientAgent(chatClient, new ChatClientAgentOptions
{
    ChatOptions = new()
    {
        Instructions = AgentPrompts.ProductSearch,
        Tools = [AIFunctionFactory.Create(searchTool.SearchProducts), AIFunctionFactory.Create(detailsTool.GetProductDetails)]
    }
});
The last piece is getting the user’s role into the request. For the sake of simplicity, I’m going to simulate this with a query parameter instead of setting up a full authentication flow.
Let’s add a “Role” field to our “UserQuery” model and set it as a claim on the “HttpContext” in the endpoint.
public record UserQuery(string Query, string? Role = "user");

app.MapGet("/api/search", async ([AsParameters] UserQuery request, HttpContext httpContext) =>
{
    httpContext.User = new ClaimsPrincipal(new ClaimsIdentity(
    [
        new Claim(ClaimTypes.NameIdentifier, "user1234"),
        new Claim(ClaimTypes.Role, request.Role ?? "user")
    ]));

    // ... rest of the endpoint stays the same
});Before we run the application, we need to spin up an OPA server. The easiest way is to use Docker and mount our policies folder directly.
docker run -p 8181:8181 -v $(pwd)/Policies:/policies openpolicyagent/opa:latest run --server --addr 0.0.0.0:8181 --set decision_logs.console=true /policiesThis starts OPA, loads our “product.rego” from the mounted folder and enables decision logging so we can see every evaluation in the console.
Decision logs are also useful if you want to capture them for auditing or compliance later on.
Now let’s start the application and try a couple of different scenarios.
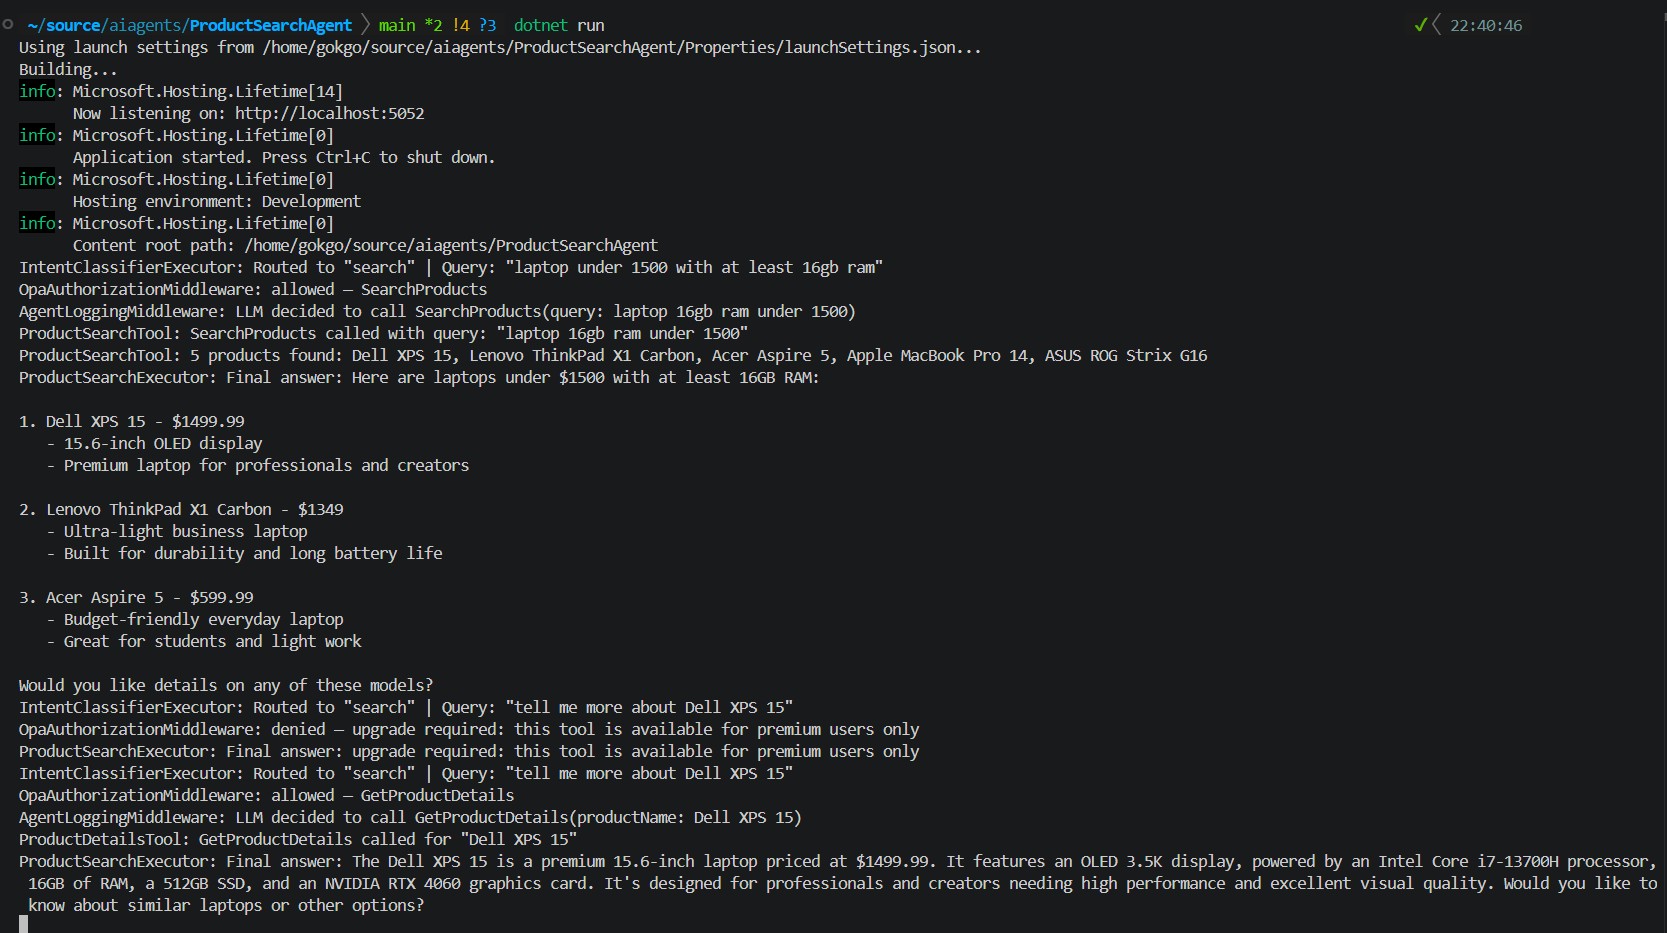
The first request is a regular product search. No role specified, so the user defaults to a standard user.
GET /api/search?query=laptop under 1500 with at least 16gb ramThe second request asks for details about a specific product, still as a standard user. This is the one OPA should deny.
GET /api/search?query=tell me more about Dell XPS 15The third request is the same query but with “role=premiumUser“. This time OPA should allow it.
GET /api/search?query=tell me more about Dell XPS 15&role=premiumUserNow if we look at the API logs, the behavior is exactly what we expect.
On the first request, the middleware logs allowed and the tool executes. On the second request, the middleware logs denied and the tool never runs. The agent simply returns the denial message directly to the user. On the third request, the middleware logs allowed again and the agent returned full product details.
As we can see, there is no tool execution log between the denial and the final answer. The middleware stopped it before the tool ran. The tool was never invoked, that is the whole point.
OPA also logs every decision it makes. With decision logging enabled, we can see exactly what input was evaluated and what the result was.
 {
   "decision_id": "390533b0-cf03-4ded-9bc8-29201d77c871",
   "timestamp": "2026-04-01T20:41:11.613282329Z",
   "path": "product/authorize",
   "input": {
     "tool": "SearchProducts",
     "user": { "id": "user1234", "role": "user" },
     "arguments": { "query": "laptop 16GB RAM under 1500" }
   },
   "result": {
     "allowed": true,
     "message": "allowed"
   }
 },

 // ...

 {
   "decision_id": "7965bd67-a4b8-4e09-93fb-776b64c016b8",
   "timestamp": "2026-04-01T20:41:36.512711273Z",
   "path": "product/authorize",
   "input": {
     "tool": "GetProductDetails",
     "user": { "id": "user1234", "role": "user" },
     "arguments": { "productName": "Dell XPS 15" }
   },
   "result": {
     "allowed": false,
     "message": "upgrade required: this tool is available for premium users only"
   }
 }
Every decision here has a unique “decision_id“, a full record of the input and the result. In production, these logs can be shipped to any log aggregator. If something goes wrong, we can reconstruct the full sequence of agent decisions without touching application logs.
In this article, we added OPA to an existing AI agent workflow and used it to enforce business specific policies before any tool runs.
By placing OPA between the agent and its tools, we get a clear enforcement point that is both context-aware and user-aware without coupling any of that logic to the application. The middleware simply forwards the input, OPA evaluates the policy and the agent behaves accordingly.
Of course, role-based tool access is just one use case. The same pattern can apply to data classification in RAG where a policy decides which documents the agent is allowed to retrieve based on the user’s role. Or argument-level guardrails where the policy inspects the tool’s arguments and denies the call if they exceed certain limits. The middleware stays the same. Only the Rego policy changes.
The real strength of this approach is that the rules live outside the code. Policies can evolve independently, teams can own their own domains and updates can be published as versioned artifacts without redeploying the agent.
I found this approach much cleaner than embedding rules in prompts and it’s a solid starting point for thinking about governance in agentic systems. As far as I have seen, a lot of governance tooling today focuses on model behavior rather than business-specific enforcement. With OPA, those rules become explicit, reviewable and deterministic.
PS: This article was written by me and reviewed with the help of AI tools for grammar and clarity.
https://open-policy-agent.github.io/opa-aspnetcore/index.html
Nowadays wherever I look, everyone talks about AI coding agents, agentic systems or LLM powered…
In the first two parts of this DevEx series, I tried to show how golden…
In the first part of this DevEx series, I tried to explain Platform Engineering and…
As an architect involved in platform engineering and DevEx transformation within a large-scale organization for…
{:en}In today’s technological age, we typically build our application solutions on event-driven architecture in order…
{:tr} Makalenin ilk bölümünde, Software Supply Chain güvenliğinin öneminden ve containerized uygulamaların güvenlik risklerini azaltabilmek…