
I think we are all aware of the importance of digital transformation and the benefits that we can achieve with it. As we know, many organizations are also taking different steps towards digital transformation.
However, as we can imagine sometimes we may also encounter different difficulties in these transformation processes. For example sometimes there are some situations that may require manpower in data digitization processes. As an example for situations which require manpower, we can think about the digitization process of documents/data such as invoices or technical maintenance reports that we receive from suppliers. In general, minimizing such situations are very important to be able to reduce time and cost. Fortunately, we can use technologies such as Optical Character Recognition (OCR) for such operations.
OCR is a technology that allows us to digitize/extract text content on documents such as images and PDFs without having any needs for manpower.
In this article, we will take a look at how we can create an automated OCR workflow by using serverless and managed services provided by Azure.
Scenario
Let’s say we are working on a document management domain where documents in PDF format are sent by different domains. And assume that we are requested to develop a feature in order to minimize time and manpower by automatically importing documents, which are sent in PDF format, into the system together with the texts they contain.
Let’s also consider that we have decided to use serverless and managed technologies of Azure as much as possible in order to deliver requested functionality quickly and not waste time with any server/infrastructure operations.
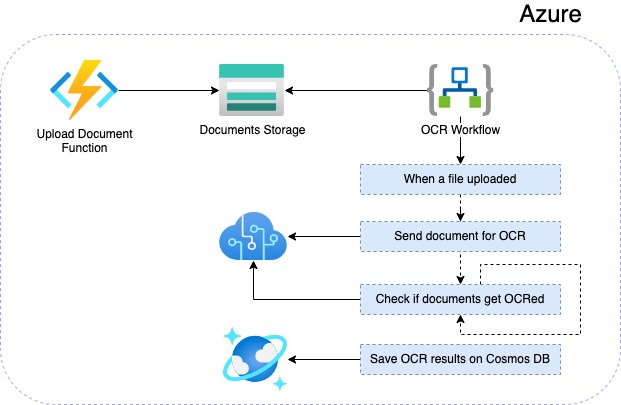
So, first we will develop an Azure Function where documents can be uploaded on Azure side. Basically with this function, we will store the related documents on an Azure Blob Storage service. Then we will create a workflow with Azure Logic Apps in order to automatically integrate the OCR process for related documents. After performing OCR operations in the workflow, we will save the OCR results of the related documents on a Cosmos DB service.
In the end, we will have a solution as shown in the diagram.
Prerequisites
- Visual Studio Code
- Azure Functions Extension
- .NET 6
- Azure Cosmos DB (SQL)
- Azure Storage Account
Let’s Begin with Azure Function
Azure Functions is a cloud service that enables us to run functional solutions, that we will develop for our domain specific business needs, in a serverless environment. Thus, it makes it easier for us to produce and deliver faster solutions by enabling us to focus on the business functionality we want to develop rather than thinking about operations such as server/infrastructure.
First, let’s create a HTTP Trigger Azure Function called “UploadADocument” with .NET 6 and Azure Functions v4 runtime by using Azure Functions extension of Visual Studio Code. Also choose the “Authorization level” option for now as “Anonymous” in order to perform the example easily.
NOTE: For production environments, it will be beneficial to use a function-specific API key in order to have a security mechanism.
After the function is created, let’s edit the function class as follows.
using System.Threading.Tasks;
using Microsoft.AspNetCore.Mvc;
using Microsoft.Azure.WebJobs;
using Microsoft.Azure.WebJobs.Extensions.Http;
using Microsoft.AspNetCore.Http;
using Microsoft.Extensions.Logging;
using Microsoft.Extensions.Configuration;
using Microsoft.WindowsAzure.Storage;
using Microsoft.WindowsAzure.Storage.Blob;

namespace Documents.Funcs
{
    public static class UploadADocument
    {
        private const string StorageConnectionString = "AZURE_STORAGE_CONNECTION_STRING";
        private const string DocumentsBaseFolder = "documents";

        [FunctionName("UploadADocument")]
        public static async Task<IActionResult> Run(
            [HttpTrigger(AuthorizationLevel.Anonymous, "post", Route = null)] HttpRequest req,
            ILogger log, ExecutionContext context)
        {
            IFormCollection data = await req.ReadFormAsync();
            var file = data.Files.GetFile("file");

            if (file == null)
            {
                return new BadRequestObjectResult("A file should be uploaded.");
            }

            CloudBlobContainer cloudBlobContainer = await GetCloudBlobContainer(context, log);

            if (cloudBlobContainer == null)
            {
                return new BadRequestObjectResult("An error occurred while processing your request.");
            }

            CloudBlockBlob blob = cloudBlobContainer.GetBlockBlobReference(file.FileName);

            await blob.UploadFromStreamAsync(file.OpenReadStream());

            return new OkResult();
        }

        private static async Task<CloudBlobContainer> GetCloudBlobContainer(ExecutionContext context, ILogger log)
        {
            try
            {
                CloudStorageAccount cloudStorageAccount = CloudStorageAccount.Parse(GetConfiguration(context)[StorageConnectionString]);
                CloudBlobClient cloudBlobClient = cloudStorageAccount.CreateCloudBlobClient();
                CloudBlobContainer cloudBlobContainer = cloudBlobClient.GetContainerReference(DocumentsBaseFolder);

                await cloudBlobContainer.CreateIfNotExistsAsync();

                return cloudBlobContainer;
            }
            catch (System.Exception ex)
            {
                log.LogError(ex, ex.Message);
            }

            return null;
        }

        public static IConfigurationRoot GetConfiguration(ExecutionContext context)
        {
            var config = new ConfigurationBuilder()
                .SetBasePath(context.FunctionAppDirectory)
                .AddJsonFile("local.settings.json", optional: true, reloadOnChange: true)
                .AddEnvironmentVariables()
                .Build();

            return config;
        }
    }
}
In this function, we are simply performing the upload operation of the desired document into an Azure Blob Storage container called “documents“. Let’s also assume that the id of the document is sent as the file name.
In order to perform test operations in the local environment, it will be enough to add the connection string information of the Azure Storage Account in the “local.settings.json” file as follows and then run the project.
{
  "IsEncrypted": false,
  "Values": {
    "AzureWebJobsStorage": "",
    "FUNCTIONS_WORKER_RUNTIME": "dotnet",
    "AZURE_STORAGE_CONNECTION_STRING": "DefaultEndpointsProtocol=https;AccountName=YOUR_ACCOUNT_NAME;AccountKey=YOUR_ACCOUNT_KEY;EndpointSuffix=core.windows.net"
  }
}
NOTE: You can access the Azure Storage Account connection string information on the Azure Portal by getting into the “Access keys” tab of the relevant storage account.
Now, let’s perform the deployment operations of this function that we have created using Visual Studio Code.
For this, let’s switch to the window of the Azure Functions extension over Visual Studio Code, and then click the “Deploy to Function App…” button under the “Functions” tab. Then it will be enough to follow the steps which the extension will provide. While following the steps, let’s make sure that we select the “.NET 6” and “Functions v4” options at the “Select a runtime stack” step.

As a result of this deployment, a function will be created which has the hosting plan “Consumption“, OS system “Windows“. If we want, there are 2 more hosting plans available called “Premium” and “Decicated” which we can choose according to our different needs.
For our example, if we assume that the document domain will not have so much traffic and frequent usage, the auto scaling and pay-as-you-go model of the “Consumption” hosting plan will be enough for our use case. You can find the details of the hosting plans here.
After the deployment is completed, now we need to add the connection string information of the Azure Storage Account for the application runtime.
For this, let’s go to the “Configuration” tab of the function app through the Azure Portal and define the “AZURE_STORAGE_CONNECTION_STRING” information here as an environment variable.

Now the function for our business use-case is ready and running.
Also in order to access the URL of the function, it will be enough to access the function’s detail page by clicking the “Functions” tab of the function app through the portal and click on the “Get Function Url” button as below.

As we can see, the serverless approach has allowed us to focus directly on the functional solution for our business problem without having to deal with any hosting/infra related operations from a technical point of view. In this way, it is possible to have quick solutions and deliveries, and it is also possible to reduce operational costs with its serverless pay-as-you-go model.
OCR with Azure Computer Vision API
With the increasing importance of the digitization of documents, there are different OCR solutions available that we can use today. If we want, either we can use Tesseract OCR which is open-source or ABBYY as commercial or we can use cloud-based solutions such as Azure Computer Vision. Within the scope of this article, I will use the Computer Vision Read API provided by Azure as fully managed OCR solution.
Read API, which has an advanced recognition model, can digitize the texts on the documents in “164” different languages. It can also digitize handwritten texts up to “9” languages (02.2022 latest preview version). The best part for me is that it does not require any machine learning expertise.
It supports documents in JPEG, PNG, BMP, PDF, and TIFF formats. Its support for PDF and TIFF documents are up to “2000” pages.
One of the features I like is that we don’t need to specify any language during the OCR process. In this way, it can support multiple languages in the document. Another nice feature is that it can give us the extracted texts on a document with coordinates and confidence scores between “0” and “100”. With this confidence score, we can determine our own strategies according to different scenarios to achieve better results. For example, If the confidence score is below a level we want, we can also get the relevant document into a process that requires a manuel operations.
After a short introduction, we can now move on the implementation part.
First of all, let’s create a Computer Vision resource through the Azure Portal.
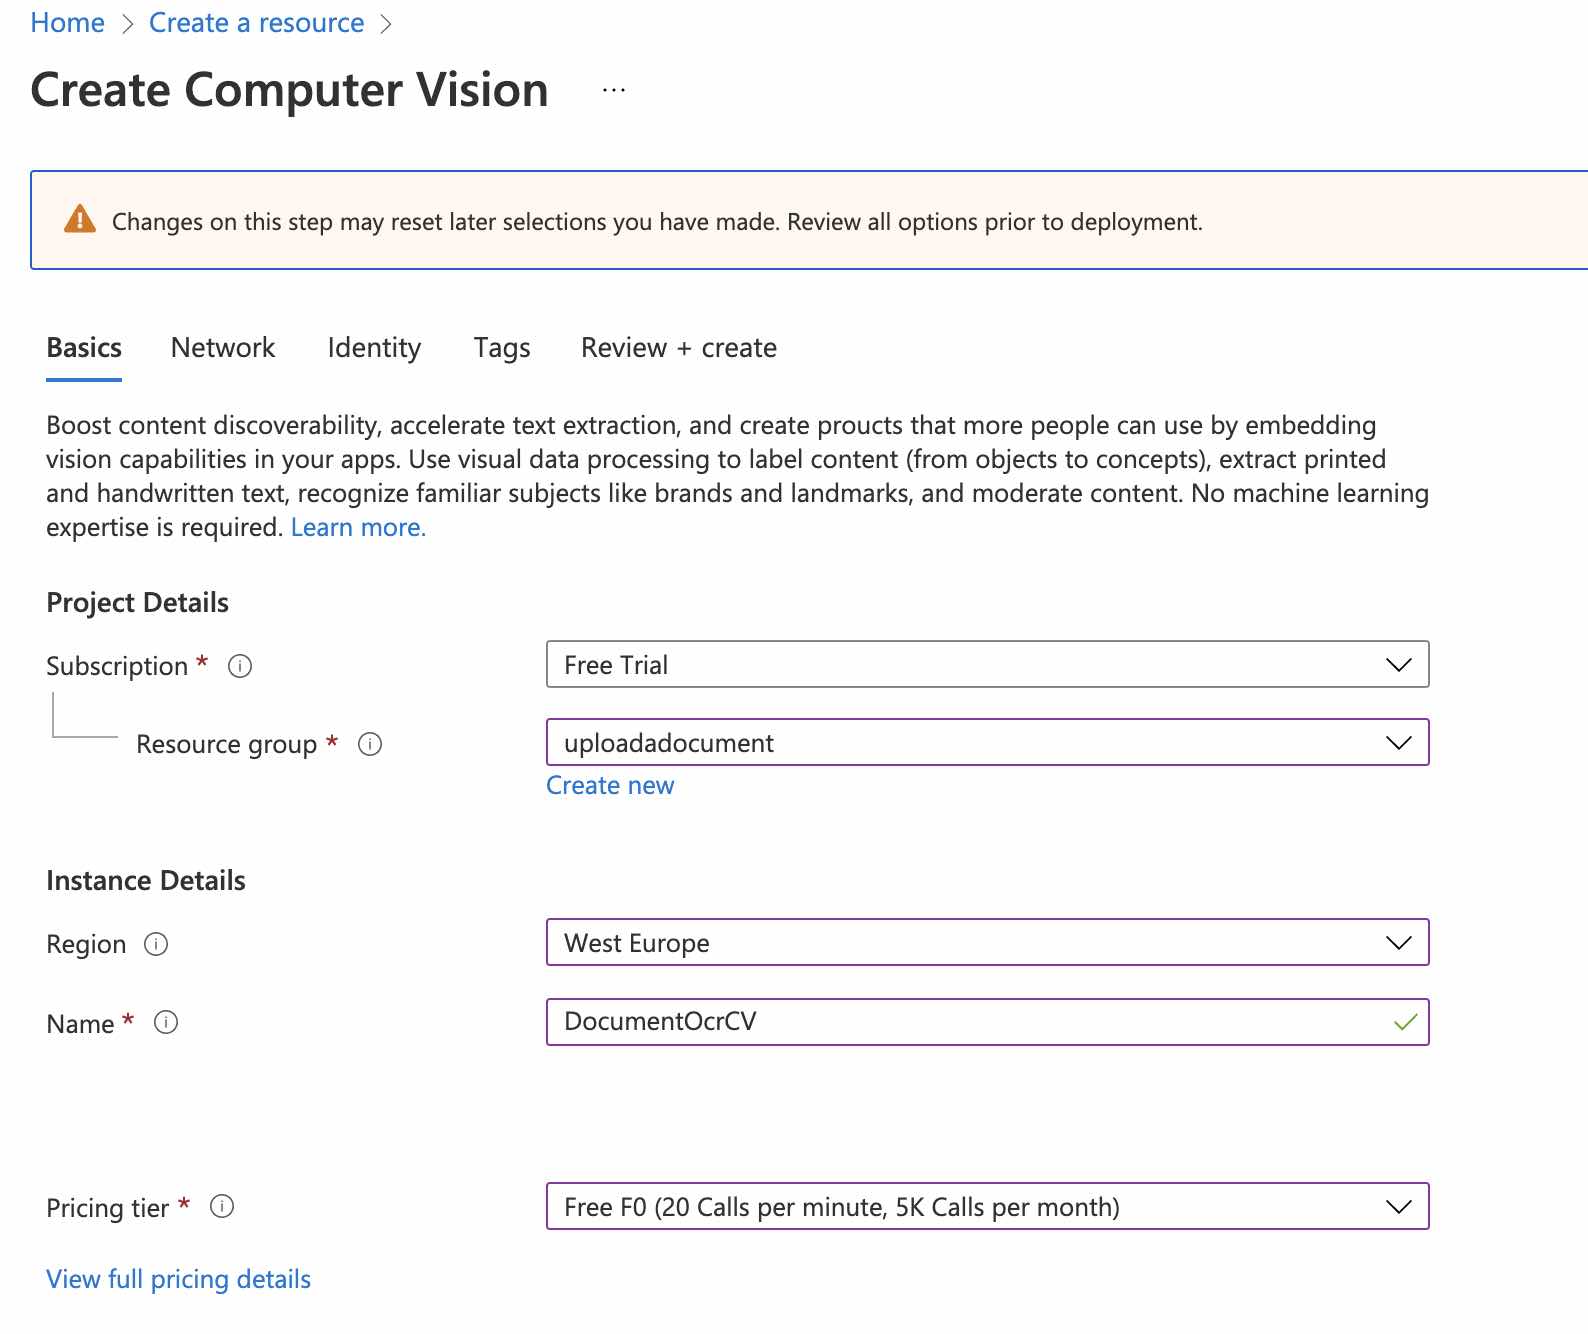
I created this resource with the name “DocumentOcrCV“. After creation, let’s go to the detail page of this resource and get to the “Keys and Endpoint” tab. Let’s take note the “Key” and “Endpoint” information found here in order to use them in the further steps.
Let’s Create an OCR Workflow with Logic Apps
We have said that we will use Azure Logic Apps to automate OCR processes. In short, we can say Logic Apps is an advanced cloud service that allow us to create easy and highly scalable serverless workflows with various integration options.
Now first let’s create a Logic App resource as follows.

When the creation process is done, let’s go to the created resource and get to the “Logic app designer” tab to start creating the workflow. Then select “Blank Logic App” option from the templates section.
When creating a workflow with Logic Apps, one of the most important building blocks is triggers. We can also think of trigger as a starting point. There are different triggers provided by various APIs in Logic Apps. Another important building blocks are actions which perform defined business operations when triggers are activated.
According to our example scenario, we will upload the documents to a container named “documents” on the Azure Blob Storage via the Azure Function we have created. So as the starting point of the workflow, we can use the trigger of Azure Blob Storage.
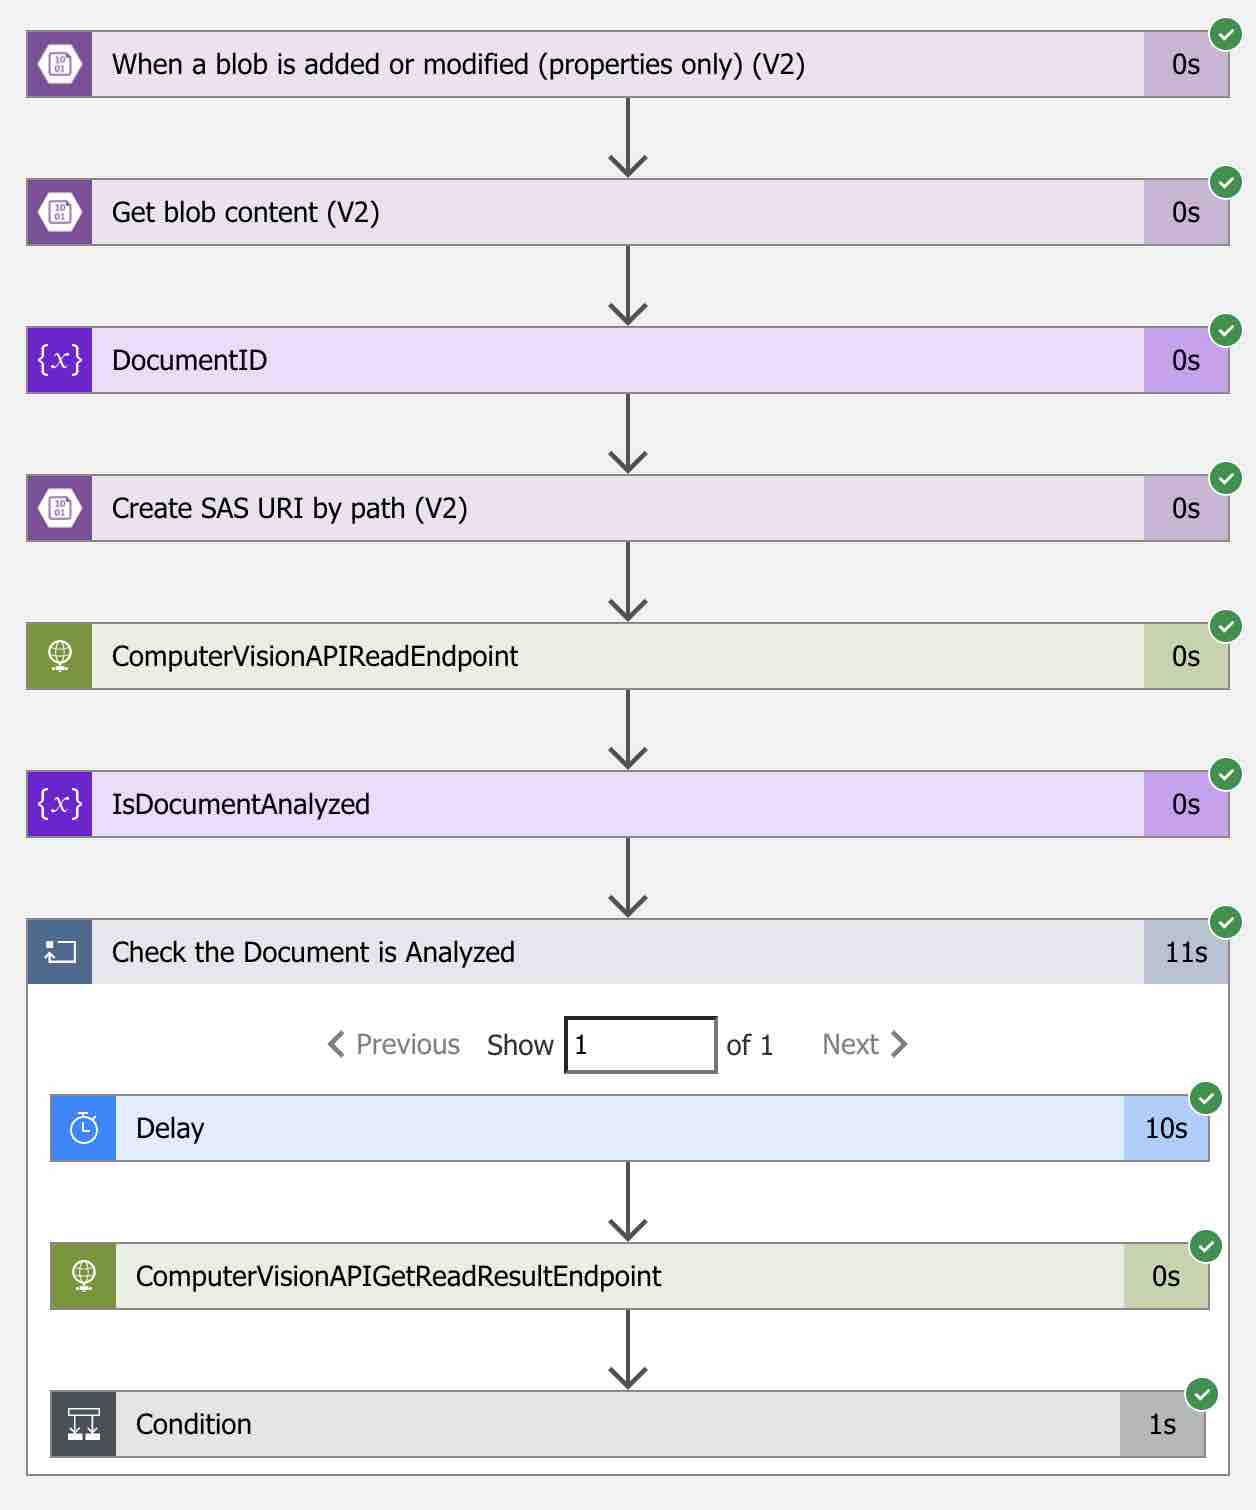
Now let’s get to the “Search connectors” search box on the designer and type “Azure Blob Storage“. Then choose “Azure Blob Storage” as the connector from the results and “When a blob is added or modified (properties only) (V2)” as the trigger.
Now we need to provide the credential information of the relevant storage account on the window that will open as follows.

Then create the trigger as follows.
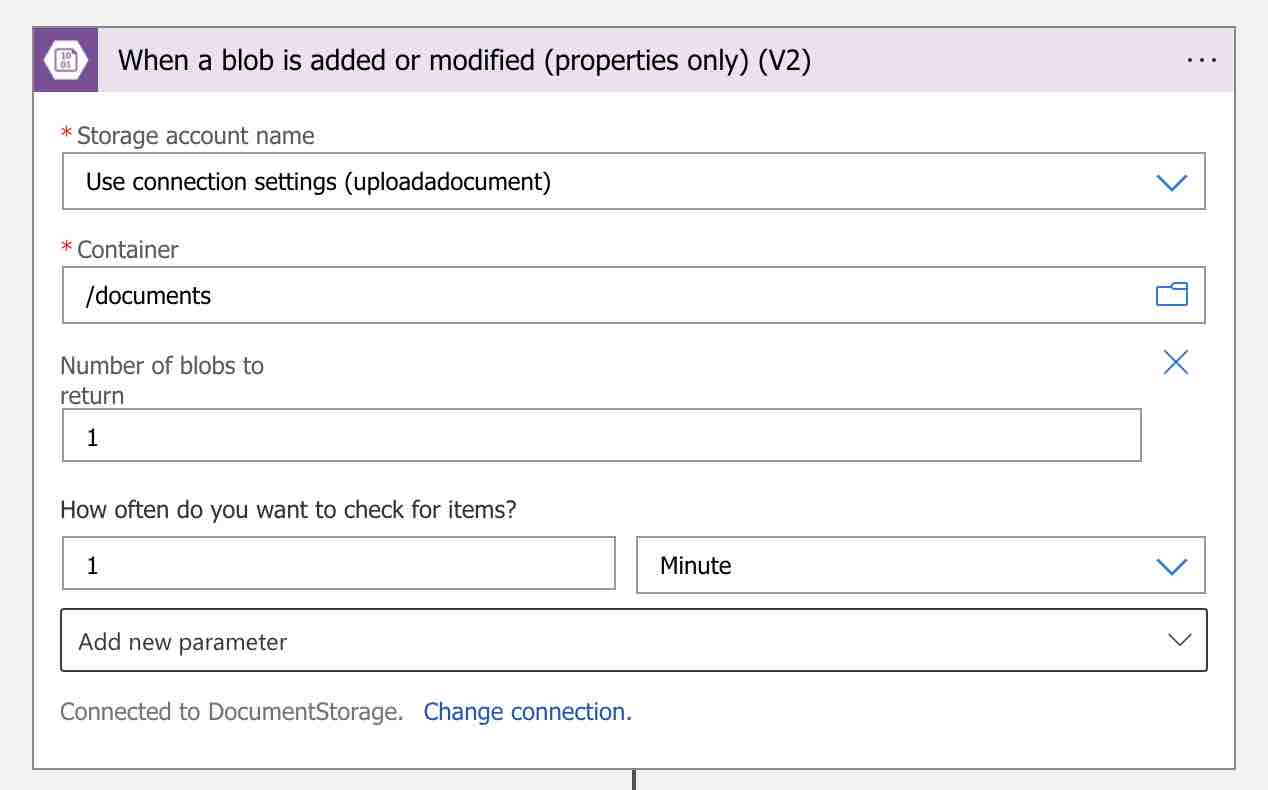
In this way, when a new document is uploaded into the “documents” container, the workflow will be triggered and perform all the steps that we will define.
Now let’s define a new step where we can access the information of the uploaded document in order to use it in the following steps. To do this, let’s again search for “Azure Blob Storage” and this time select the “Get blob content (V2)” action.
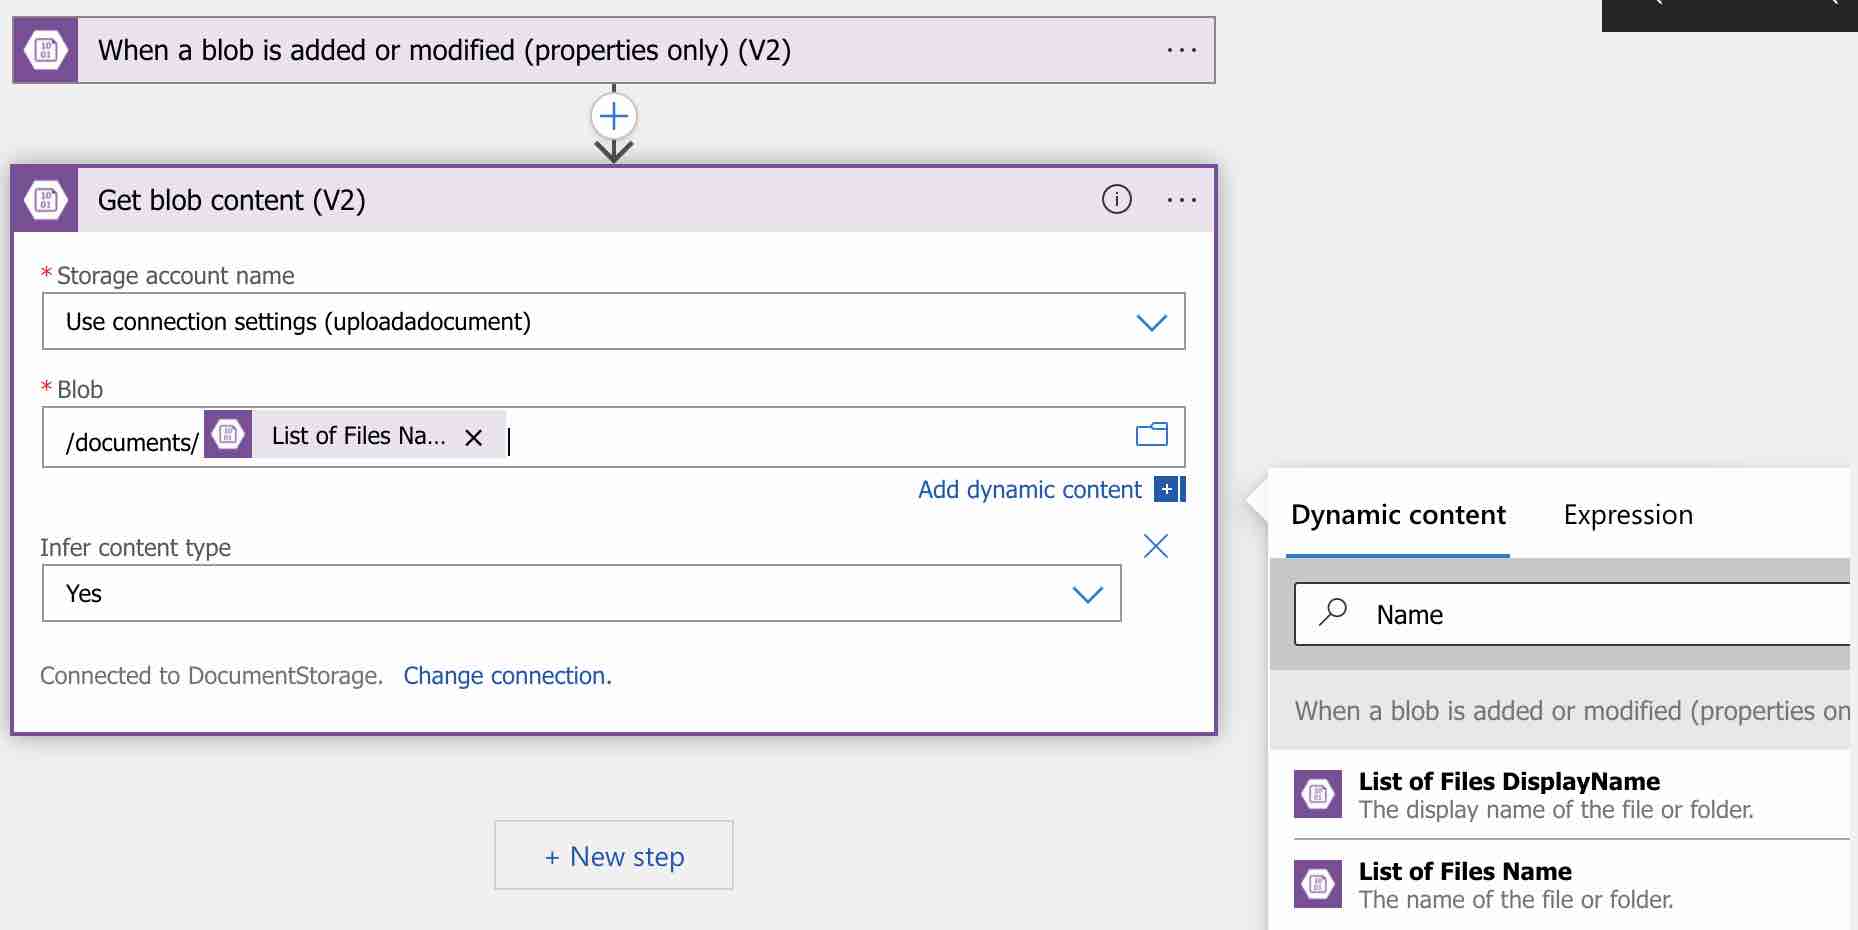
In this action, we are specifying the path of the document whose information we want to access. In order to specify the path, we are using the “List of Files Name” dynamic content which belongs to the previous trigger. As an expression, we could also use it as “triggerBody()?[‘Name’]“. Now there is a step where we can access the information of the relevant document.
We have mentioned the id of the document will be sent as the file name. Since we can access the relevant document’s information after this step, let’s create a variable that we can keep the document’s id information on the workflow explicitly. For this, let’s click on the add new step button and search for “Variables“. Then choose “Initialize variable” as the action and create a variable called “DocumentID“.
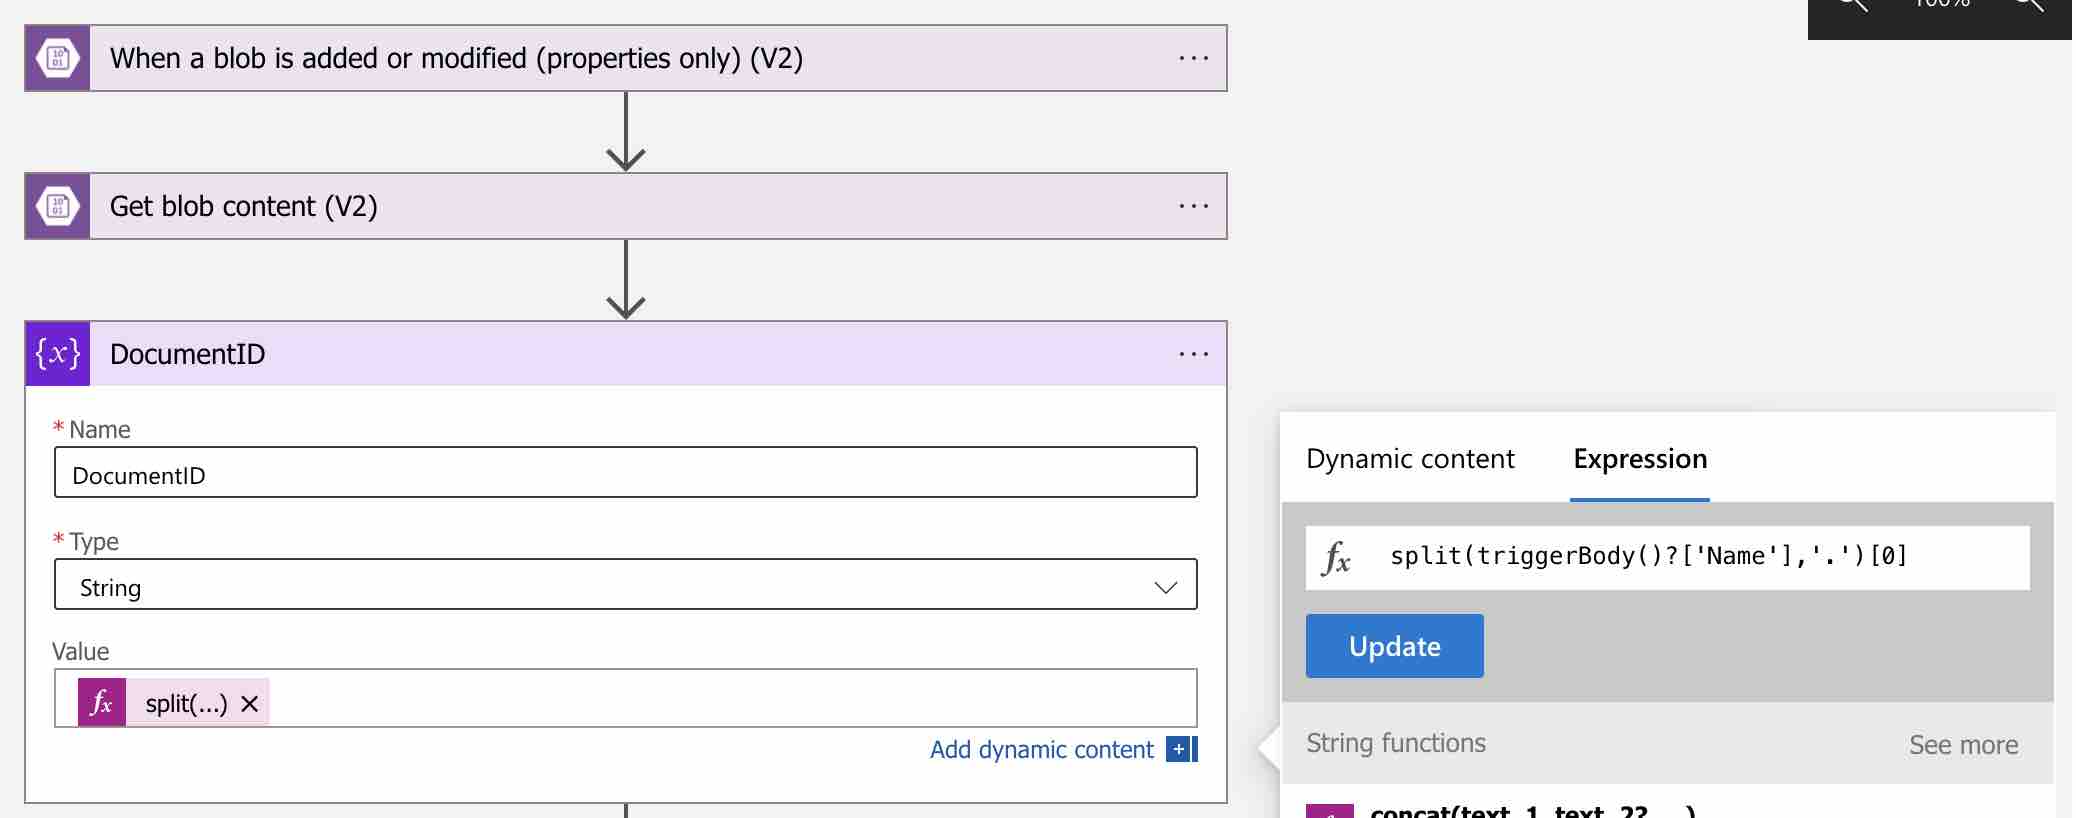
In the value section of the variable, let’s write an expression like that “split(triggerBody()?[‘Name’],’.’)[0]“. With this simple split expression, we will obtain the id information of the document over the file name.
Now we can start defining the necessary workflow steps for OCR operations.
First of all, let’s define the “key” and “endpoint” information of the Computer Vision resource as parameters by clicking the “Parameters” button on the workflow as follows.
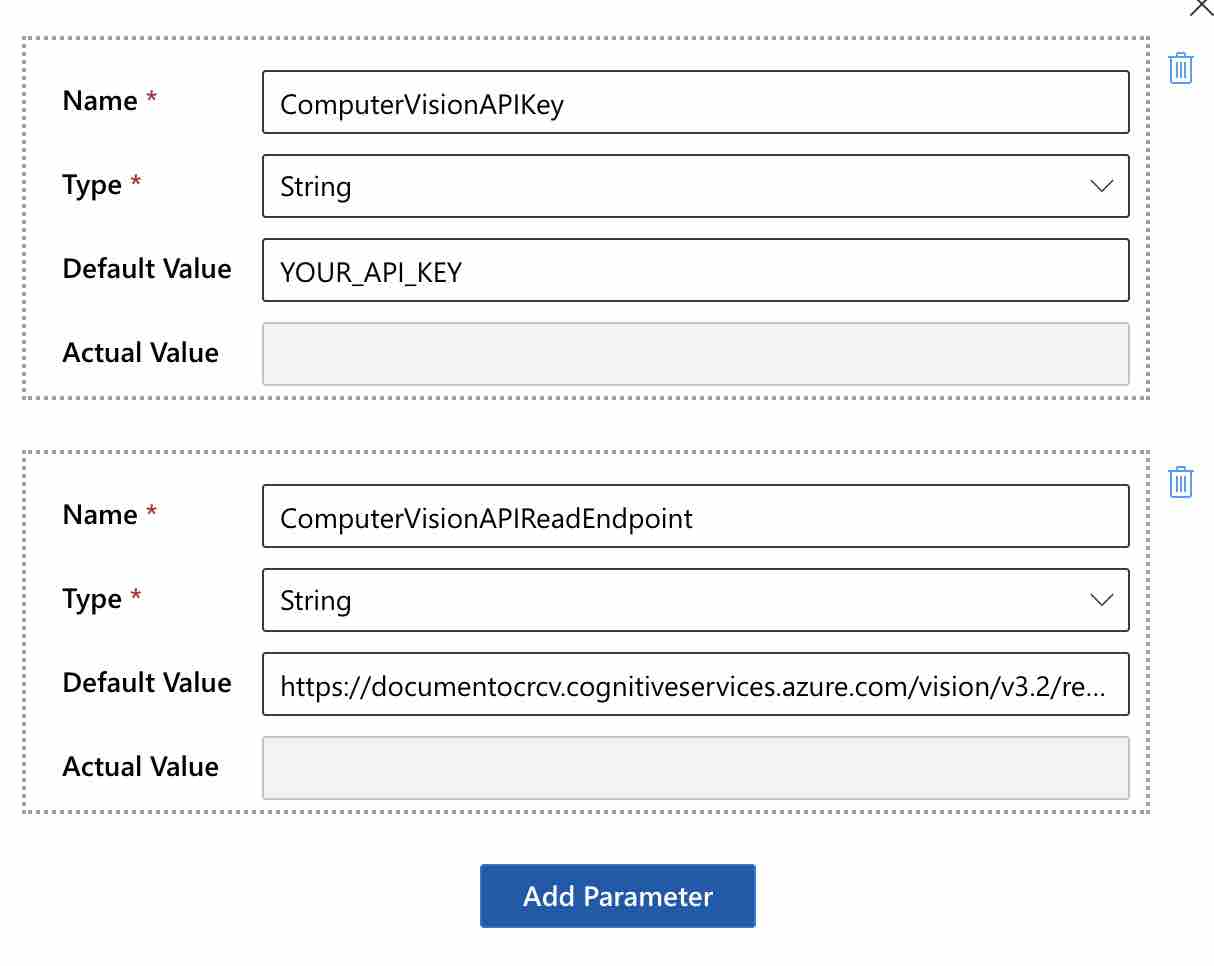
As a value of the “ComputerVisionAPIReadEndpoint” parameter, let’s use the “https://{endpoint}/vision/v3.2/read/analyze” endpoint.
Now, we need to create a SAS link for the relevant document in order for Computer Vision to access uploaded document on the Blob Storage. Of course if the relevant Blob Storage account is not publicly accessible.
For this, let’s include the “Create SAS URI by path (V2)” action into the workflow as follows.
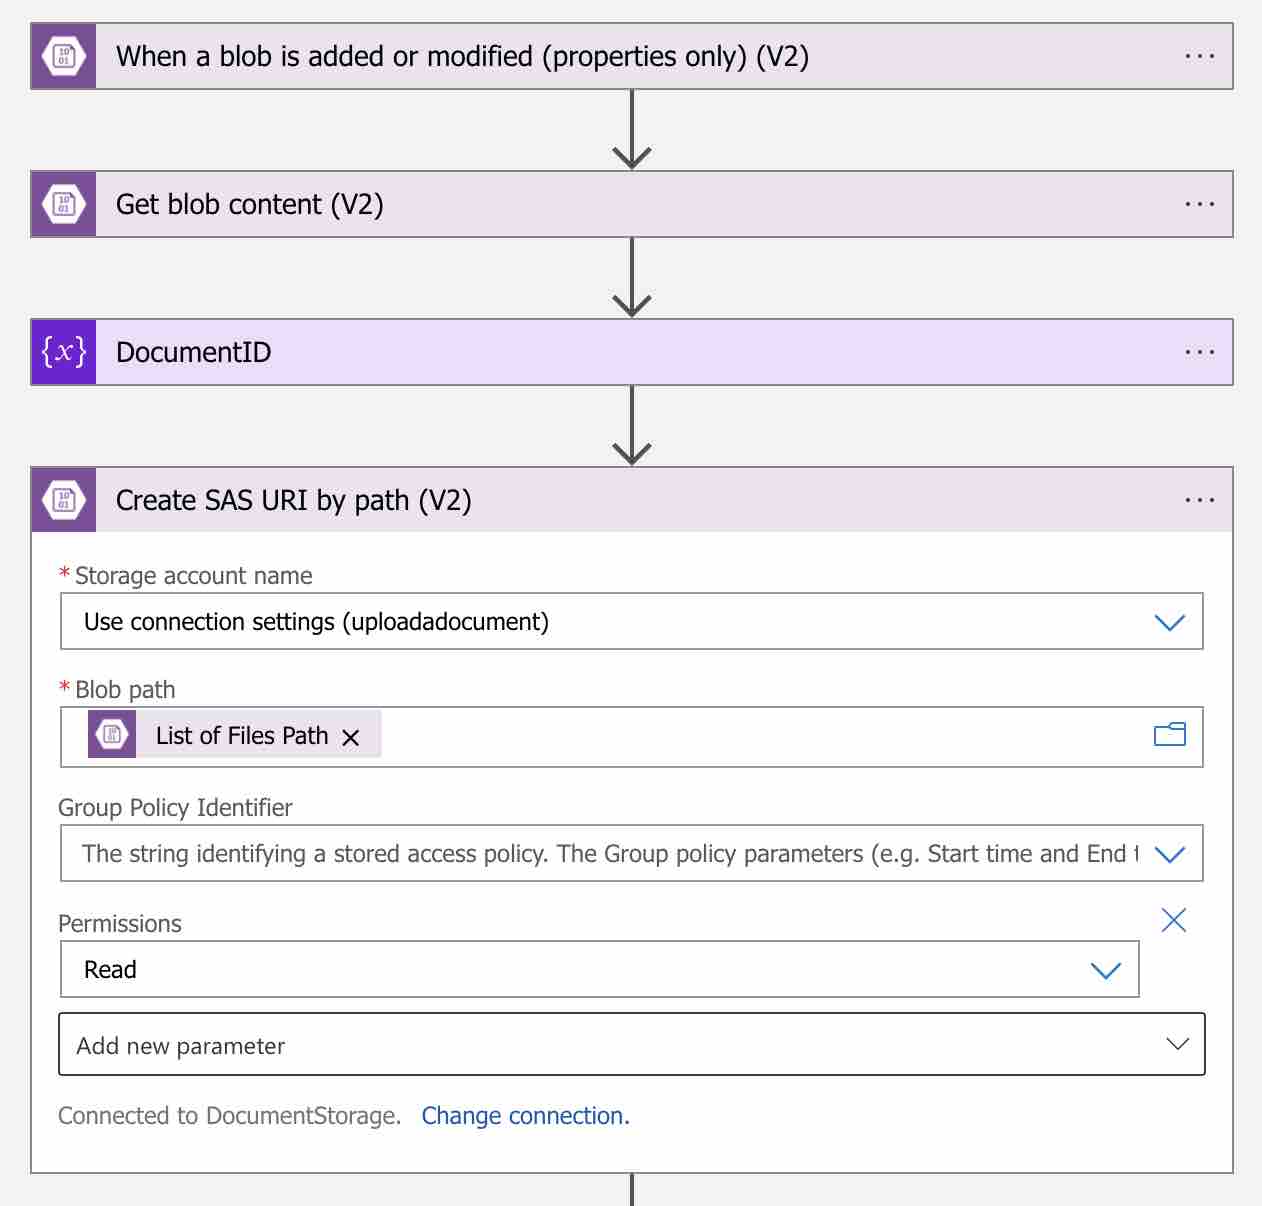
For the “Blob path” value, let’s use the “List of Files Path” dynamic content. Thus, a SAS link will be created for the relevant document.
Now in order to start the OCR process of the relevant document, we need to add an HTTP action like below. Let’s call this action as “ComputerVisionAPIReadEndpoint“. Thus, we can easily access the output of this action in the following steps.
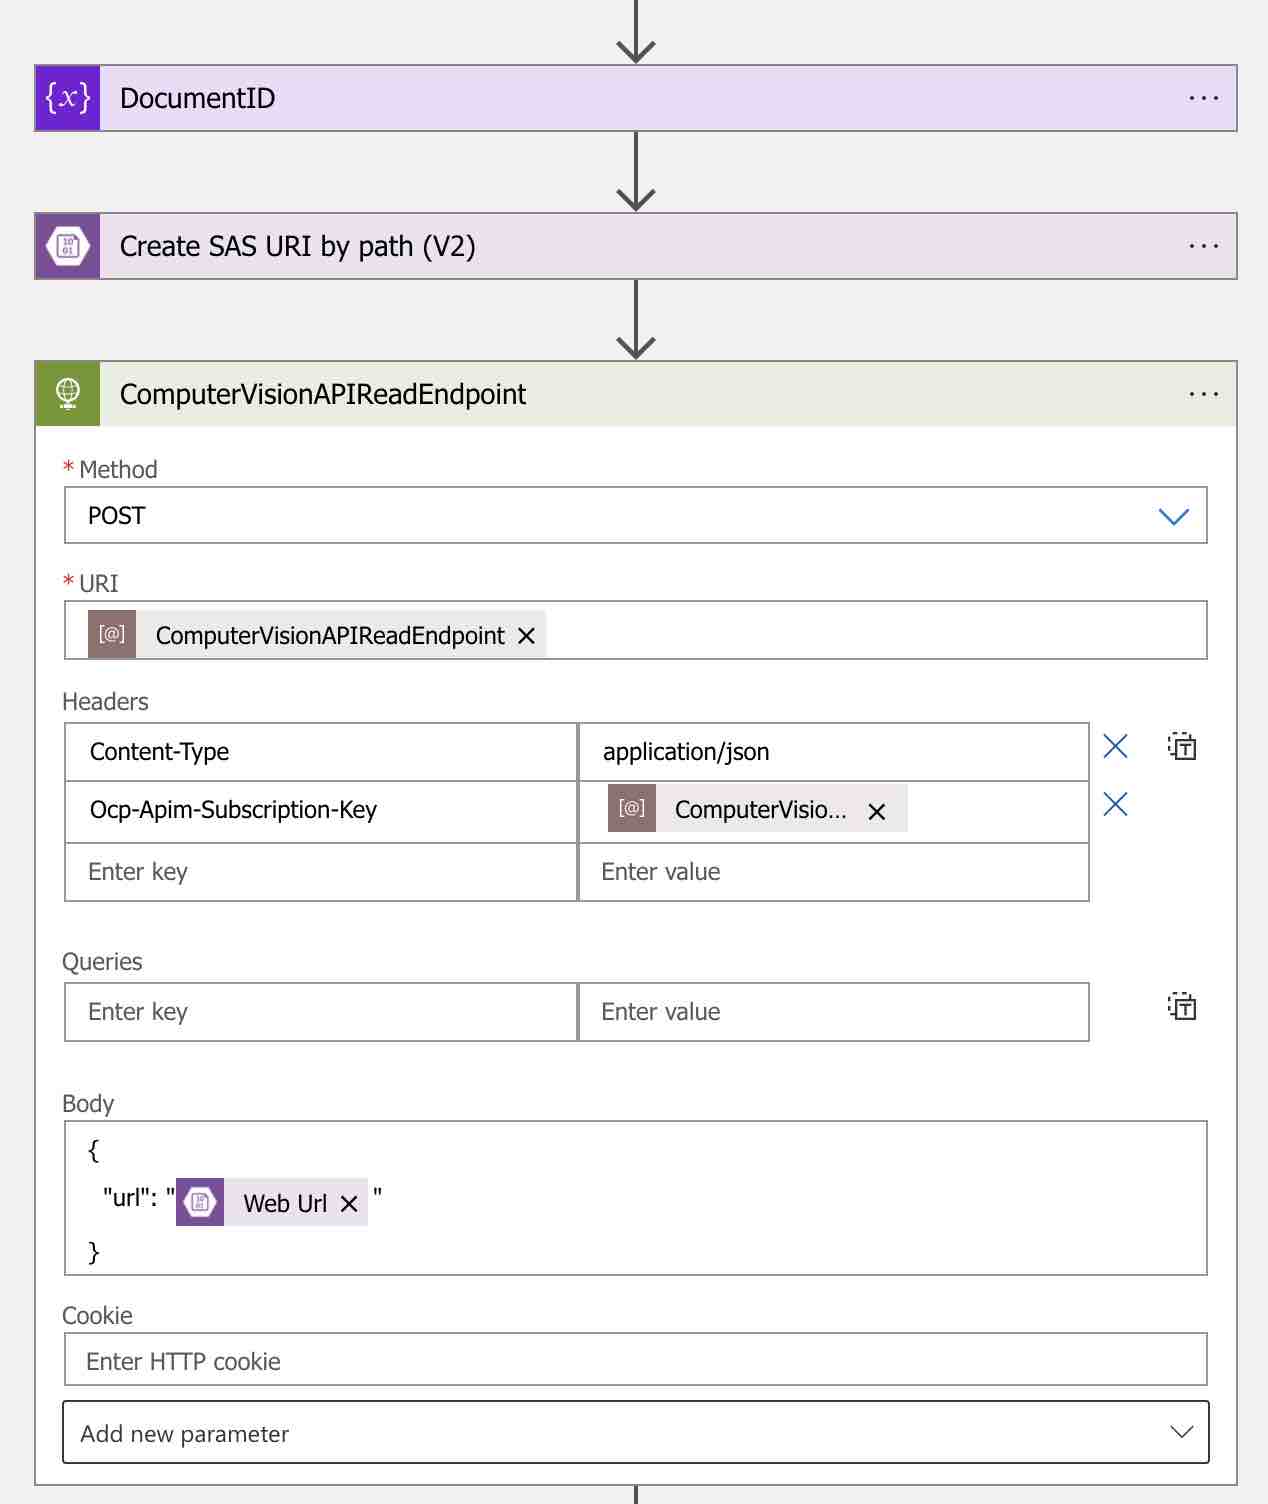
With this action, we will simply send the the URL information of the relevant document to the Read API. Also Read API accepts binary data in “octet-stream” format. For “URI” information, let’s use the “ComputerVisionAPIReadEndpoint” parameter. In addition, we can also perform page selection operations for multi-page PDF and TIFF documents by using “pages” request parameter. For example: “?pages=1,2,3” or “?pages=1-3”
Another important point is Computer Vision API key information. We will send this information with the “Ocp-Apim-Subscription-Key” header parameter.
In the body, we specify the URL information of the relevant document by using the SAS link that we have created for the relevant document in the previous step. We can access the relevant SAS link under the “Create SAS URI by path (V2)” header within the dynamic contents.
So the HTTP request that is required to start OCR process is also ready. Now we can move on to the step where we can access the OCR results.
Computer Vision Read API performs OCR processes asynchronously. For this reason, Read API returns the endpoint information of the Get Read Result method where the details of the OCR process can be queried. In short, we need to query the Get Read Result endpoint with interval until the OCR process is completed.
First, let’s define a boolean variable called “IsDocumentAnalyzed” as follows.
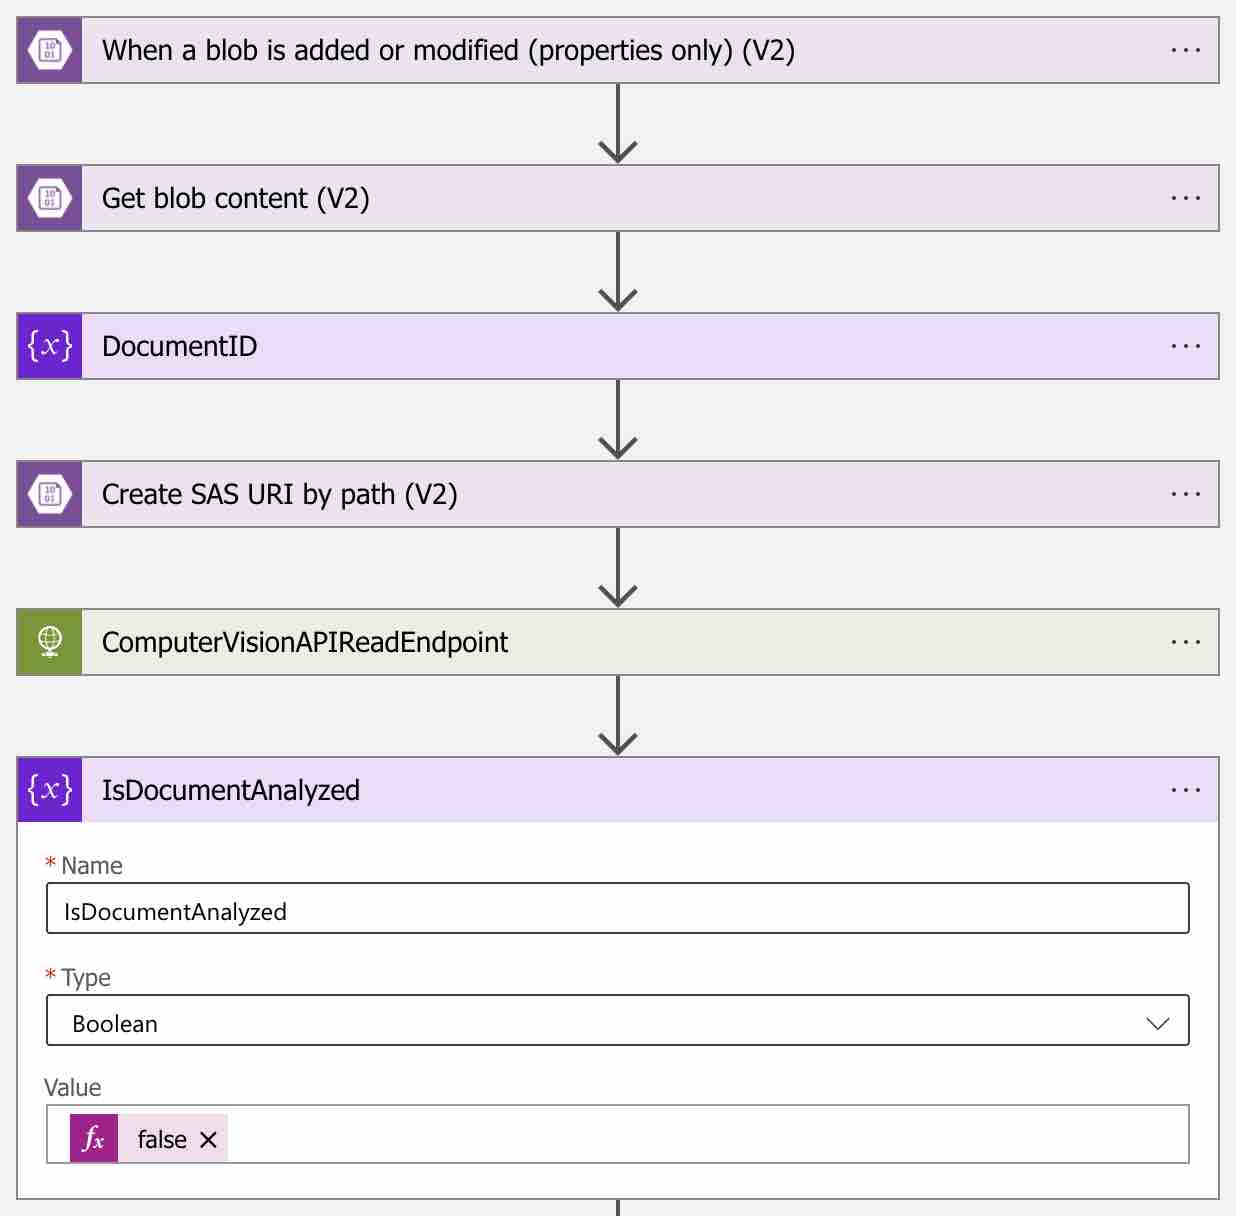
As long as this variable has the value false, we will be querying the Get Read Result endpoint in a loop.
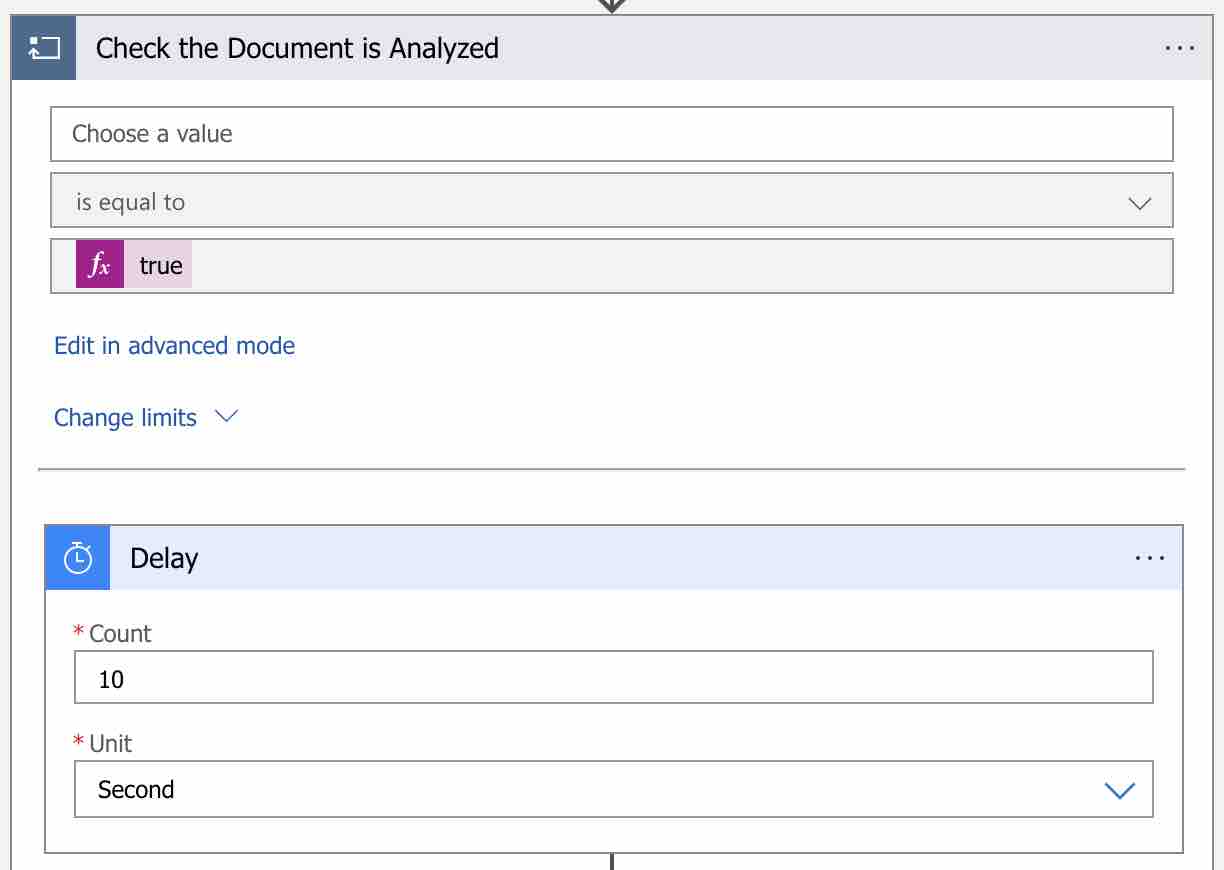
In order to add a loop in the workflow, let’s type “Control” in the search box and then select the “Until” as the action.
I called this loop step “Check the Document is Analyzed“. As a condition, I set the “IsDocumentAnalyzed” variable that we defined should be “true“. Now we can start querying the Get Read Result endpoint within this loop scope.
First of all, let’s add a “Delay” action into this loop in order to perform query operations at a certain time intervals.
After adding the “Delay” action, let’s add a new HTTP action to query the Get Read Result endpoint. Let’s call this action “ComputerVisionAPIGetReadResultEndpoint“.
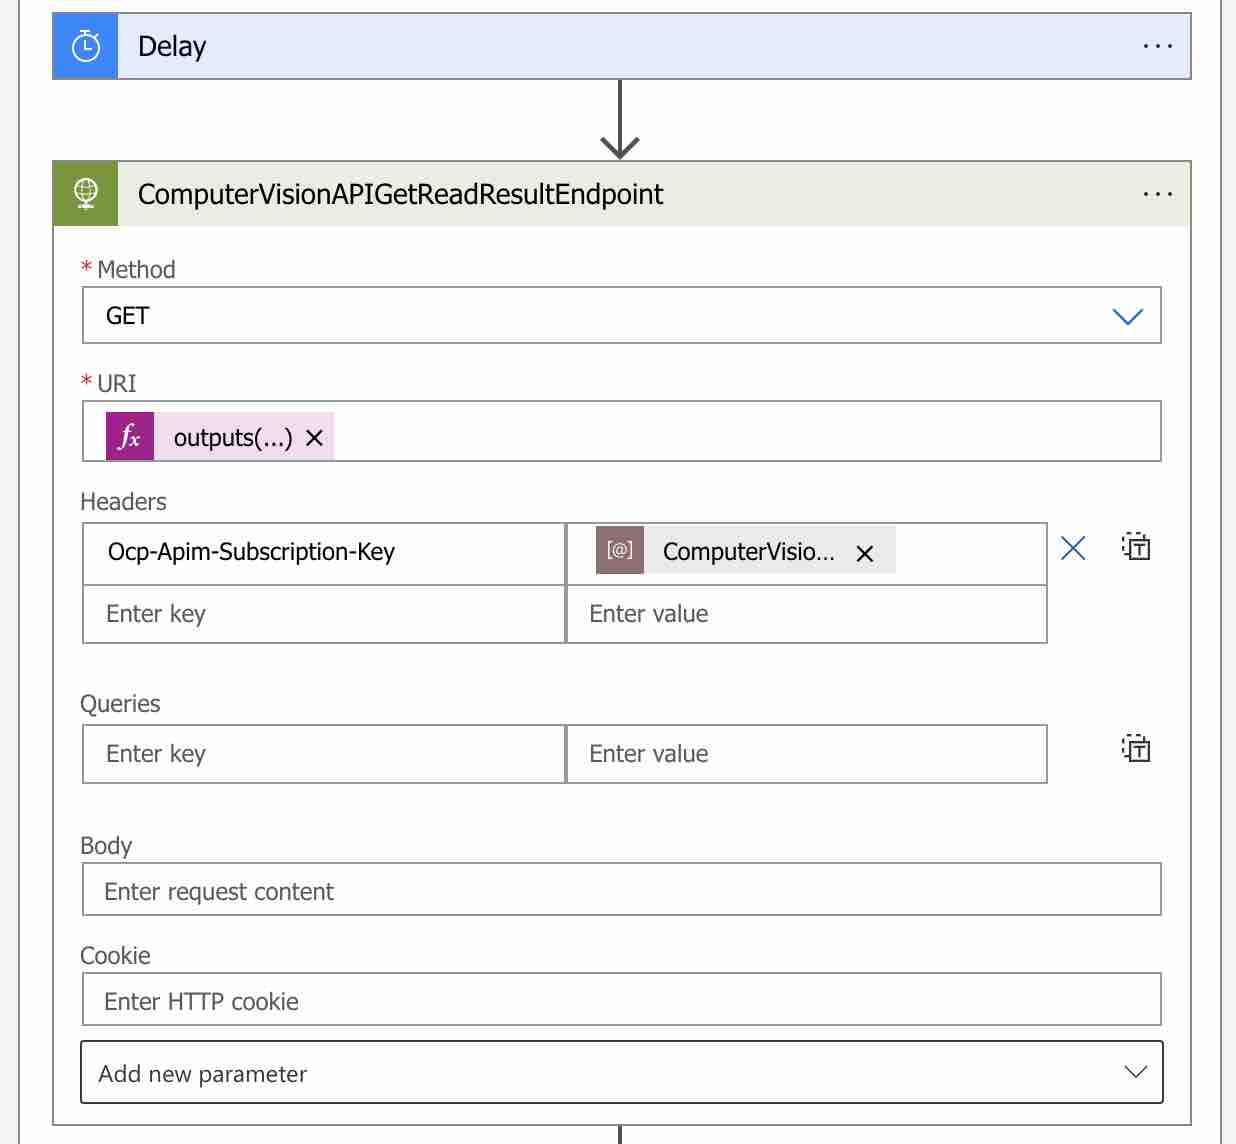
Let’s use “GET” as the “Method” and the Get Read Result endpoint as the “URI” address. We will access this endpoint information via the “Operation-Location” response header parameter of the “ComputerVisionAPIReadEndpoint” HTTP action that we have defined before.
For this, it will be enough to write an expression like the following.
outputs('ComputerVisionAPIReadEndpoint')['headers']['Operation-Location']We will be also passing the Computer Vision API key information via the “Ocp-Apim-Subscription-Key” header parameter.
So, the HTTP request where we will query the results of the OCR process is ready. Now checking the response of this request and saving the OCR results on the Cosmos DB steps are left.
In order to perform the remaining steps, we need to add a new condition step in the same “Check the Document is Analyzed” loop scope. For this, let’s type “Control” in the search box and this time select the “Condition” as the action.

At this point, we need to check the “status” property, that we will get in the response body of the Get Read Result endpoint, in order to check whether the operation has been completed successfully. If we get the value “succeeded“, it means, the relevant OCR process has ben successfully completed.
In order to perform this control operation, let’s write an expression to condition value as follows.
body('ComputerVisionAPIGetReadResultEndpoint')['status']Also we need to choose “is equal to” as condition and set its value as “succeeded“.
After this point, if the condition we set is successful and gets into the “True” block, first we need to update the value of the “IsDocumentAnalyzed” variable to “true” in order to stop the “Check the Document is Analyzed” loop. To do this, let’s add the “Set variable” action inside the “True” block as shown above, and update the value of the “IsDocumentAnalyzed” variable to “true“.
Since I’m going through the happy-path scenario for this article, I won’t cover the cases where it fails. For unsuccessful cases, you need to design your own error handling strategies on the workflow.
So, now we can access the relevant OCR results and save them on the Cosmos DB. For this, let’s click the add a new step button after the “Set variable” action and type “Azure Cosmos DB” in the search box. Then select the “Create or update document (V3) 2” action.
At the first screen, we need to create a new connection by providing “Access Key” and “Account ID” information of the relevant Cosmos DB account. Then let’s fill the second screen that will open as follows.
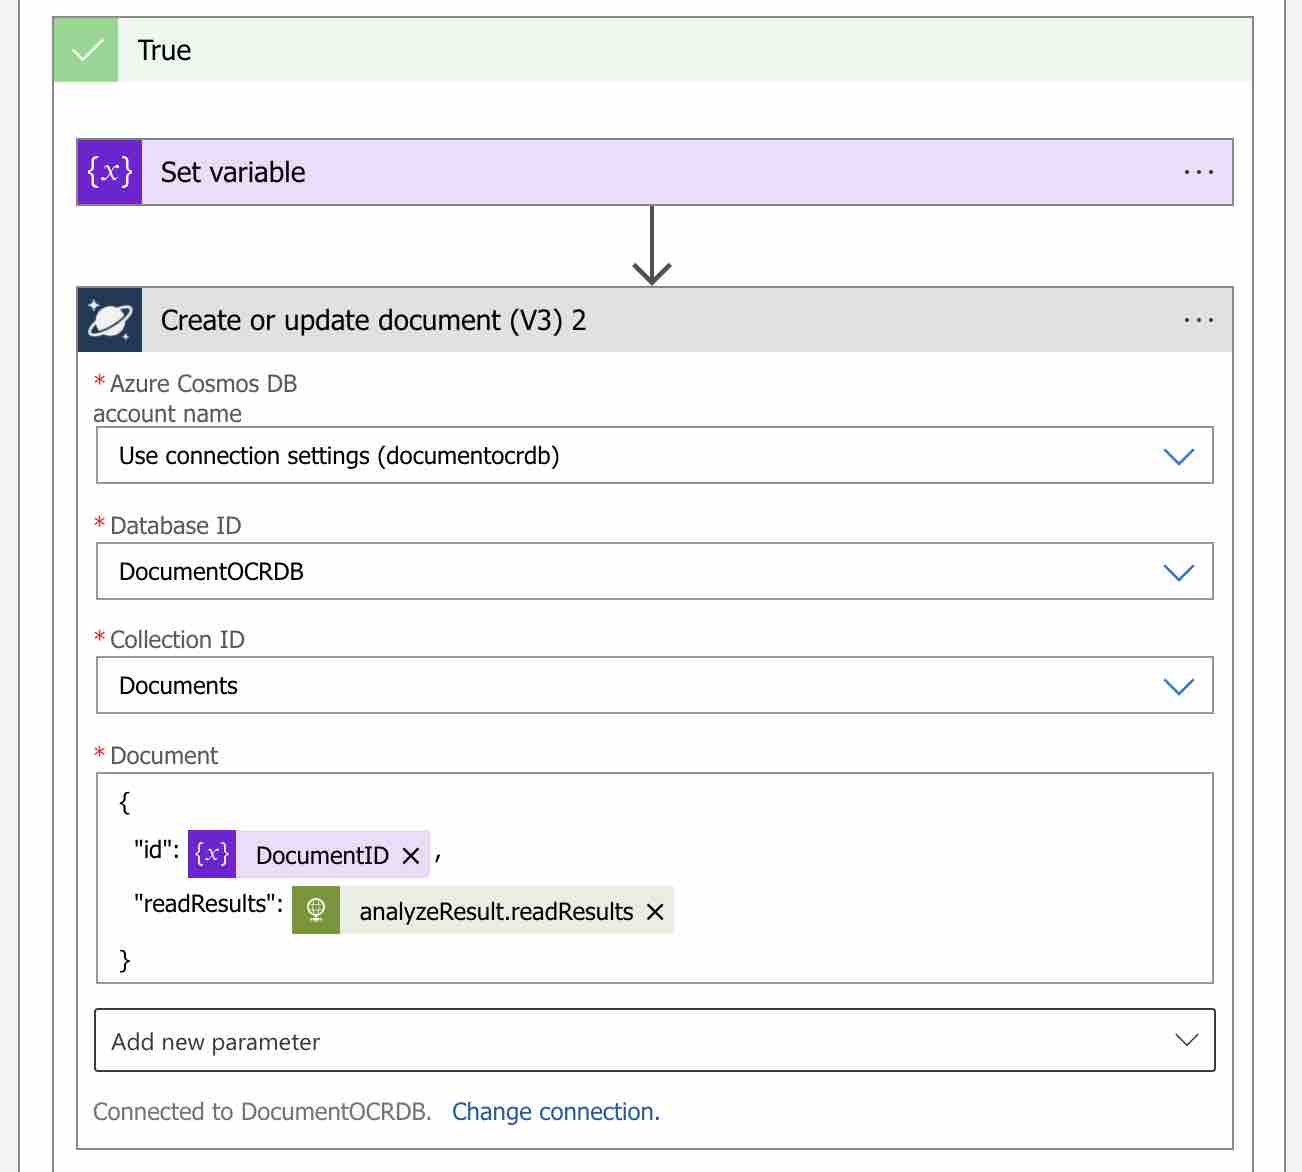
In this step, we will define the document that we will create on the Cosmos DB. First, in the “Account name” option, let’s select the connection information that we have created in the previous step. Then we need to provide the “Database” and “Collection” information that we will keep the related OCR results. I will keep the relevant results in a collection called “Documents” in the “DocumentOCRDB” database that I created before.
In the “Document” section, we need to define how we will store the OCR results in the collection. You can design your document model however you want. For the sake of example, I will keep the OCR results as it comes as a response from the Get Read Result endpoint. OCR results also have the following format.
{
  "status": "",
  "analyzeResult": {
      "readResults": [
          {
            ...
          }
        ]
    }
}
In order to access OCR results, we need to have the following expression.
body('ComputerVisionAPIGetReadResultEndpoint')['analyzeResult']['readResults']You can find the response model details of the Get Read Result endpoint here.
Thus, we have created an automated OCR workflow by taking advantage of Azure‘s serverless and managed services. Now, when a new document is uploaded to Blob Storage, this workflow will run and automatically perform OCR operations for the relevant document.
Let’s Test It
In order to perform a quick test, let’s send a PDF document upload request to the address of the Azure Function as follows. The PDF document that I will upload, just contains a simple text like “Hello, how are you“.
curl --location --request POST 'https://YOUR_FUNCTION_URL/api/UploadADocument' --form 'file=@"/YOUR_PATH/977ab862-e432-4bf6-83ee-94453bfb6768.pdf"'
After the upload process is completed, let’s go to the “Overview” page of the Logic App resource called “DocumentOcrWorkflow” and click to the “Run History” tab.
From this tab, we can access the run history of the relevant Logic App. If the related Logic App run successfully after the upload process is completed, we should see a screen like below.

Then, in order to reach the run details of the relevant workflow, it will be enough to click on the result we have seen.
As we have seen, after the related document has been uploaded to the Blob Storage, the Blob Storage trigger that we have defined as a start point successfully got triggered and all steps have been run in a sequence. Also if you want, you can access the detailed information of the each step by clicking on them.
Also, when we look at to the Cosmos DB, we can see a record is created in the “Documents” collection by using the id information of the relevant document file.
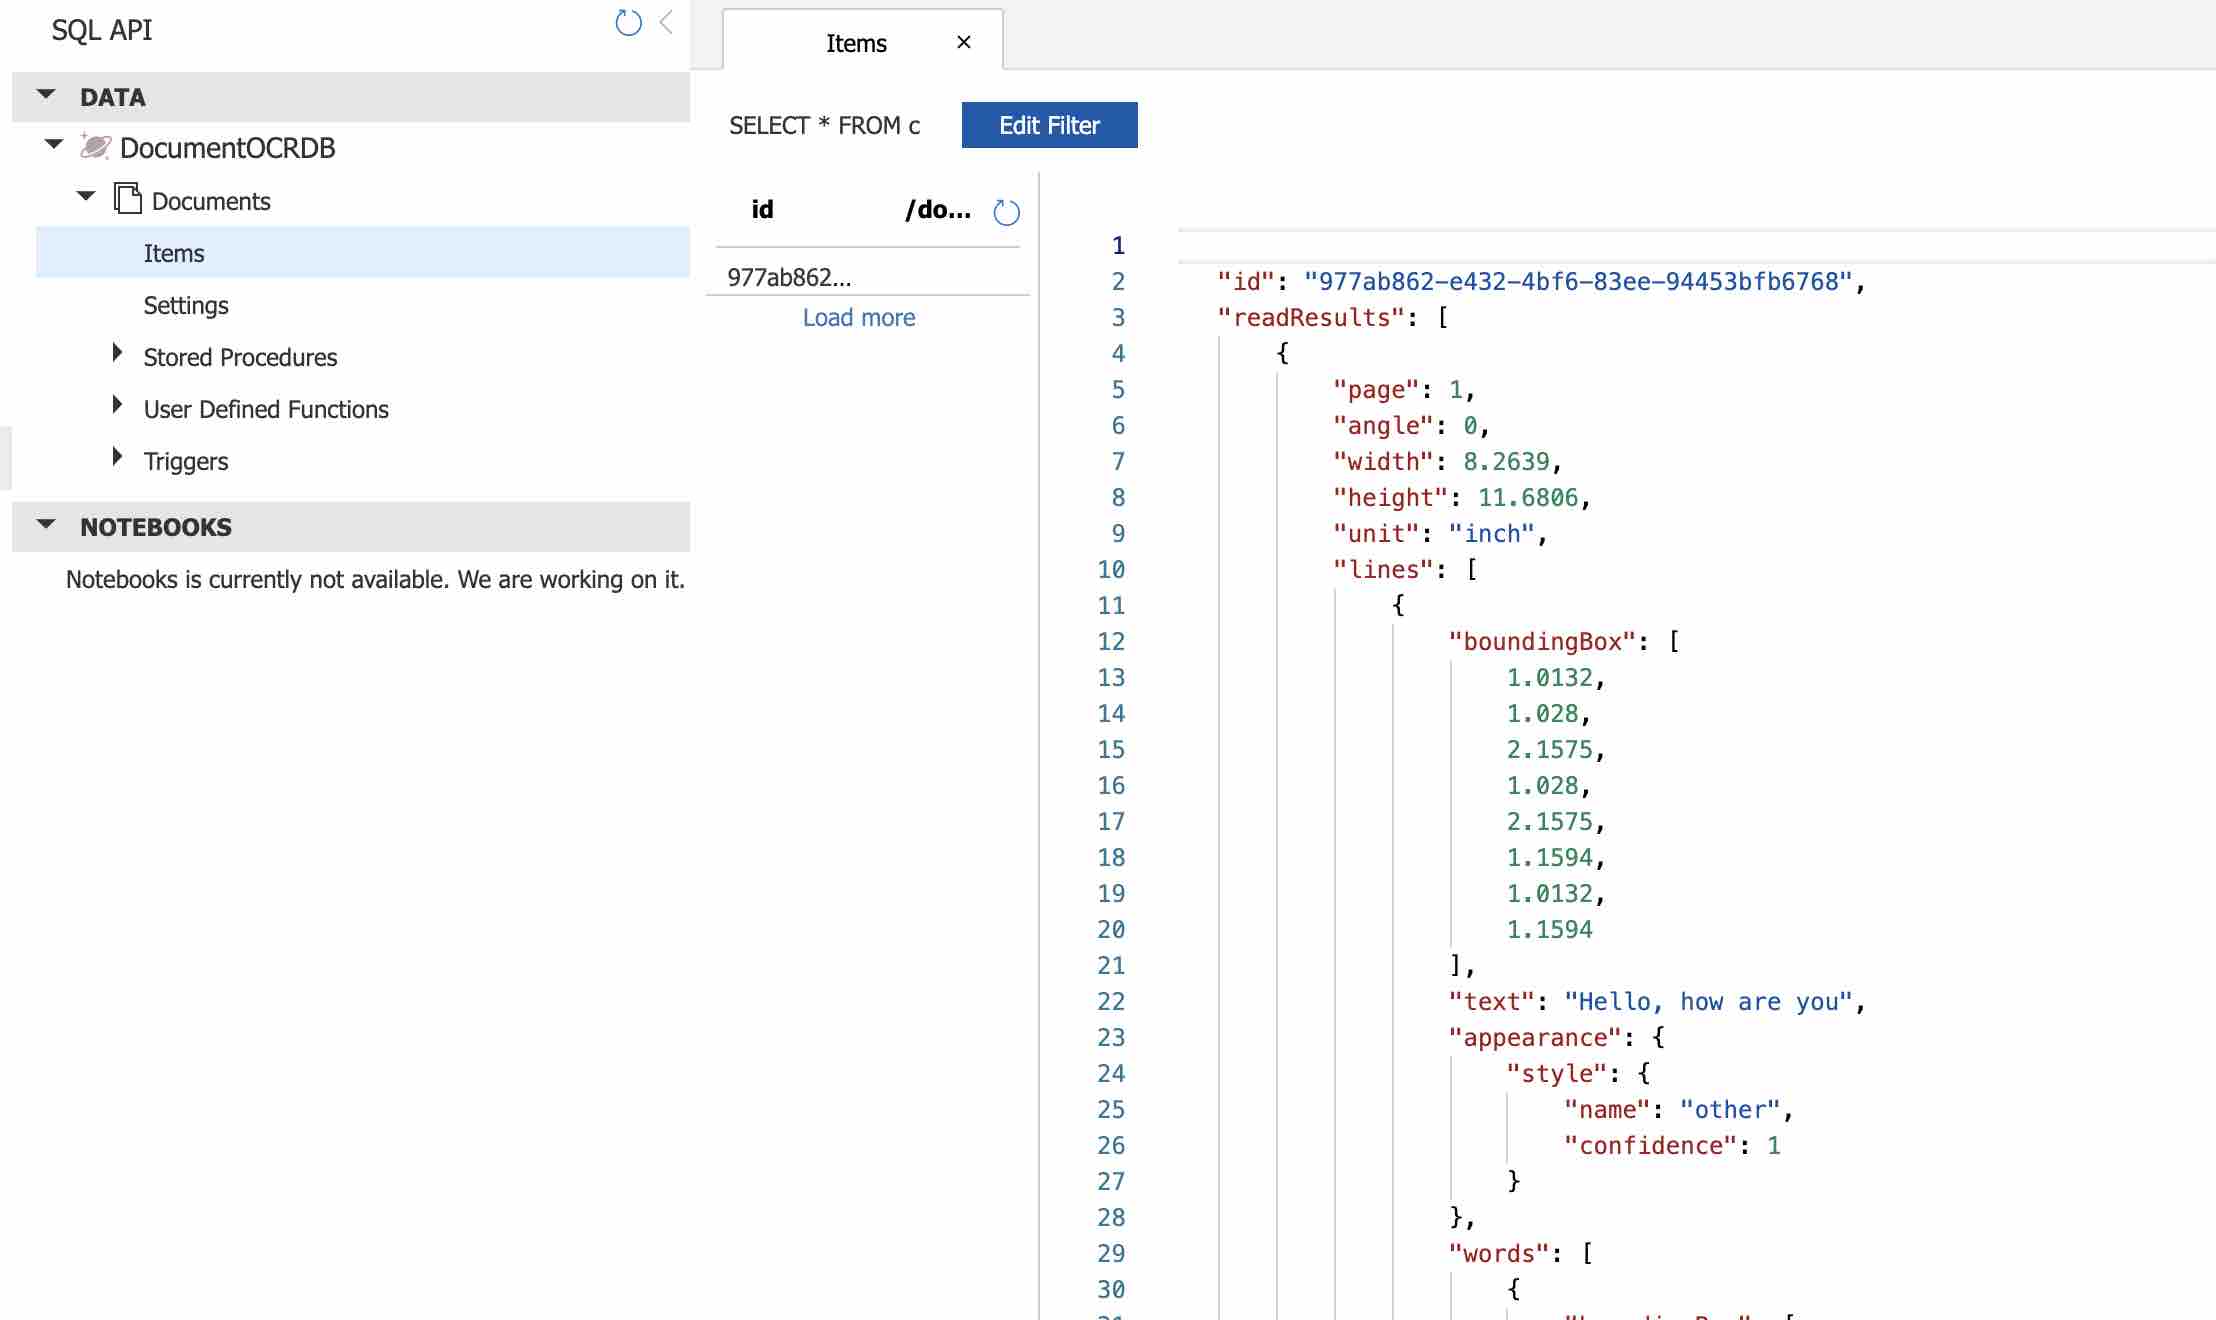
Within these OCR results, we can find information such as the document metadata and coordinates of the extracted texts together with the confidence scores.
In my case, the JSON response is like below.
{
    "id": "977ab862-e432-4bf6-83ee-94453bfb6768",
    "readResults": [
        {
            "page": 1,
            "angle": 0,
            "width": 8.2639,
            "height": 11.6806,
            "unit": "inch",
            "lines": [
                {
                    "boundingBox": [
                        1.0132,
                        1.028,
                        2.1575,
                        1.028,
                        2.1575,
                        1.1594,
                        1.0132,
                        1.1594
                    ],
                    "text": "Hello, how are you",
                    "appearance": {
                        "style": {
                            "name": "other",
                            "confidence": 1
                        }
                    },
                    "words": [
                        {
                            "boundingBox": [
                                1.0132,
                                1.028,
                                1.3514,
                                1.028,
                                1.3514,
                                1.1538,
                                1.0132,
                                1.1538
                            ],
                            "text": "Hello,",
                            "confidence": 1
                        },
                        {
                            "boundingBox": [
                                1.4082,
                                1.028,
                                1.6625,
                                1.028,
                                1.6625,
                                1.1334,
                                1.4082,
                                1.1334
                            ],
                            "text": "how",
                            "confidence": 1
                        },
                        {
                            "boundingBox": [
                                1.7072,
                                1.0595,
                                1.8962,
                                1.0595,
                                1.8962,
                                1.1334,
                                1.7072,
                                1.1334
                            ],
                            "text": "are",
                            "confidence": 1
                        },
                        {
                            "boundingBox": [
                                1.9395,
                                1.0595,
                                2.1575,
                                1.0595,
                                2.1575,
                                1.1594,
                                1.9395,
                                1.1594
                            ],
                            "text": "you",
                            "confidence": 1
                        }
                    ]
                }
            ]
        }
    ],
}
Now, we can ensure that the relevant document can be automatically imported into the system with the texts it contains by using the above OCR results.
References
https://docs.microsoft.com/en-us/azure/azure-functions/functions-scale#overview-of-plans
https://docs.microsoft.com/en-us/azure/cognitive-services/computer-vision/overview-ocr
https://docs.microsoft.com/en-us/azure/cognitive-services/computer-vision/vision-api-how-to-topics/call-read-api#determine-how-to-process-the-data-optional
Be First to Comment