In the first part of this DevEx series, I tried to explain Platform Engineering and DevEx and showed how Backstage can help make an organization’s assets discoverable while creating golden paths that enable developer self-service without chaos. The goal is to increase developer productivity. In this second part, I will dive deeper into Backstage’s catalog capabilities and then take it a step further by integrating an AI-powered MCP server which allows copilots to transform the catalog into a more conversational developer experience.
Imagine a developer simply asking “Do we have a microservice template in C#?” and getting an instant, accurate answer or better spinning it up immediately. It’s still Backstage, but with an extra layer of intelligence on top.
If you haven’t read the first part of this article series, I highly recommend checking it out first here. If you would like to skip the catalog capabilities and jump straight to the MCP server section, go here: Accelerating DevEx With Mcp
Why the Catalog Matters
In the first part of this series, we touched on Backstage’s Software Catalog as the heart of the platform. It is the place where services, websites, APIs, libraries and more come together under one unified view.
We looked at how each component is defined with a simple “catalog-info.yaml“, how ownership and metadata make them easier to manage. We only looked at the surface. The catalog is not just a feature. It is the backbone of platform discoverability and governance.
It gives your organization a shared language for all its software assets. When used well, it transforms from a static list of entries into a clear map of your platform. This is where concepts like a clear taxonomy, up-to-date ownership and well curated metadata become essential. Without these, the catalog can quickly decay into a messy directory that nobody trusts.
Best Practices for a Living Catalog
I would say a healthy catalog starts with a clear taxonomy. Backstage’s entity kinds give us the foundation, but it’s up to the organization to define and enforce how they are used. Backstage supports different entity kinds like Components, APIs, Systems, Domains, Resources and Templates.

Each has a specific role and acts as the building block for your taxonomy:
- Component: The core building block in Backstage. In practice, a component could be your user microservice, a shared authentication library or even an infrastructure-as-code. The key point is that a component represents something that can be owned, versioned and reused. Once it is in the catalog, anyone can discover it, see its documentation and understand who owns it, what it depends on and how other teams can use it. Common subtypes of components include service, website, library, IaC module, data pipeline and more.
- API: In Backstage, an API entity is more like a catalog entry it points to the spec (OpenAPI, GraphQL schema or gPRC proto). You can think of an API entity in Backstage as being similar to SwaggerHub in the sense that it makes APIs discoverable and documented. But unlike SwaggerHub, it is integrated into broader developer portal, showing which services provide or depend on the API.
- System: A grouping of related components that together deliver a capability. For example, an Order Management System could include a web frontend, a set of backend microservices an API for third party integrations and a reporting dashboard. In Backstage, grouping them under a system gives you one place to see the full picture of how they fit together.
- Domain: A higher level grouping that usually aligns with business functions. Think of a Payments Domain that contains multiple systems like billing and fraud detection. Or a DevEx domain that owns the IDP, CI/CD pipelines and template library. Domains help people navigate the catalog when they do not know the exact service name but understand the business area they are looking for.
- Resource: Resources in Backstage represent the infrastructure and services that your software components rely on. Unlike APIs or templates (which are about scaffolding) resources act as the inventory of building blocks for your systems. Databases, message queues, storage accounts or kubernetes clusters.
- Template: Templates in Backstage are reusable blueprints for creating new software components. Instead of developers starting from scratch, they can pick a template that includes best practices, security requirements and organizational standards. If you have read my first article series on Golden Paths, this is exactly where they come to life. Backstage templates are the engine behind Golden Paths.
Once the taxonomy is in place, the real work is keeping it alive and trusted. That’s where best practices come in:
- Keep ownership metadata updated: even make some fields mandatory, so every component has someone accountable for its accuracy.
- Define systems, domains and teams carefully so the catalog reflects the real organizational map.
- Model relationships clearly for example a service belongs to a system, a team owns a service, an API is provided by a service.
- Making sure documentation isn’t stale.
- Enforce new software through golden templates to ensure consistent quality, governance and metadata coverage.
- Use tags and lifecycle states for better discoverability and maintenance.
- Integrate automated checks so drift and missing metadata are caught early.
- Reviewing and cleaning up deprecated entities.
Let’s Perform a Quick Example
In the first article of this series, we built a .NET 9 API template as a golden path for new microservices. Using that template, we scaffolded a simple Search API, where we set the “Team Name” to “guests” without actually creating any team or user in Backstage. This time we will take things a step further and show how the service fits into the bigger picture by defining its system, domain and team in the catalog.
Let’s take a simple example from an e-commerce domain. Imagine we are building an Order Management System. This system could include a web frontend, a set of backend microservices and so on. In Backstage, we can model all of these related components as part of a single system. Before we scaffold a new Search API, this time we will define the bigger picture. The domain it belongs to, the system it supports and the team responsible for it. Once these are in place, any new service we scaffold will have the right context in the catalog. That way, when a developer looks up a service like the Search API, they immediately see how it fits into the broader ecosystem and who is accountable for it.
Backstage also uses YAML entity definitions to represent domains, systems, teams and users just like we did with “catalog-info.yaml” and template manifests. We will start defining them from the top (domain) and then move down to systems, teams and users.
To keep everything organized, we will follow a folder structure that allows us to manage catalog entities in a centralized and structured way.
backstage-catalog/
└── domains/
    ├── ecommerce-domain.yaml
└── systems/
    ├── order-management-system.yaml
└── teams/
    ├── ecommerce-domain-team.yaml
    ├── oms-team.yaml
└── users/
    ├── gokhan-gokalp-user.yaml
ecommerce-domain.yaml
apiVersion: backstage.io/v1alpha1
kind: Domain
metadata:
  name: ecommerce
  title: ECommerce
  description: Domain that covers everything related to the ecommerce ecosystem.
spec:
  owner: ecommerce-domain-team
ecommerce-domain-team.yaml
apiVersion: backstage.io/v1alpha1
kind: Group
metadata:
  name: ecommerce-domain-team
  title: ECommerce Domain Team
  description: Team responsible for the ECommerce domain.
spec:
  type: team
  children: [oms-team]
order-management-system.yaml
apiVersion: backstage.io/v1alpha1
kind: System
metadata:
  name: order-management
  title: Order Management System
  description: Handles orders from checkout to delivery.
spec:
  domain: ecommerce
  owner: oms-team
oms-team.yaml
apiVersion: backstage.io/v1alpha1
kind: Group
metadata:
  name: oms-team
  title: OMS Team
  description: Team responsible for the Order Management system within the ECommerce domain.
spec:
  type: team
  children: []
gokhan-gokalp-user.yaml
apiVersion: backstage.io/v1alpha1
kind: User
metadata:
  name: gokhangokalp
  description: Gokhan Gokalp
spec:
  profile:
    displayName: Gokhan Gokalp
    email: info@gokhan-gokalp.com
  memberOf:
    - oms-team
We have now defined our catalog entities step by step. Starting from the domain we added the system that belongs to it and then described the team and users responsible for that system. With these YAML definitions in place, our Order Management System is now represented in Backstage. This structure provides a solid foundation for discovery and ownership and we can easily extend it later by adding components, APIs or resources as the system evolves.
So, for higher level entities such as Domain, System, Group and User, we use a dedicated shared catalog repository. This approach ensures better governance, traceability and consistency across the organization. To avoid manually registering each file, we can enable Backstage’s auto discovery capability to watch that repository folder and automatically ingest these entities into the catalog.
Let’s do the following in the “app-config.yml” file to enable auto discovery for our local environment. You can also point it to a Git repository if you prefer by setting the “type” to “url“.
catalog:
  import:
    entityFilename: catalog-info.yaml
    pullRequestBranchName: backstage-integration
  rules:
    - allow: [Domain, Component, System, API, Resource, Location, Template, User, Group]
  locations:
    - type: url
      target: https://YOUR_TEMPLATE_REPOSITORY_URL_FROM_FIRST_ARTICLE/template.yaml
    - type: file
      target: ../../backstage-catalog/domains/**/*.yaml
    - type: file
      target: ../../backstage-catalog/systems/**/*.yaml
    - type: file
      target: ../../backstage-catalog/teams/**/*.yaml
    - type: file
      target: ../../backstage-catalog/users/**/*.yaml
NOTE: Make sure to update the path to match where you created the “backstage-catalog” folder.
Now we are ready to see Backstage in action. Let’s start the app and let it do the magic:
cd my-backstage-app # your app name
yarn start
Once the app is running, Backstage will automatically pick up the catalog entities from our local “backstage-catalog” folder.
Now that all our entities have to be ingested, let’s explore them in the catalog. In the “Catalog” page, filter by kind “Domain“. Click on “ECommerce” to see the full map of our domain.
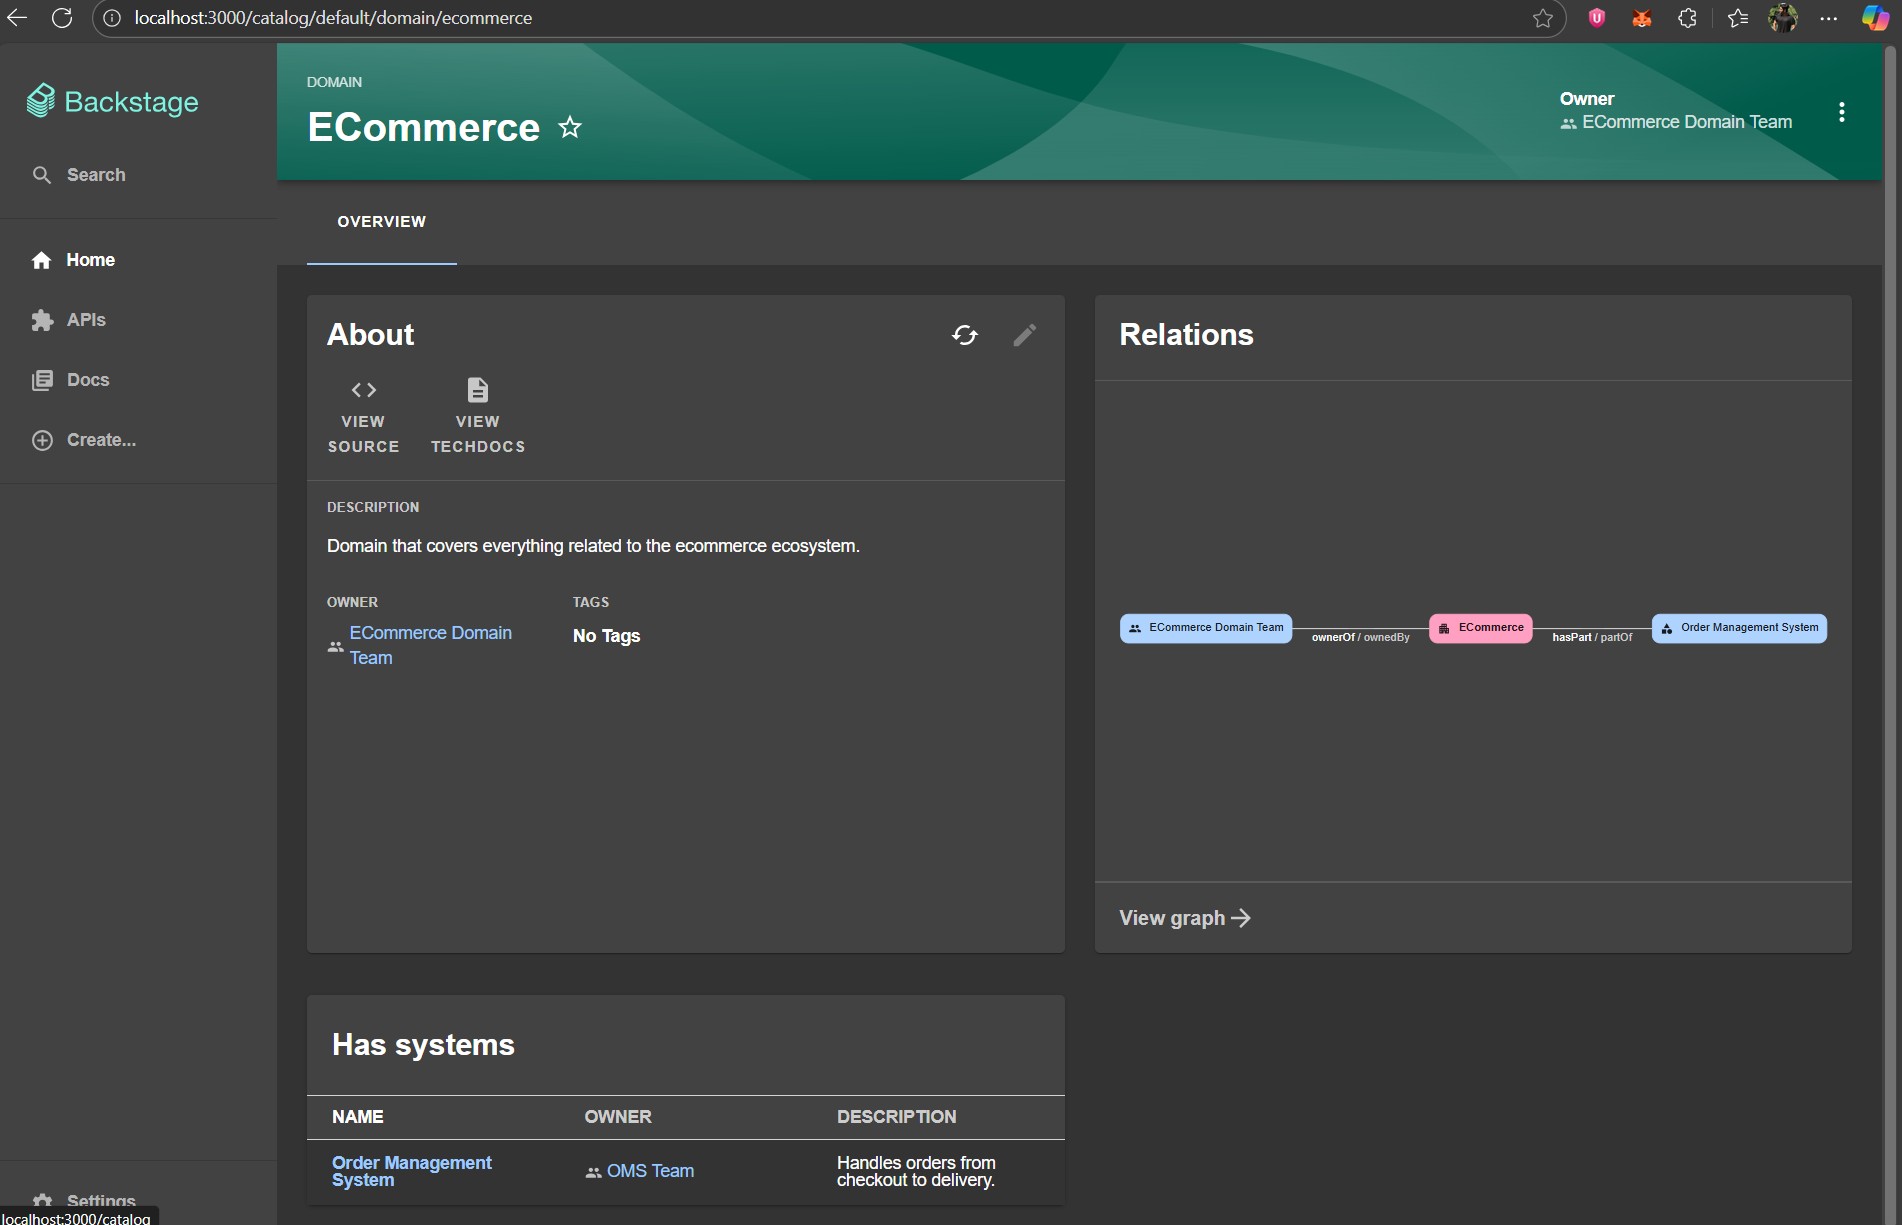
Here we can see the description and owner of the domain. On the right, the “Relations” panel visualizes how the domain is connected to systems and teams. At the bottom, the “Has systems” section lists the systems under this domain along with their owners and descriptions. This view helps us quickly understand the structure of the domain and who is responsible for each part.
Now let’s use the golden path template we developed in the first part of this series to scaffold a new microservice, this time tying it to the “OMS Team” to make ownership clearly visible within the portal. I will be using the following values during scaffolding:
- Project Name: Inventory.API
- Port: 5000
- Team Name: oms-team
Once the service is scaffolded, let’s enrich its catalog definition so that it fits into our larger architecture and also shows its runtime footprint. Open the “catalog-info.yaml” file in the root of the “MyOrg.Inventory.API” repository and update it as follows.
apiVersion: backstage.io/v1alpha1
kind: Component
metadata:
  name: MyOrg.Inventory.API
  description: MyOrg.Inventory.API project.
  tags:
    - dotnet
    - api
    - microservice
    - oms-team
  annotations:
    backstage.io/techdocs-ref: dir:.
spec:
  type: service
  lifecycle: experimental
  owner: oms-team
  system: order-management
  dependsOn:
    - resource:MyOrg.Inventory.API.Database
---
apiVersion: backstage.io/v1alpha1
kind: Resource
metadata:
  name: MyOrg.Inventory.API.Database
  description: Azure SQL Database for Inventory.API
spec:
  type: database
  owner: oms-team
  system: order-management
Here, we have associate the service with a system. So it becomes part of the “order-management” system. We have also defined a database resource entity so developers can clearly see that this service depends on an Azure SQL Database instead of having to guess where the data lives.
NOTE: I recommend keeping the resource name aligned with your IaC naming conventions as this makes it easier to navigate and cross reference infrastructure resources.
Once you commit and push the updated file, go to Backstage, navigate to the “MyOrg.Inventory.API” component and on the “About” card, click on the “Schedule entity refresh“. Backstage will then re-ingest the definition and we will see the system and the resource we defined linked to the service.
After a few seconds or minutes, let’s refresh the component detail page of “MyOrg.Inventory.API“. If Backstage has successfully re-ingested the definition, this time we will see that:
- The component is linked to “OMS Team” as its owner.
- It belongs to the “Order Management System“.
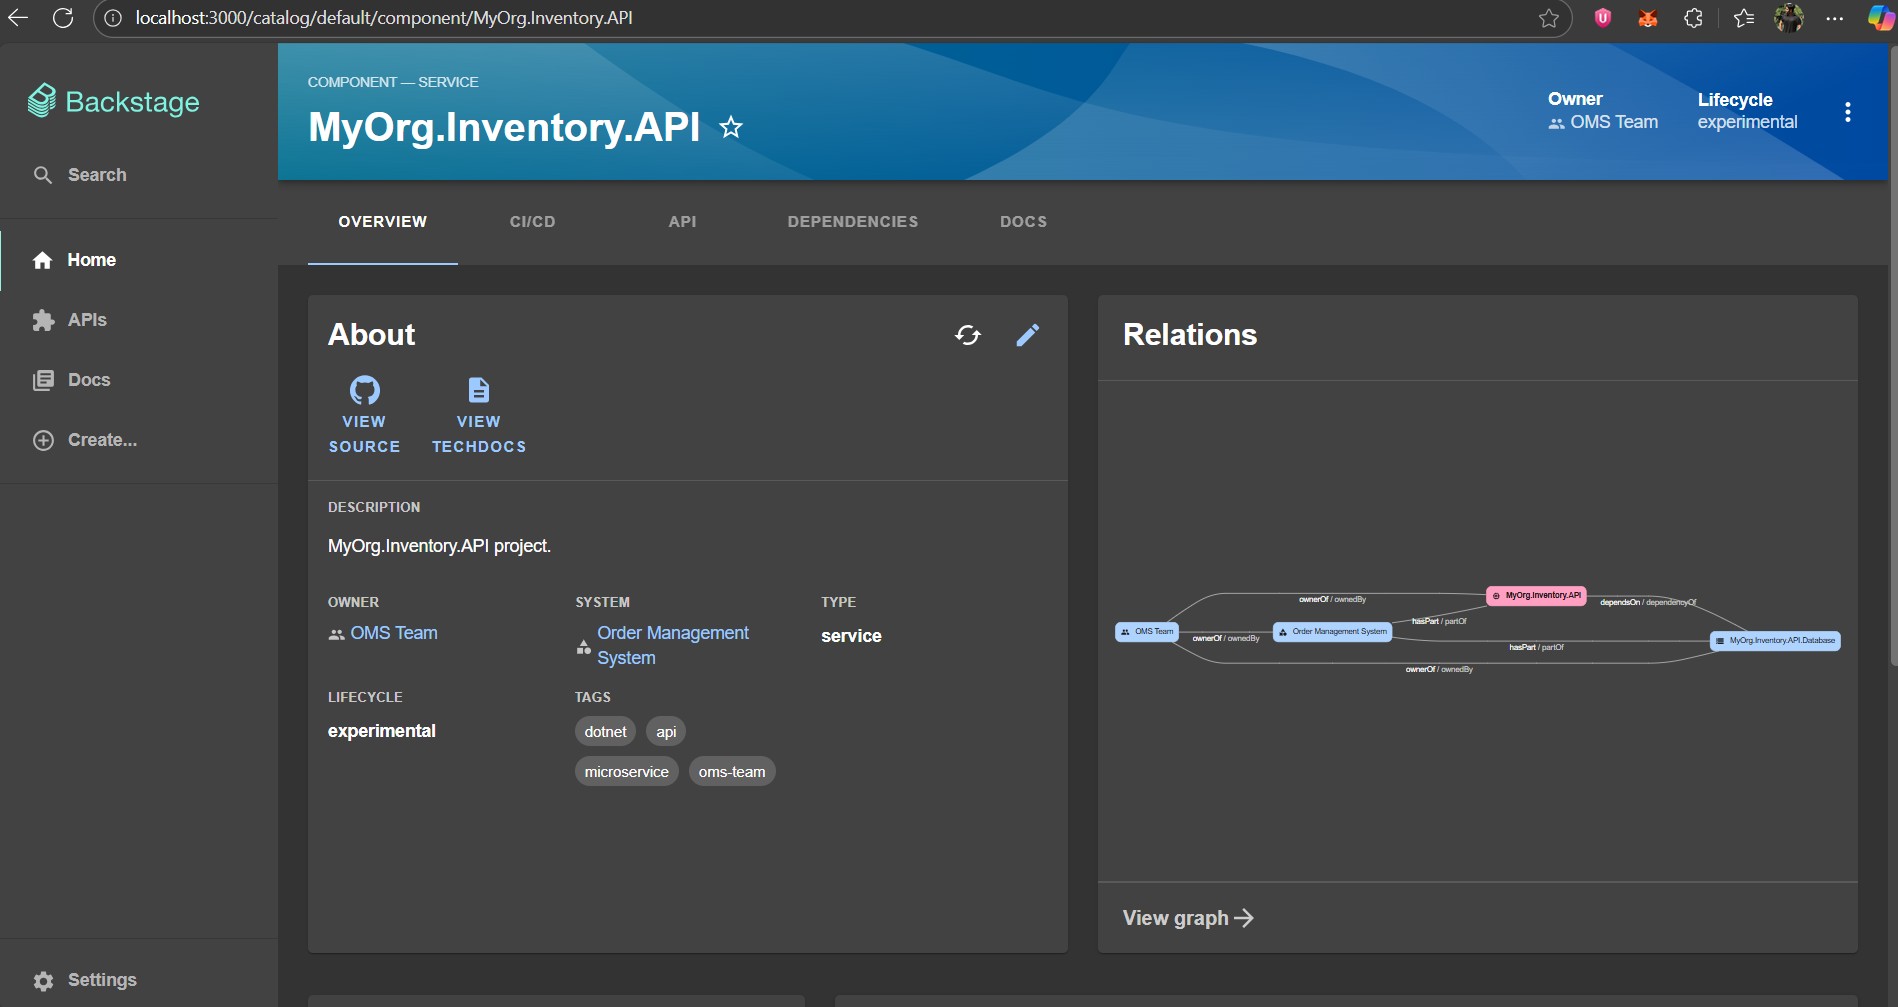
If we also look at the “Relations” view, we can also see the resources this service depends on. From a developer’s perspective, this is extremely valuable. I can understand what kind of service I’m dealing with, what system it belongs to and what infrastructure resources it relies on.
Now, If we click on the team name, Backstage takes us to the team details page.
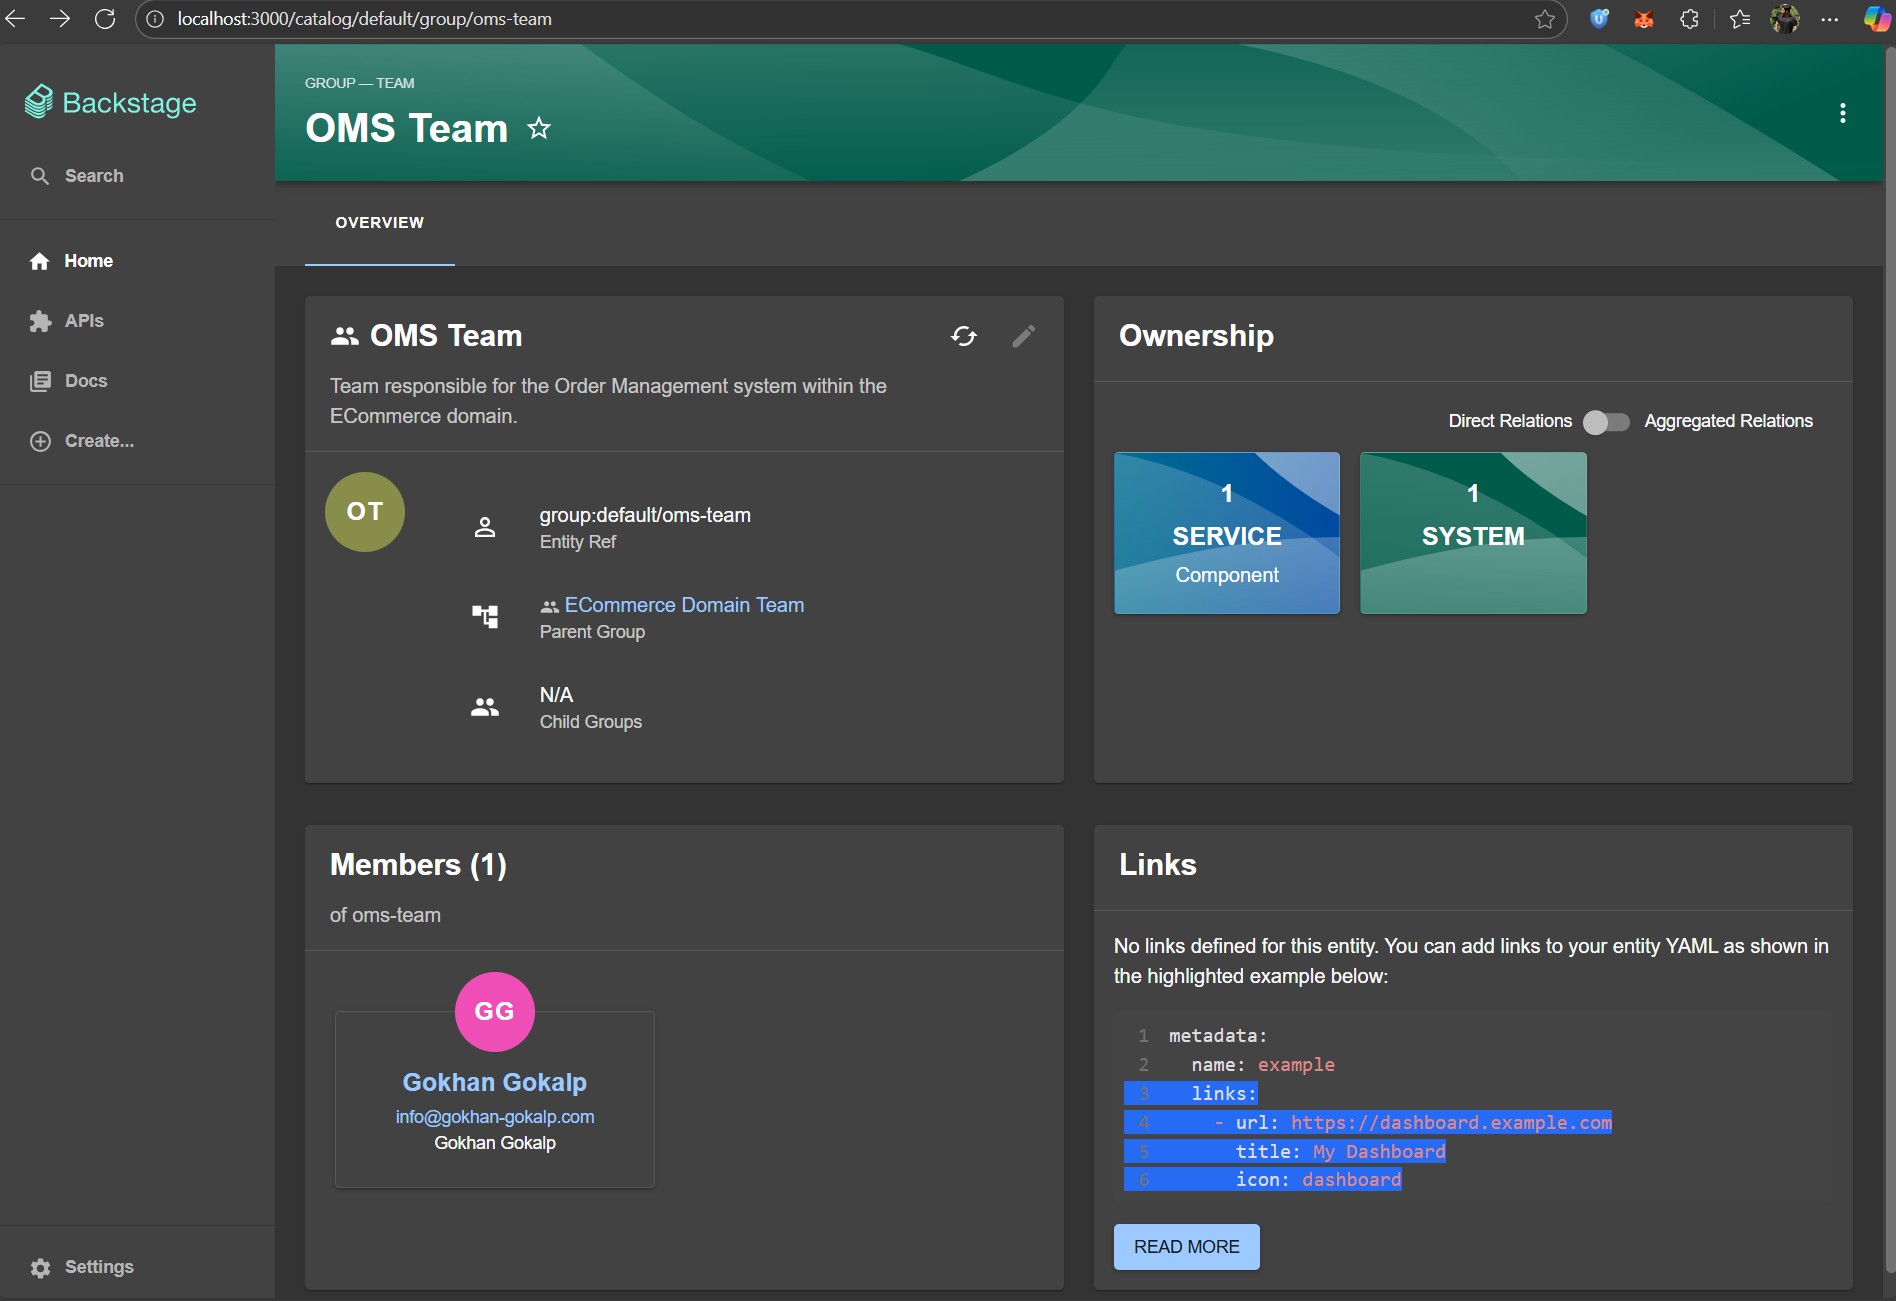
Here, we can see the members of this team, the services and systems they own. This creates a clear, traceable relationship between developers, teams and the software they are responsible for.
Now that we have both components and resources connected in the catalog with a clear structure that everyone can more easily connect the dots across the broader landscape. To speak frankly, cataloging alone isn’t enough anymore… What if we make this experience conversational for developers, reducing context switching as they increasingly rely on copilots in their daily work?
Accelerating DevEx With MCP
From the beginning of this article, I mentioned that I would take this further by empowering Backstage with an AI-powered MCP server that copilots can consume to reduce context-switching for developers. The goal is to make this experience conversational, meaning that instead of clicking around, we can simply ask “Do we have a microservice template in C#?” or “Who owns Order Management System?” and get instant answers powered by Backstage’s catalog.
I believe this is a major productivity boost. Speed is everything today. Time to market defines competitiveness and the ability to reduce friction in development makes a difference. When we enable copilots to access and share Backstage’s internal knowledge, developers no longer waste time digging through documentation or pinging teammates. They get contextual answers in seconds directly in their IDE with the help of copilots.
Copilots are becoming the new layer of productivity, almost like an extension of our way of thinking. When we connect them with our internals in this case with DevEx, they evolve from being just coding assistants into an organizational memory. This is where real acceleration happens.
Development of an MCP Server
You probably already know what MCP server is but to recall in short, an MCP (Model Context Protocol) server acts as a bridge between LLM applications and your organizational systems. It makes internal knowledge, assets and workflows available in a conversational way and it does so through a standardized protocol.
A couple of months back, Microsoft released an official C# SDK for MCP in collaboration with Anthropic which helps us to easily build both servers and clients. So we will be using this SDK to create a simple MCP server for Backstage and test it locally in VS Code using GitHub Copilot’s agent mode.
This minimal setup hopefully will show us how copilots can start to act as a developer’s gateway into the Backstage catalog to reduce friction and increase productivity.
Let’s start by creating a new console application and adding the required NuGet packages:
dotnet new console -n MyBackstage.MCP
dotnet add package ModelContextProtocol --prerelease
dotnet add package Microsoft.Extensions.Hosting
Then add a new folder to the project called “Models” and define the following records. These will represent the simple shape of Backstage catalog entities that we care about for now.
Models/BackstageMetadata.cs
public record BackstageMetadata
{
    public required string Name { get; set; }
    public required string Title { get; set; }
    public required string Description { get; set; }
}
Models/BackstageSystem.cs
public record BackstageSystem
{
    public required BackstageMetadata Metadata { get; set; }
    public required BackstageSystemSpec Spec { get; set; }
}

public record BackstageSystemSpec
{
    public required string Owner { get; set; }
    public string? Domain { get; set; }
}
Models/BackstageTemplate.cs
public record BackstageTemplate
{
    public required BackstageMetadata Metadata { get; set; }
    public required BackstageTemplateSpec Spec { get; set; }
}

public record BackstageTemplateSpec
{
    public required string Owner { get; set; }
    public string? Type { get; set; }
    public string? Lifecycle { get; set; }
    public List? Parameters { get; set; }
}

public record BackstageTemplateParameter
{
    public string? Title { get; set; }
    public List<string>? Required { get; set; }
    public Dictionary<string, BackstageTemplateProperty>? Properties { get; set; }
}

public record BackstageTemplateProperty
{
    public string? Title { get; set; }
    public string? Type { get; set; }
    public string? Description { get; set; }
}
Here, basically we have defined a simple representation of Backstage’s catalog entities such as metadata, systems and templates. This will make serialization/deserialization from Backstage’s backend API straightforward and we can expose through our MCP server, so copilots can query “what templates exist?” or “which systems are defined?” without us manually hardcoding anything.
Now let’s create another folder called “Services” and start defining “BackstageService.cs” inside it. This is the place where we will connect these models to Backstage’s API so our MCP server can actually fetch live catalog data.
using System.Net.Http.Json;

public interface IBackstageService
{
    Task ListTemplatesAsync();
    Task ListSystemsAsync();
}

public class BackstageService(IHttpClientFactory httpClientFactory) : IBackstageService
{
    public async Task ListTemplatesAsync()
    {
        try
        {
            var _httpClient = httpClientFactory.CreateClient("BackstageClient");
            var response = await _httpClient.GetAsync("/api/catalog/entities?filter=kind=Template");

            response.EnsureSuccessStatusCode();

            var templates = await response.Content.ReadFromJsonAsync<List<BackstageTemplate>>();

            return templates ?? [];
        }
        catch
        {
            return [];
        }
    }

    public async Task ListSystemsAsync()
    {
        try
        {
            var _httpClient = httpClientFactory.CreateClient("BackstageClient");
            var response = await _httpClient.GetAsync("/api/catalog/entities?filter=kind=System");

            response.EnsureSuccessStatusCode();

            var systems = await response.Content.ReadFromJsonAsync<List<BackstageSystem>>();

            return systems ?? [];
        }
        catch
        {
            return [];
        }
    }
}
Here we simply use HttpClient to call Backstage’s backend API endpoints. This allows our MCP server to fetch templates and systems in real time. Depending on the needs of your organization, these capabilities can be extended further. For example to automatically scaffold new resources or integrate with additional internal services.
Now that our service layer is in place, we can start defining our MCP tool, which is a semantic interface that acts as a bridge between LLM applications and our system’s actionable capabilities. In other words, this is where we expose Backstage operations (like listing templates and systems) in a way that an LLM can understand and invoke.
Let’s create a new folder called “McpTools” and create “BackstageTool.cs” inside it.
using System.ComponentModel;
using ModelContextProtocol.Server;

[McpServerToolType]
public class BackstageTool(IBackstageService backstageService)
{
    [McpServerTool, Description("Lists all available Backstage software templates with their metadata and spec such as title, description, owner, lifecycle of the template and all parameters that are required to run this template to scaffold a new component.")]
    public async Task<List<BackstageTemplate>> ListTemplatesAsync()
    {
        try
        {
            return await backstageService.ListTemplatesAsync();
        }
        catch
        {
            return [];
        }
    }

    [McpServerTool, Description("Lists all available Backstage systems from the software catalog. Systems represent a collection of resources and components that work together to deliver business functionality with metadata such as name, title, description, owner and domain information.")]
    public async Task<List<BackstageSystem>> ListSystemsAsync()
    {
        try
        {
            return await backstageService.ListSystemsAsync();
        }
        catch
        {
            return [];
        }
    }
}
Here we have defined our MCP tool methods that delegate calls to the service layer. By doing this, we are allowing LLMs to directly invoke Backstage’s backend APIs through the MCP protocol to list templates and systems on demand.
We have also marked the class with the “[McpServerToolType]” attribute so the MCP runtime can discover and register the tool methods. We have also added the “[McpServerTool]” attribute to each method we want to expose to the LLMs.
Additionally, we have added a “Description” attribute to each tool method. It serves as the semantic contract between your MCP server and the LLM. So, a well written description ensures that the LLM can understand the tool’s purpose, parameters and expected responses.
We are almost done. Now let’s have the “Program.cs” like below:
using Microsoft.Extensions.DependencyInjection;
using Microsoft.Extensions.Hosting;
using Microsoft.Extensions.Logging;

var builder = Host.CreateApplicationBuilder(args);
builder.Logging.AddConsole(consoleLogOptions =>
{
    consoleLogOptions.LogToStandardErrorThreshold = LogLevel.Trace;
});

builder.Services
    .AddMcpServer()
    .WithStdioServerTransport()
    .WithToolsFromAssembly();

builder.Services.AddHttpClient("BackstageClient", client =>
{
    client.BaseAddress = new Uri("http://localhost:7007");
    client.DefaultRequestHeaders.Add("Authorization", "Bearer 2SNWBsDxv9KqB+YkQ3eUG6kiSCfr5yeG");
});

builder.Services.AddSingleton<IBackstageService, BackstageService>();

await builder.Build().RunAsync();
Here we first configure the MCP server by calling ”.AddMcpServer()“. This wires up the MCP server and automatically discovers our MCP tools from the current assembly.
Then we register our “IBackstageService” and since this is a service to service communication, we keep it simple by using the static token approach as described in Backstage’s docs.
In the “app-config.yaml” file of Backstage. we simply need to enable static token for external access.
backend:
  auth:
    externalAccess:
      - type: static
        options:
          token: 2SNWBsDxv9KqB+YkQ3eUG6kiSCfr5yeG
          subject: backstage-mcp
And that’s all.
With this setup in place, we can now test our MCP server directly from VS Code using GitHub Copilot’s agent mode.
Testing with VS Code using GitHub Copilot Agent Mode
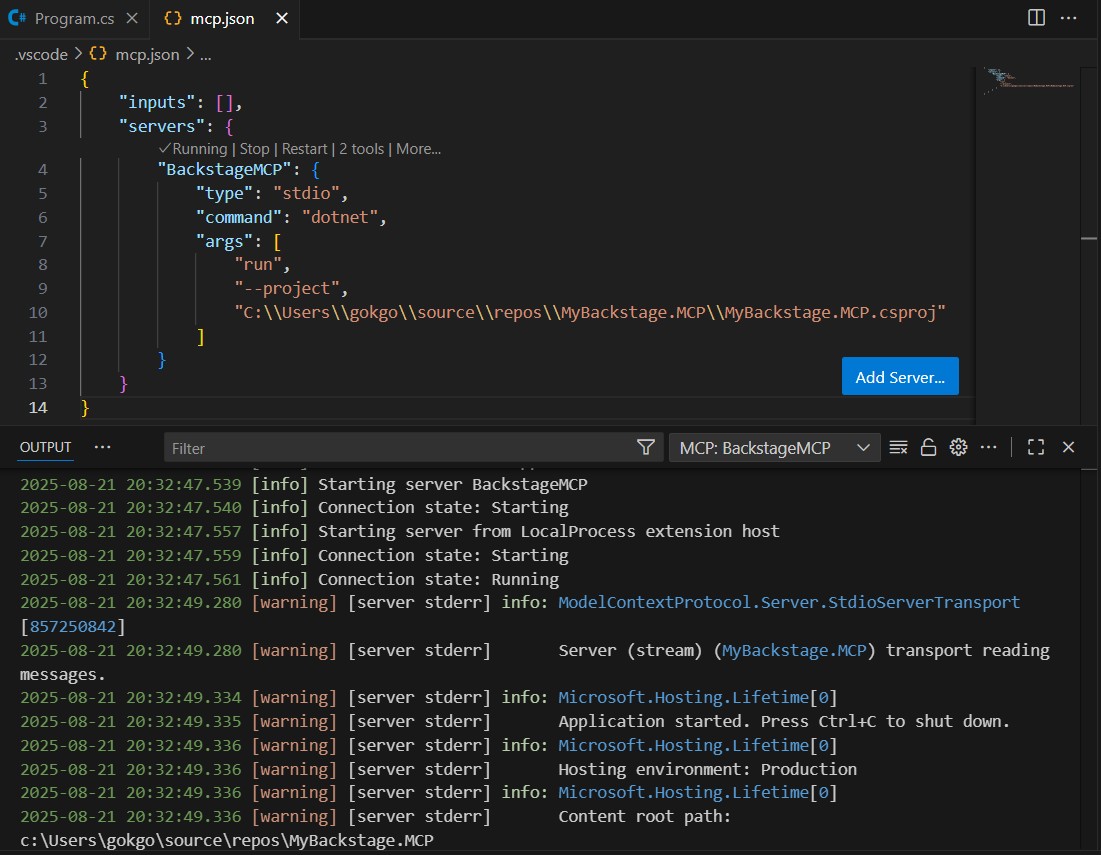
Thanks to VS Code’s built-in MCP support, we can interact with our Backstage MCP tools without additional setup. The only thing we need to do is create a “mcp.json” file inside the “.vscode” folder.
{
    "inputs": [],
    "servers": {
        "BackstageMCP": {
            "type": "stdio",
            "command": "dotnet",
            "args": [
                "run",
                "--project",
                "YOUR_PATH\\MyBackstage.MCP\\MyBackstage.MCP.csproj"
            ]
        }
    }
}
Once we define our “BackstageMCP” server, a start button will appear in VS Code where we can easily launch it. Let’s click on it! Also don’t forget that your Backstage app must be up and running, otherwise the MCP server won’t be able to communicate with it.
After starting, we should see logs in the VS Code output confirming that the MCP server is active and waiting for requests.
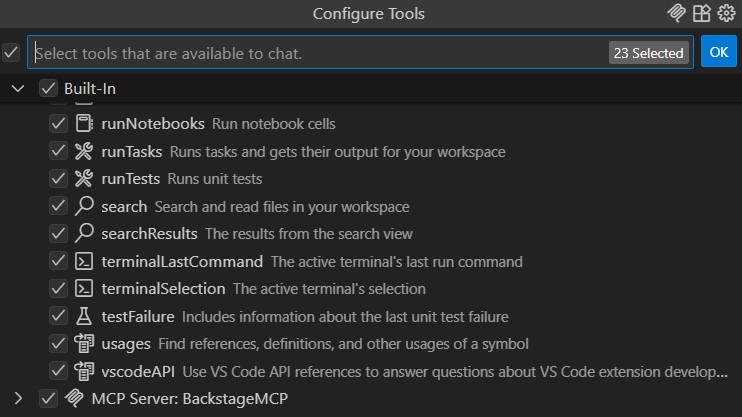
Let’s also make sure that our “BackstageMCP” server is available in the tools list. We can check this by clicking on the “Configure tools” icon in the copilot chat window. If everything is configured correctly, we should see “BackstageMCP” listed there.
Now, we can start sending prompts to GitHub Copilot and see how it interacts with our Backstage instance through our MCP.
Let’s start with a simple one: “Show me the available software templates in my Backstage instance?”
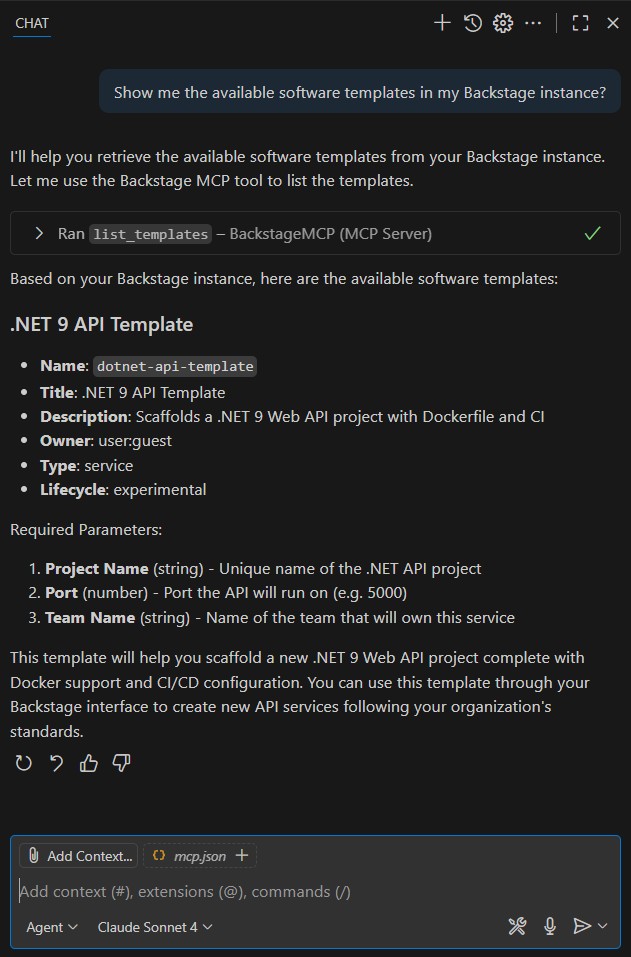
As we can see, GitHub Copilot successfully communicated with our “BackstageMCP” server and retrieved the list of available software templates. These are the same templates we previously registered in the Backstage software catalog.
Now, just imagine I’m a developer who has newly joined the “OMS Team” and I’m curious to know which systems we own. With copilot, I can simply ask: “What are the available systems owned by the OMS team in my Backstage instance?”
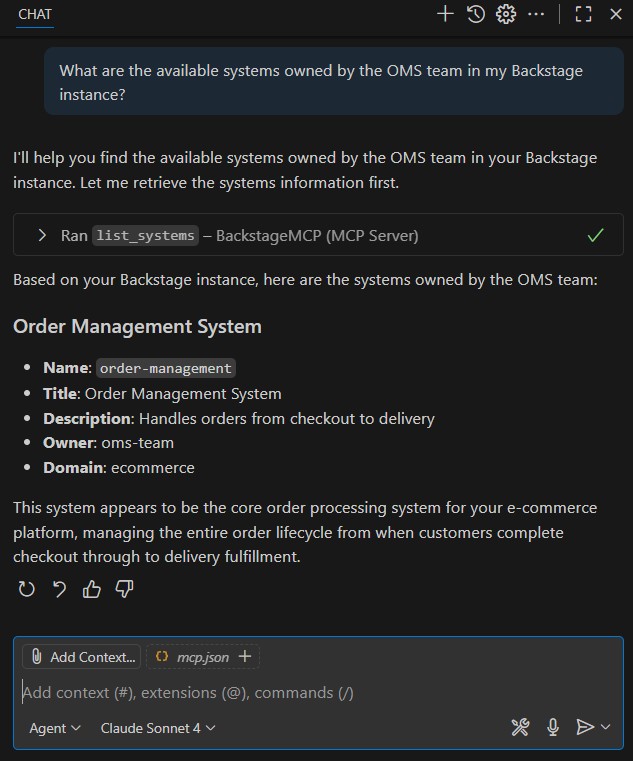
We can see how seamlessly Copilot interacts with our “BackstageMCP” server to surface organizational knowledge. As a developer, I don’t need to search through documentation, ping teammates or navigate multiple catalogs. Instead, I can simply ask a natural question and instantly get the list of systems our team owns.
This highlights the real power of Backstage’s system modeling. Everything in our software ecosystem from domains and systems to teams, templates, and components is represented in a structured and connected way. When combined with copilot, this catalog becomes conversational and actionable. The result is improved developer productivity, faster onboarding for new team members and a smoother way for teams to operate in harmony with the broader engineering ecosystem.
Wrapping Up
Backstage combined with copilot, turns system knowledge into something that is not only structured but also easy to explore and act on. By making our ecosystem both transparent and conversational, we help developers move faster, collaborate better and keep the entire engineering organization in sync.
I have tried to show how we can organize our catalog and how to create a simple MCP server with C# SDK. Hopefully, this gives some ideas on how you can bring similar improvements to your own setup.
References
https://devblogs.microsoft.com/dotnet/build-a-model-context-protocol-mcp-server-in-csharp/
https://backstage.io/docs/features/software-catalog/system-model/
https://code.visualstudio.com/blogs/2025/05/12/agent-mode-meets-mcp
İlk Yorumu Siz Yapın