
Nowadays wherever I look, everyone talks about AI coding agents, agentic systems or LLM powered applications and so on. It has been almost a year that I have been working on different domains where we integrate LLMs into our applications, as well as getting my hands dirtier by integrating AI assisted coding practices into our SDLC lifecycles.
To be honest, after spending some time with these, I really liked the new way of working and how these tools make things simpler compared to what and how we used to build. Lately, I have been also playing with Microsoft’s newAgent Framework after spending some time with Semantic Kernel before, and I must say, Microsoft plays the game very well! I really liked how much it simplifies the experience compared to Semantic Kernel although since it is still quite new and evolving, the documentation and community resources are not as mature yet.
What I also liked is that Microsoft Agent Framework (MAF) does not just give us an agent runner. It comes with building blocks we actually need in real projects. Model clients for chat completions, session management for state, context providers for memory, middleware for intercepting and observing agent actions and MCP clients for tool integration. We are not starting from scratch or gluing things together ourselves, the foundation is already there.
In this article, I will try to show how we can build a simple but practical AI agent using MAF. The agent we will build is a product search assistant that uses deterministic routing as the backbone and an intelligent search capability powered by Azure AI Search as the RAG store where MAF’s agent automatically handles the reasoning loop internally.
Let’s Get Our Hands Dirtier
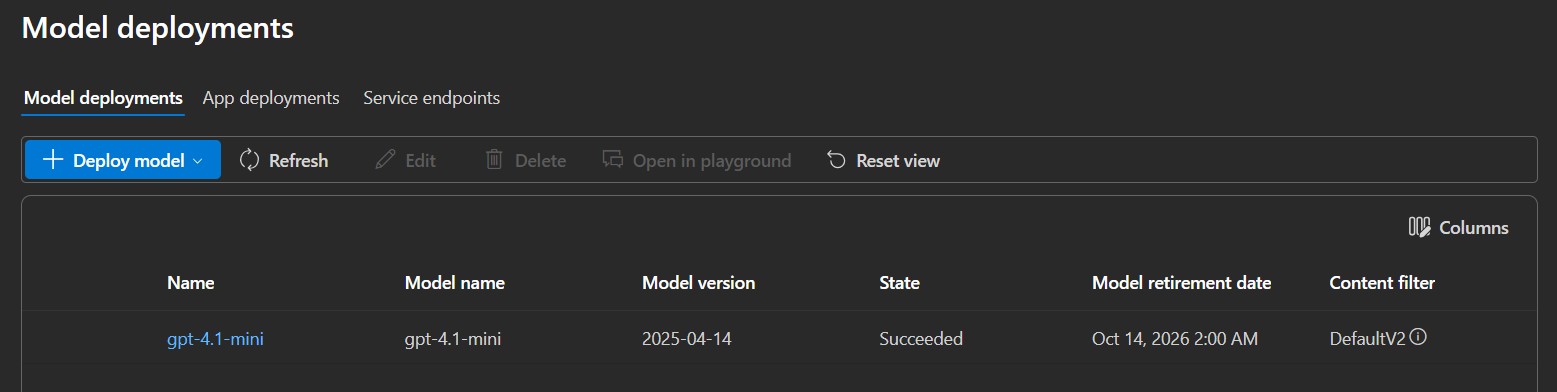
Before getting into the code, there are two Azure services we need to have ready. The first one is Azure OpenAI with a model deployed. I used “gpt-4.1-mini” for this article which is lightweight and more than capable for intent classification and tool-based reasoning. If you don’t have one yet, you can follow this guide to create a resource and deploy a model and keep keys, endpoints and deployed model names somewhere handy.
The second one is Azure AI Search, which will serve as our RAG store, the place where our agent will look up products. You can also follow this guide to create a free tier instance and again keep key and endpoint information.
So, we are going to build a minimal product search assistant exposed as a REST API. A user sends a natural language query, the agent classifies the intent, routes to the
right executor and the search agent retrieves and reasons over matching products from Azure AI Search. The interesting part is how we wire all of this together with deterministic routing for control and an agentic reasoning loop for the intelligent part which MAF handles for us automatically under the hood.
First, let’s create a minimal .NET API project by running the following command.
dotnet new webapi -n ProductSearchAgentAfter that do a quick cleanup of the default template files and create the following folders inside the project: “Data“, “Executors“, “Models“, “Prompts” and “Tools“.
Our folder structure should now look like this:
ProductSearchAgent
    ├── Data
    ├── Executors
    ├── Models
    ├── Prompts
└── ToolsThen, let’s add the required packages from NuGet.
dotnet add package Microsoft.Agents.AI.OpenAI --prerelease
dotnet add package Microsoft.Agents.AI.Workflows --prerelease
dotnet add package Azure.AI.OpenAI --prerelease
dotnet add package Azure.Search.Documents
dotnet add package Azure.Identity“Microsoft.Agents.AI.OpenAI” is the core MAF package that brings the agent implementation. “Microsoft.Agents.AI.Workflows” adds the workflow and routing support.
Defining the Models
Now let’s start by defining the models inside the “Models” folder.
First, let’s create IntentResult class.
using System.Text.Json.Serialization;

namespace ProductSearchAgent.Models;

public sealed class IntentResult
{
    [JsonPropertyName("intent")]
    public string Intent { get; set; } = string.Empty;

    [JsonIgnore]
    public string OriginalQuery { get; set; } = string.Empty;
}This is what the classifier agent is going to return. The “Intent” property will be deserialized from the agent’s JSON response, so we map it explicitly. The “OriginalQuery” is marked with [JsonIgnore] because we will set it manually later on after deserialization, it is just a way to carry the user’s original query forward through the workflow.
Next, let’s create SearchAgentResponse class.
namespace ProductSearchAgent.Models;

public class SearchAgentResponse
{
    public string Answer { get; set; } = string.Empty;
    public string Route { get; set; } = string.Empty;
}This will be the final output of the workflow, the answer the API returns to the caller. “Route” also tells us which path was taken, which is useful for debugging and observability.
Last but not least, let’s create UserQuery.
public record UserQuery(string Query);Designing the Prompts
Let’s create AgentPrompts class inside the “Prompts” folder.
namespace ProductSearchAgent.Prompts;

public static class AgentPrompts
{
    public const string IntentClassifier = """
        You are an intent classifier for a product search system.
        Classify the user query into exactly one intent.

        Intents:
        - "search": user wants to find, compare, or ask about products (e.g. laptops, phones, accessories)
        - "unknown": anything else (greetings, off-topic, non-product questions)

        Rules:
        - Always respond with valid JSON only
        - Do not include any explanation or extra text

        Response format: {"intent": "search"} or {"intent": "unknown"}
        """;

    public const string ProductSearch = """
        You are a product search assistant for an electronics store.
        Your job is to help users find products from our catalog.

        When you receive a query:
        1. Call the SearchProducts tool using the user's actual search keywords (e.g. "laptop", "gaming laptop", "dell xps", "macbook"). Use the words from the query — do not replace them with generic category names like "electronics".
        2. Summarize the results focusing on what the user asked for, including price and key specs
        3. If the user mentioned a price constraint, filter results by that price range when summarizing

        Rules:
        - Be concise and focus on facts from the search results
        - Do not make up products that were not returned by the search tool
        - If no results are found, let the user know and suggest broadening their search
        - Always mention price and key specs when presenting products
        """;
}
The important point here is how differently the two prompts are designed.
The “IntentClassifier” prompt is fully deterministic, we try our best here not to give the agent any room for creativity. We tell it exactly what intents exist, the exact JSON format to return and that no explanation or extra text is allowed. Together, these constraints make the classifier output predictable and safe to deserialize.
The “ProductSearch” prompt is intentionally more open because we want the agent to reason, so we guide it rather than constrain it. The most important thing here is step one, telling the agent to use the user’s actual search keywords rather than abstracting them into generic terms.
NOTE: For the purpose of this article, I kept things simple. In a production scenario you would want to add content safety filters, citation-based answers and hard numeric filters on the search side rather than relying on the LLM to apply price or spec constraints during summarization
Defining the Tools
Now it is time to define the tools. In MAF, tools are actually plain C# methods that the agent can call during its reasoning loop to fetch data, trigger actions or interact with external systems. Let’s create ProductSearchTool class inside the “Tools” folder.
using System.ComponentModel;
using Azure.Search.Documents;
using Azure.Search.Documents.Models;

namespace ProductSearchAgent.Tools;

public class ProductSearchTool
{
    private readonly SearchClient _searchClient;

    public ProductSearchTool(SearchClient searchClient)
    {
        _searchClient = searchClient;
    }

    [Description("Search the product catalog for electronics products. Returns matching products with name, description, price, and specifications. Use this when the user is looking for products.")]
    public async Task<string> SearchProducts(
        [Description("Plain keyword search terms from the user's request, e.g. 'laptop', 'gaming laptop', 'dell xps', 'macbook'.")] string query)
    {
        var options = new SearchOptions
        {
            Size = 5,
            Select = { "name", "description", "price", "category", "brand", "specifications" }
        };

        Console.WriteLine($"ProductSearchTool: SearchProducts called with query: \"{query}\"");
        var results = await _searchClient.SearchAsync<SearchDocument>(query, options);
        var products = new List<string>();

        await foreach (var result in results.Value.GetResultsAsync())
        {
            var doc = result.Document;
            string Get(string key) => doc.TryGetValue(key, out var v) ? v?.ToString() ?? "" : "";

            products.Add($"Product: {Get("name")} | Brand: {Get("brand")} | Category: {Get("category")} | Price: ${Get("price")} | Description: {Get("description")}");
        }

        if (products.Count == 0)
            return "No products found matching the search query.";

        var names = products
            .Select(p => p.Split('|')[0].Replace("Product: ", "").Trim())
            .ToList();
        Console.WriteLine($"ProductSearchTool: {products.Count} products found: {string.Join(", ", names)}");

        return string.Join("\n", products);
    }
}Here we simply wrap the Azure AI Search SDK. The “[Description]” attributes on the method and the query parameter are the important things here, because when we register this tool with the agent, MAF uses these descriptions to build the function schema that gets sent to the model. In short, the better the description, the better the agent understands when and how to call the tool. This is where prompt engineering and tool design meet.
Now, let’s also add a small “IChatClient” middleware to observe what happens inside the agent’s reasoning loop.
using Microsoft.Extensions.AI;

namespace ProductSearchAgent.Tools;

public class AgentLoggingMiddleware(IChatClient inner) : DelegatingChatClient(inner)
{
    public override async Task<ChatResponse> GetResponseAsync(
        IEnumerable<ChatMessage> messages, ChatOptions? options = null, CancellationToken cancellationToken = default)
    {
        var response = await base.GetResponseAsync(messages, options, cancellationToken);

        foreach (var msg in response.Messages)
            foreach (var call in msg.Contents.OfType<FunctionCallContent>())
            {
                var args = call.Arguments?.Select(a => $"{a.Key}: {a.Value}") ?? [];
                Console.WriteLine($"AgentLoggingMiddleware: LLM decided to call {call.Name}({string.Join(", ", args)})");
            }

        return response;
    }
}With this middleware we can intercept every LLM call and inspect the response for “FunctionCallContent“, which is the model’s tool call decision.
Executors
In MAF, an executor is the unit of work inside a workflow. Each executor receives a typed input, does its job and returns a typed output. That typed contract is what allows MAF to wire executors together and route between them cleanly.
Let’s start with IntentClassifierExecutor class first inside the “Executors” folder.
using System.Text.Json;
using Microsoft.Agents.AI;
using Microsoft.Agents.AI.Workflows;
using Microsoft.Extensions.AI;
using ProductSearchAgent.Models;

namespace ProductSearchAgent.Executors;

public class IntentClassifierExecutor : Executor<ChatMessage, IntentResult>
{
    private readonly AIAgent _agent;

    public IntentClassifierExecutor(AIAgent agent) : base("IntentClassifierExecutor")
    {
        _agent = agent;
    }

    public override async ValueTask<IntentResult> HandleAsync(
        ChatMessage message, IWorkflowContext context, CancellationToken cancellationToken = default)
    {
        var response = await _agent.RunAsync(message, cancellationToken: cancellationToken);
        var result = JsonSerializer.Deserialize<IntentResult>(response.Text) ?? new IntentResult { Intent = "unknown" };
        result.OriginalQuery = message.Text ?? string.Empty;

        Console.WriteLine($"IntentClassifierExecutor: Routed to \"{result.Intent}\" | Query: \"{result.OriginalQuery}\"");
        return result;
    }
}This executor receives a “ChatMessage” from the caller, runs it through the classifier agent and deserializes the JSON response into an “IntentResult” that we defined. The important point here is the last line before the return. We copy the original user query into “result.OriginalQuery“. Because the workflow only passes the typed output forward, we store the original query here so the next executor can still read it. As far as i can see, MAF also provides an “IWorkflowContext” for shared state across executors, but I couldn’t make it work for some reason in this RC version.
Now let’s define ProductSearchExecutor class.
using Microsoft.Agents.AI;
using Microsoft.Agents.AI.Workflows;
using ProductSearchAgent.Models;

namespace ProductSearchAgent.Executors;
public class ProductSearchExecutor : Executor<IntentResult, SearchAgentResponse>
{
    private readonly AIAgent _agent;

    public ProductSearchExecutor(AIAgent agent) : base("ProductSearchExecutor")
    {
        _agent = agent;
    }

    public override async ValueTask<SearchAgentResponse> HandleAsync(
        IntentResult message, IWorkflowContext context, CancellationToken cancellationToken = default)
    {
        var response = await _agent.RunAsync(message.OriginalQuery, cancellationToken: cancellationToken);
        Console.WriteLine($"ProductSearchExecutor: Final answer: {response.Text}");

        return new SearchAgentResponse
        {
            Answer = response.Text,
            Route = "search"
        };
    }
}Here, we simply take the “IntentResult” we received, read “OriginalQuery” and pass it directly to the search agent. The executor then wraps the agent’s response in a “SearchAgentResponse” and returns it as the final output of the workflow.
As we can also see, both executors keep a reference to an “AIAgent” instance. “AIAgent” is MAF’s base abstraction for all AI agents. It handles the underlying chat client, system prompt and tool configuration so our executors stay focused on their own logic.
Wiring the Workflow
In many AI applications, the LLM decides what happens next. We describe the available paths in a prompt and let the model choose. This works well for open ended conversations and it brings autonomy but also unpredictability. In our case, we want the opposite. When the intent is search, we always run the search executor. No exceptions, no surprises.
In enterprise environments, we sometimes need to trade autonomy for predictability. Not every AI agent needs to be fully autonomous I would say and knowing exactly which path runs under which condition is often more valuable than flexibility. In short, in our use case here, the workflow acts as a deterministic orchestration layer on top of the agents that gives us control where we need it while letting the agents stay autonomous where they add value.
MAF workflows give us that guarantee. A workflow is a directed graph of executors connected by edges. Each edge has a typed condition and MAF evaluates it at runtime to decide which executor runs next. The routing here is code, not a prompt, which makes it deterministic, testable and easy to reason about.
With that in mind, let’s now wire everything together in “Program.cs“.
using Azure;
using Azure.AI.OpenAI;
using Azure.Search.Documents;
using Microsoft.Agents.AI;
using Microsoft.Agents.AI.Workflows;
using Microsoft.Extensions.AI;
using ProductSearchAgent.Executors;
using ProductSearchAgent.Models;
using ProductSearchAgent.Prompts;
using ProductSearchAgent.Tools;

var builder = WebApplication.CreateBuilder(args);

// Azure OpenAI configuration
var azureOpenAiEndpoint = builder.Configuration["AzureOpenAI:Endpoint"]!;
var chatDeployment = builder.Configuration["AzureOpenAI:ChatDeployment"]!;
var azureOpenAiKey = builder.Configuration["AzureOpenAI:ApiKey"];

// Azure AI Search configuration
var searchEndpoint = builder.Configuration["AzureAISearch:Endpoint"]!;
var searchKey = builder.Configuration["AzureAISearch:ApiKey"]!;
var searchIndex = builder.Configuration["AzureAISearch:IndexName"]!;

// Create OpenAI chat client
var openAiClient = new AzureOpenAIClient(new Uri(azureOpenAiEndpoint), new AzureKeyCredential(azureOpenAiKey!));

// Middleware intercepts the LLM's tool-call decision
var chatClient = openAiClient.GetChatClient(chatDeployment)
    .AsIChatClient()
    .AsBuilder()
    .Use(inner => new AgentLoggingMiddleware(inner))
    .Build();

// Create the search tool
var searchClient = new SearchClient(new Uri(searchEndpoint), searchIndex, new AzureKeyCredential(searchKey));
var searchTool = new ProductSearchTool(searchClient);

// Create agents with their prompts and tools
AIAgent classifierAgent = new ChatClientAgent(chatClient, new ChatClientAgentOptions
{
    ChatOptions = new()
    {
        Instructions = AgentPrompts.IntentClassifier,
        ResponseFormat = ChatResponseFormat.ForJsonSchema<IntentResult>()
    }
});

AIAgent searchAgent = new ChatClientAgent(chatClient, new ChatClientAgentOptions
{
    ChatOptions = new()
    {
        Instructions = AgentPrompts.ProductSearch,
        Tools = [AIFunctionFactory.Create(searchTool.SearchProducts)]
    }
});

// Create executors for each agent
var classifierExecutor = new IntentClassifierExecutor(classifierAgent);
var searchExecutor = new ProductSearchExecutor(searchAgent);

// Build the workflow: classifier routes to search
var workflow = new WorkflowBuilder(classifierExecutor)
    .AddEdge<IntentResult>(classifierExecutor, searchExecutor,
        condition: result => result is not null && result.Intent == "search")
    .WithOutputFrom(searchExecutor)
    .Build();

var app = builder.Build();

app.MapGet("/api/search", async ([AsParameters] UserQuery request) =>
{
    await using var run = await InProcessExecution.RunStreamingAsync(
        workflow,
        new ChatMessage(ChatRole.User, request.Query));

    await run.TrySendMessageAsync(new TurnToken(emitEvents: true));

    SearchAgentResponse? response = null;
    await foreach (var evt in run.WatchStreamAsync())
    {
        if (evt is WorkflowOutputEvent outputEvent && outputEvent.Is<SearchAgentResponse>(out var agentResponse))
            response = agentResponse;
    }

    return response;
});

app.Run();The first thing we do is create the “AzureOpenAIClient” using an API key, then build the “IChatClient” pipeline and plug in our “AgentLoggingMiddleware“.
Then we create two “ChatClientAgent” instances which is MAF’s concrete implementation of “AIAgent“.
The important point here is how differently they are configured. The classifier agent gets “ChatResponseFormat.ForJsonSchema<IntentResult>()“, which enforces structured JSON output at the model level. The search agent gets no response format constraint but receives the search tool registered via “AIFunctionFactory.Create(searchTool.SearchProducts)“.
We then wrap both agents in their executors and build the workflow as follows:
var workflow = new WorkflowBuilder(classifierExecutor)
    .AddEdge<IntentResult>(classifierExecutor, searchExecutor,
        condition: result => result is not null && result.Intent == "search")
    .WithOutputFrom(searchExecutor)
.Build();We start with classifierExecutor as the entry point add an edge that fires when Intent == “search” and declare searchExecutor as the output source. That single “AddEdge” call is where the deterministic routing lives.
The API endpoint is straightforward. We wrap the workflow in an “InProcessExecution“, pass the user query as a “ChatMessage” and stream the workflow events. We watch for a
“WorkflowOutputEvent” carrying a “SearchAgentResponse” and return it as the HTTP response.
Let’s Seed the Search Index
Before we can run the agent, we need some data in our Azure AI Search index. Let’s create SearchIndexSeeder class inside the “Data” folder.
using Azure;
using Azure.Search.Documents;
using Azure.Search.Documents.Indexes;
using Azure.Search.Documents.Indexes.Models;
using Azure.Search.Documents.Models;

namespace ProductSearchAgent.Data;

public static class SearchIndexSeeder
{
    public static async Task SeedAsync(string endpoint, string apiKey, string indexName)
    {
        var credential = new AzureKeyCredential(apiKey);
        var indexClient = new SearchIndexClient(new Uri(endpoint), credential);
        var searchClient = new SearchClient(new Uri(endpoint), indexName, credential);

        await CreateIndexAsync(indexClient, indexName);
        await UploadProductsAsync(searchClient);

        Console.WriteLine("Seeding complete.");
    }

    private static async Task CreateIndexAsync(SearchIndexClient indexClient, string indexName)
    {
        var index = new SearchIndex(indexName)
        {
            Fields =
            [
                new SimpleField("id", SearchFieldDataType.String) { IsKey = true },
                new SearchableField("name"),
                new SearchableField("description"),
                new SearchableField("brand"),
                new SearchableField("category"),
                new SimpleField("price", SearchFieldDataType.Double),
                new SearchableField("specifications"),
            ]
        };

        await indexClient.CreateOrUpdateIndexAsync(index);
        Console.WriteLine($"Index '{indexName}' created or updated.");
    }

    private static async Task UploadProductsAsync(SearchClient searchClient)
    {
        var products = new[]
        {
            new SearchDocument
            {
                ["id"] = "1",
                ["name"] = "Dell XPS 15",
                ["brand"] = "Dell",
                ["category"] = "Laptop",
                ["price"] = 1499.99,
                ["description"] = "15.6-inch premium laptop with OLED display, ideal for professionals and creators.",
                ["specifications"] = "Intel Core i7-13700H, 16GB RAM, 512GB SSD, NVIDIA RTX 4060, 15.6\" OLED 3.5K"
            },
            new SearchDocument
            {
                ["id"] = "2",
                ["name"] = "Apple MacBook Pro 14",
                ["brand"] = "Apple",
                ["category"] = "Laptop",
                ["price"] = 1999.99,
                ["description"] = "Compact pro laptop powered by Apple M3 Pro chip with exceptional battery life.",
                ["specifications"] = "Apple M3 Pro, 18GB RAM, 512GB SSD, 14\" Liquid Retina XDR, 18h battery"
            },
            new SearchDocument
            {
                ["id"] = "3",
                ["name"] = "Lenovo ThinkPad X1 Carbon",
                ["brand"] = "Lenovo",
                ["category"] = "Laptop",
                ["price"] = 1349.00,
                ["description"] = "Ultra-light business laptop built for durability and long battery life.",
                ["specifications"] = "Intel Core i5-1335U, 16GB RAM, 256GB SSD, 14\" IPS FHD, 15h battery, 1.12kg"
            },
            new SearchDocument
            {
                ["id"] = "4",
                ["name"] = "ASUS ROG Strix G16",
                ["brand"] = "ASUS",
                ["category"] = "Gaming Laptop",
                ["price"] = 1799.00,
                ["description"] = "High-performance gaming laptop with fast refresh rate display and powerful GPU.",
                ["specifications"] = "Intel Core i9-13980HX, 32GB RAM, 1TB SSD, NVIDIA RTX 4070, 16\" QHD 240Hz"
            },
            new SearchDocument
            {
                ["id"] = "5",
                ["name"] = "Acer Aspire 5",
                ["brand"] = "Acer",
                ["category"] = "Laptop",
                ["price"] = 599.99,
                ["description"] = "Budget-friendly everyday laptop great for students and light work.",
                ["specifications"] = "AMD Ryzen 5 7530U, 8GB RAM, 512GB SSD, 15.6\" FHD IPS"
            }
        };

        var batch = IndexDocumentsBatch.Upload(products);
        await searchClient.IndexDocumentsAsync(batch);
        Console.WriteLine($"Uploaded {products.Length} products.");
    }
}Here, we create the index with the fields our search tool expects, then upload five sample laptops. To run it, we just need to put the following two lines after the Azure AI
Search configuration section in “Program.cs” and run the project once, but we will come back to this after we define our endpoints and keys in “appsettings.json”.
await SearchIndexSeeder.SeedAsync(searchEndpoint, searchKey, searchIndex);
return;Configuration
Here is the “appsettings.json” file we need:
{
  "Logging": {
    "LogLevel": {
      "Default": "Information",
      "Microsoft.AspNetCore": "Warning"
    }
  },
  "AllowedHosts": "*",
  "AzureOpenAI": {
    "Endpoint": "https://YOUR_ENDPOINT.openai.azure.com",
    "ChatDeployment": "gpt-4.1-mini",
    "ApiKey": "YOUR_API_KEY"
  },
  "AzureAISearch": {
    "Endpoint": "https://YOUR_ENDPOINT.search.windows.net",
    "ApiKey": "YOUR_API_KEY",
    "IndexName": "products"
  }
}
Let’s Run the Agent!
First, let’s seed the index. Run the project and you should see:
Index 'products' created or updated.
Uploaded 5 products.
Seeding complete.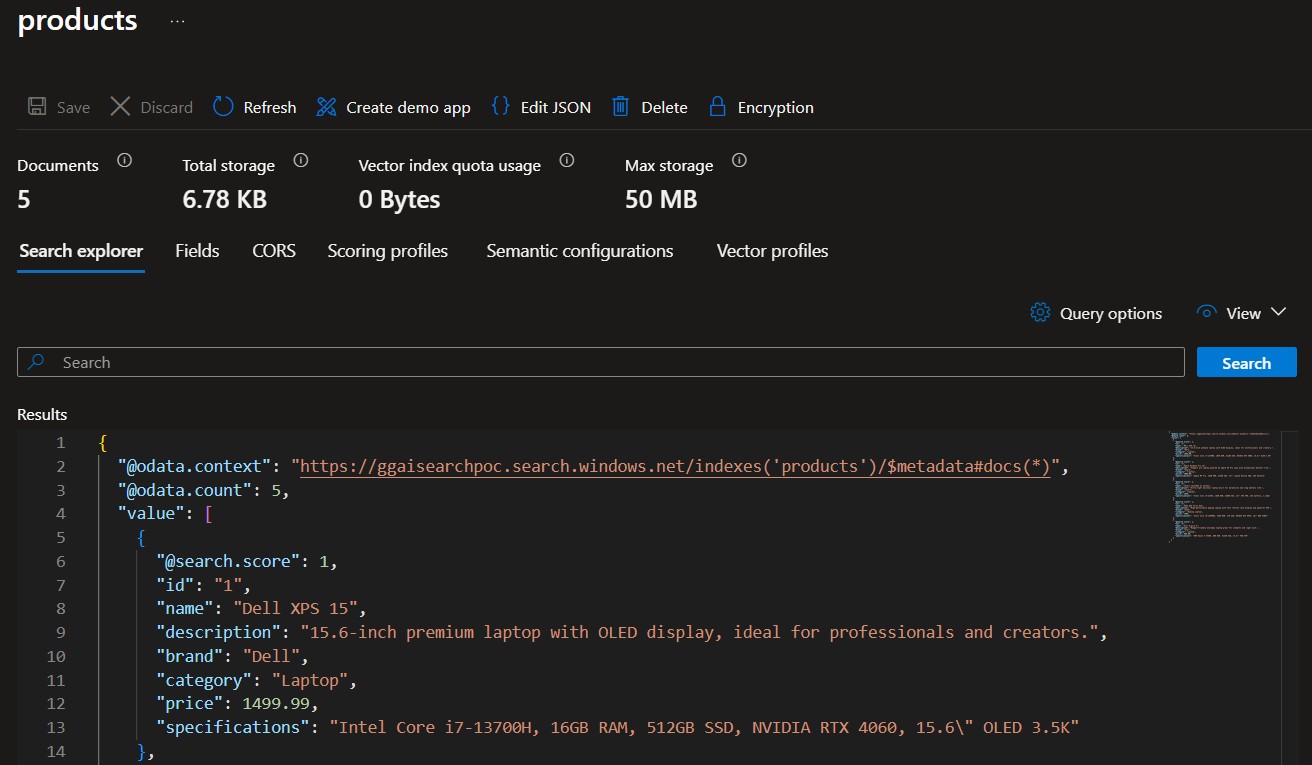
Once we have data, let’s start the API and send a query like “laptop under 1500 with at least 16gb ram“.
GET /api/search?query=laptop under 1500 with at least 16gb ramThis is the response I got:
{
  "answer": "I found some laptops under $1500 with at least 16GB RAM:\n\n1. Dell XPS 15 - $1499.99: 15.6-inch premium OLED display, suitable for professionals and creators.\n2. Lenovo ThinkPad X1 Carbon - $1349: Ultra-light business laptop known for durability and long battery life.\n3. Acer Aspire 5 - $599.99: Budget-friendly, good for students and light work.\n\nWould you like details on any of these?",
  "route": "search"
}The agent correctly identified three laptops matching the criteria and filtered out the ones above “$1500” or with less than “16GB” RAM. Notice the route field confirms the workflow took the “search” path.
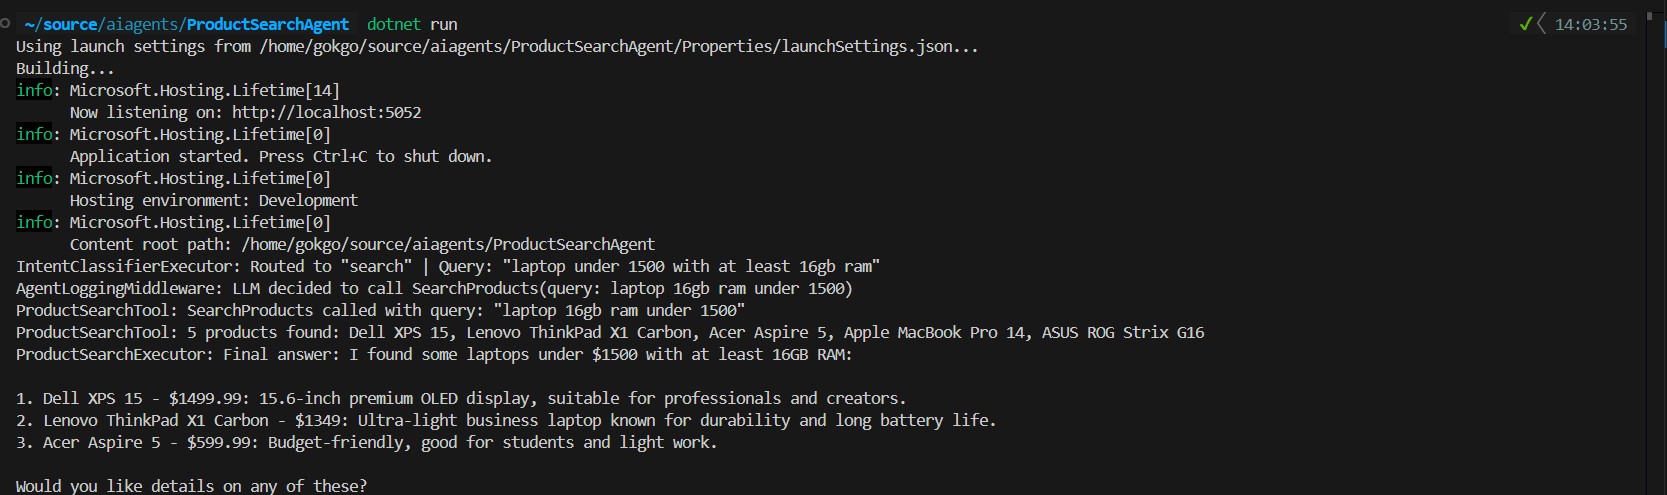
And here is what the console trace looks like behind the scenes. We can see the classifier routing the intent, then our middleware capturing the moment the LLM decides to call the search tool. From that point, “ChatClientAgent” takes over its internal reasoning loop, the tool executes, results come back, and the LLM reasons over them to assemble the final answer.
Let’s Wrap Up
I tried my best to cover a lot of ground here with the RC version of MAF. As I keep playing and learning this framework, I wanted to share what we can build with it. Models, prompts, tools, executors, a workflow all wired together to get a product search agent that is predictable where it needs to be and intelligent where it has to be. The framework is still in preview and some rough edges exist, but I would say the patterns are already practical enough to build on.
There is still a lot to explore, prompt engineering alone deserves its own article, and things like content safety filters and citation-based answering are worth covering separately as well.
Full source code is available on GitHub: GokGokalp/ai-agent-implementation-in-dotnet: Sample AI Agent implementation with Microsoft Agent Framework
PS: This article was written by me and reviewed with the help of AI tools for grammar and clarity.
References
https://learn.microsoft.com/en-us/azure/search/
https://learn.microsoft.com/en-us/azure/ai-services/openai/
https://github.com/Microsoft/Agents-for-net
https://learn.microsoft.com/en-us/agent-framework/overview/?pivots=programming-language-csharp
Be First to Comment