In the first part of the article, we talked the importance of Software Supply Chain security and the measures that can be taken throughout the SDLC processes to mitigate the security risks of containerized applications. In this context, we emphasized the importance of the shifting-left approach, highlighting the benefits of integrating various security elements into the early stages of SDLC processes as much as possible, and the measures we can take to ensure reliability, integrity, and security within the software supply chain.
If you haven’t read the first part of the article yet, I suggest that you read it first to have a better understanding the topic.
In this part of the article, we will discuss how to declaratively define various policies using OPA Gatekeeper and Ratify in a kubernetes environment, enforce these policies during the deployment of containerized applications, and achieve automated governance.
NOTE: In this article, I will assume that we have a v1.20+ kubernetes environment.
OPA Gatekeeper & Ratify
If you have never heard of Open Policy Agent (OPA) before, it is a general-purpose open-source policy engine that allows us to define various policies as code using a declarative query language called Rego. For more details, I strongly recommend taking a look here. Gatekeeper, on the other hand, is an admission controller webhook for kubernetes that uses the OPA constraint framework to define and enforce various policies as ConstraintTemplates.

Before making containerized applications functional in a kubernetes environment, we can intercept the admission request on the API server side using Gatekeeper to check for compliance with defined policies, enforce them accordingly, and thereby strengthen software supply chain security and the governance model at the infrastructure level.
Ratify is another open-source project that helps us verify supply chain artifacts in the container security supply chain field. Although Ratify is an executable that can run in any environment, it acts as an external data provider for Gatekeeper in kubernetes, allowing us to define and verify policies against the OCI artifact metadata associated with containers.
Action Time!
Let’s Prepare the Gatekeeper
In the first part of the article, we discussed how to verify the software supply chain artifacts and their signatures in the simplest way on the pipeline before deployment, using ORAS and Notation CLI tools. Additionally, while creating these artifacts, we also generated them in specific formats to leverage OPA Gatekeeper and Ratify in this part of the article.
For example, we had created the container security scan results in SARIF format, the SBOM document in SPDX format, and the artifacts signed with Notation in COSE format. Now, let’s see how we can declaratively configure and enforce more specific control policies using Ratify‘s verifier plugins for these artifacts.
First, in order for Ratify to perform the verification and provide feedback to Gatekeeper, it must access the supply chain artifacts associated with the relevant container image through the container registry. In the background, Ratify uses the ORAS tool for this purpose. For this article series, we used Azure Container Registry (ACR) as the container registry. At this point, Ratify provides several authentication provider options to allow ORAS to access the registry. Since I created the related AKS cluster (v1.20+) with ACR integration enabled, I will be using the kubelet identity (managed identity). Alternatively, you can use your own user-assigned managed identity or workload identity options. You can access the relevant options here.
First, we need to install Gatekeeper in the kubernetes environment with the external data feature enabled.
For the sake of simplicity, I will perform the installation of Gatekeeper and Ratify within the CICD template that we used in the previous article. Additionally, in order to use Ratify ‘s built-in Notation plugin for verifying signed artifacts through policies, we need to provide the CA certificate, created by the Notation tool during the signing processes, to Ratify during the installation process. If we had created the certificate in a central location like Azure Key Vault instead of on-the-fly throughout CI, we could have performed the installation steps at different points.
Now, let’s add a new job named “DeployToDev” after the “VerifyArtifacts” job within the stage we created earlier called “Dev“. As the first step in this job, we will download the Notation certificate that we share as a pipeline artifact after the signing processes of the relevant artifacts in the “SigningStage“.
  - job: DeployToDev
    displayName: 'Deploy to Dev'
    dependsOn: VerifyArtifacts
    steps:
    - task: DownloadPipelineArtifact@2
      inputs:
        buildType: 'current'
        artifactName: 'notation'
        downloadPath: '$(Agent.BuildDirectory)/../../.config/notation/localkeys'
    - task: AzureCLI@2
      displayName: 'Prepare OPA Gatekeeper & Ratify'
      inputs:
        azureSubscription: 'DevOpsPoC'
        scriptType: 'bash'
        scriptLocation: 'inlineScript'
        inlineScript: |
          curl https://raw.githubusercontent.com/helm/helm/main/scripts/get-helm-3 | bash

          az aks get-credentials --resource-group YOUR_AKS_RG --name YOUR_AKS_NAME

          helm repo add gatekeeper https://open-policy-agent.github.io/gatekeeper/charts

          helm upgrade --install gatekeeper gatekeeper/gatekeeper --atomic  \
              --namespace gatekeeper-system --create-namespace \
              --set enableExternalData=true \
              --set validatingWebhookTimeoutSeconds=5 \
              --set mutatingWebhookTimeoutSeconds=2 \
              --set externaldataProviderResponseCacheTTL=10s
Then, we perform the installation of Gatekeeper on the relevant AKS cluster via Helm. After the Gatekeeper installation, we can start the installation of Ratify along with the validator plugins we want to use.
Ratify
Verifying the Signatures with Notation
Now, as a continuation of the relevant task, let’s configure the Ratify helm chart as shown below and ensure its installation within the same namespace as Gatekeeper.
          helm repo add ratify https://deislabs.github.io/ratify

          helm upgrade --install ratify ratify/ratify --version 1.12.1 \
              --namespace gatekeeper-system \
              --set featureFlags.RATIFY_CERT_ROTATION=true \
              --set logger.level=debug \
              --set-file notationCerts={$(Agent.BuildDirectory)/../../.config/notation/localkeys/order-api.io.crt} \
              --set oras.authProviders.azureManagedIdentityEnabled=true \
              --set azureManagedIdentity.clientId=\"YOUR_CLIENT_ID\" \
              --set azureManagedIdentity.tenantId="YOUR_TENANT_ID"

          kubectl apply -f https://deislabs.github.io/ratify/library/default/template.yaml
          kubectl apply -f https://deislabs.github.io/ratify/library/default/samples/constraint.yaml
At this point, we instruct Ratify to use the Azure Managed Identity credentials that we have provided so it can access the relevant artifact metadata through ACR for different verification processes. Additionally, since Notation comes as the default signature verifier in Ratify as we mentioned before, we provide the CA certificate used in the signing processes with the “notationCerts” parameter. Thus, Ratify will allow us to run only signed container images within kubernetes.
In the beginning of the article, we have mentioned that Gatekeeper allows us to define and enforce various policies using the OPA constraint framework as ConstraintTemplates, which are CRD-based.
To briefly touch on the concept of OPA Constraint and ConstraintTemplate, a ConstraintTemplate is a CRD where the policy logic and the schema of the constraint are defined. Additionally, it is the place where we define Rego policies as configurations. So, in order to enforce defined policies, an instance of a policy needs to be created. This is also done by defining CRD-based Constraints.
Now let’s take a look at a basic OPA Gatekeeper ConstraintTemplate (template.yaml) that we are implementing with kubectl in the code block above.
apiVersion: templates.gatekeeper.sh/v1beta1
kind: ConstraintTemplate
metadata:
  name: ratifyverification
spec:
  crd:
    spec:
      names:
        kind: RatifyVerification
  targets:
    - target: admission.k8s.gatekeeper.sh
      rego: |
        package ratifyverification

        # Get data from Ratify
        remote_data := response {
          images := [img | img = input.review.object.spec.containers[_].image]
          response := external_data({"provider": "ratify-provider", "keys": images})
        }

        # Base Gatekeeper violation
        violation[{"msg": msg}] {
          general_violation[{"result": msg}]
        }

        # Check if there are any system errors
        general_violation[{"result": result}] {
          err := remote_data.system_error
          err != ""
          result := sprintf("System error calling external data provider: %s", [err])
        }

        # Check if there are errors for any of the images
        general_violation[{"result": result}] {
          count(remote_data.errors) > 0
          result := sprintf("Error validating one or more images: %s", remote_data.errors)
        }

        # Check if the success criteria is true
        general_violation[{"result": result}] {
          subject_validation := remote_data.responses[_]
          subject_validation[1].isSuccess == false
          result := sprintf("Subject failed verification: %s", [subject_validation[0]])
        }
At this point, the ConstraintTemplate creates a CRD schema of RatifyVerification type, which includes the policy logic to be enforced in Rego language.
Also if we pay attention to the following line,
response := external_data({"provider": "ratify-provider", "keys": images})
        }
We can see that Gatekeeper uses Ratify as an external data provider so that it can verify the container image.
Now let’s take a look at the Constraint (constraint.yaml) that we are applying with kubectl.
apiVersion: constraints.gatekeeper.sh/v1beta1
kind: RatifyVerification
metadata:
  name: ratify-constraint
spec:
  enforcementAction: deny
  match:
    kinds:
      - apiGroups: [""]
        kinds: ["Pod"]
    namespaces: ["default"]
As we mentioned, this Constraint acts as an instance of the ConstraintTemplate we defined earlier. Within this Constraint, we specify that the policy logic in the ConstraintTemplate should be applied to all “Pods” under the “default” namespace.
From this point on, since Notation comes as a built-in verifier within Ratify and we provided the CA certificate, we used during signing, via the “notationCerts” parameter when installing Ratify, only container images signed with this certificate will be allowed to run in the “default” namespace within kubernetes.
Before moving on to testing, when we look at the built-in Ratify verifiers on the kubernetes side, we can see that Notation and Cosign are included by default.
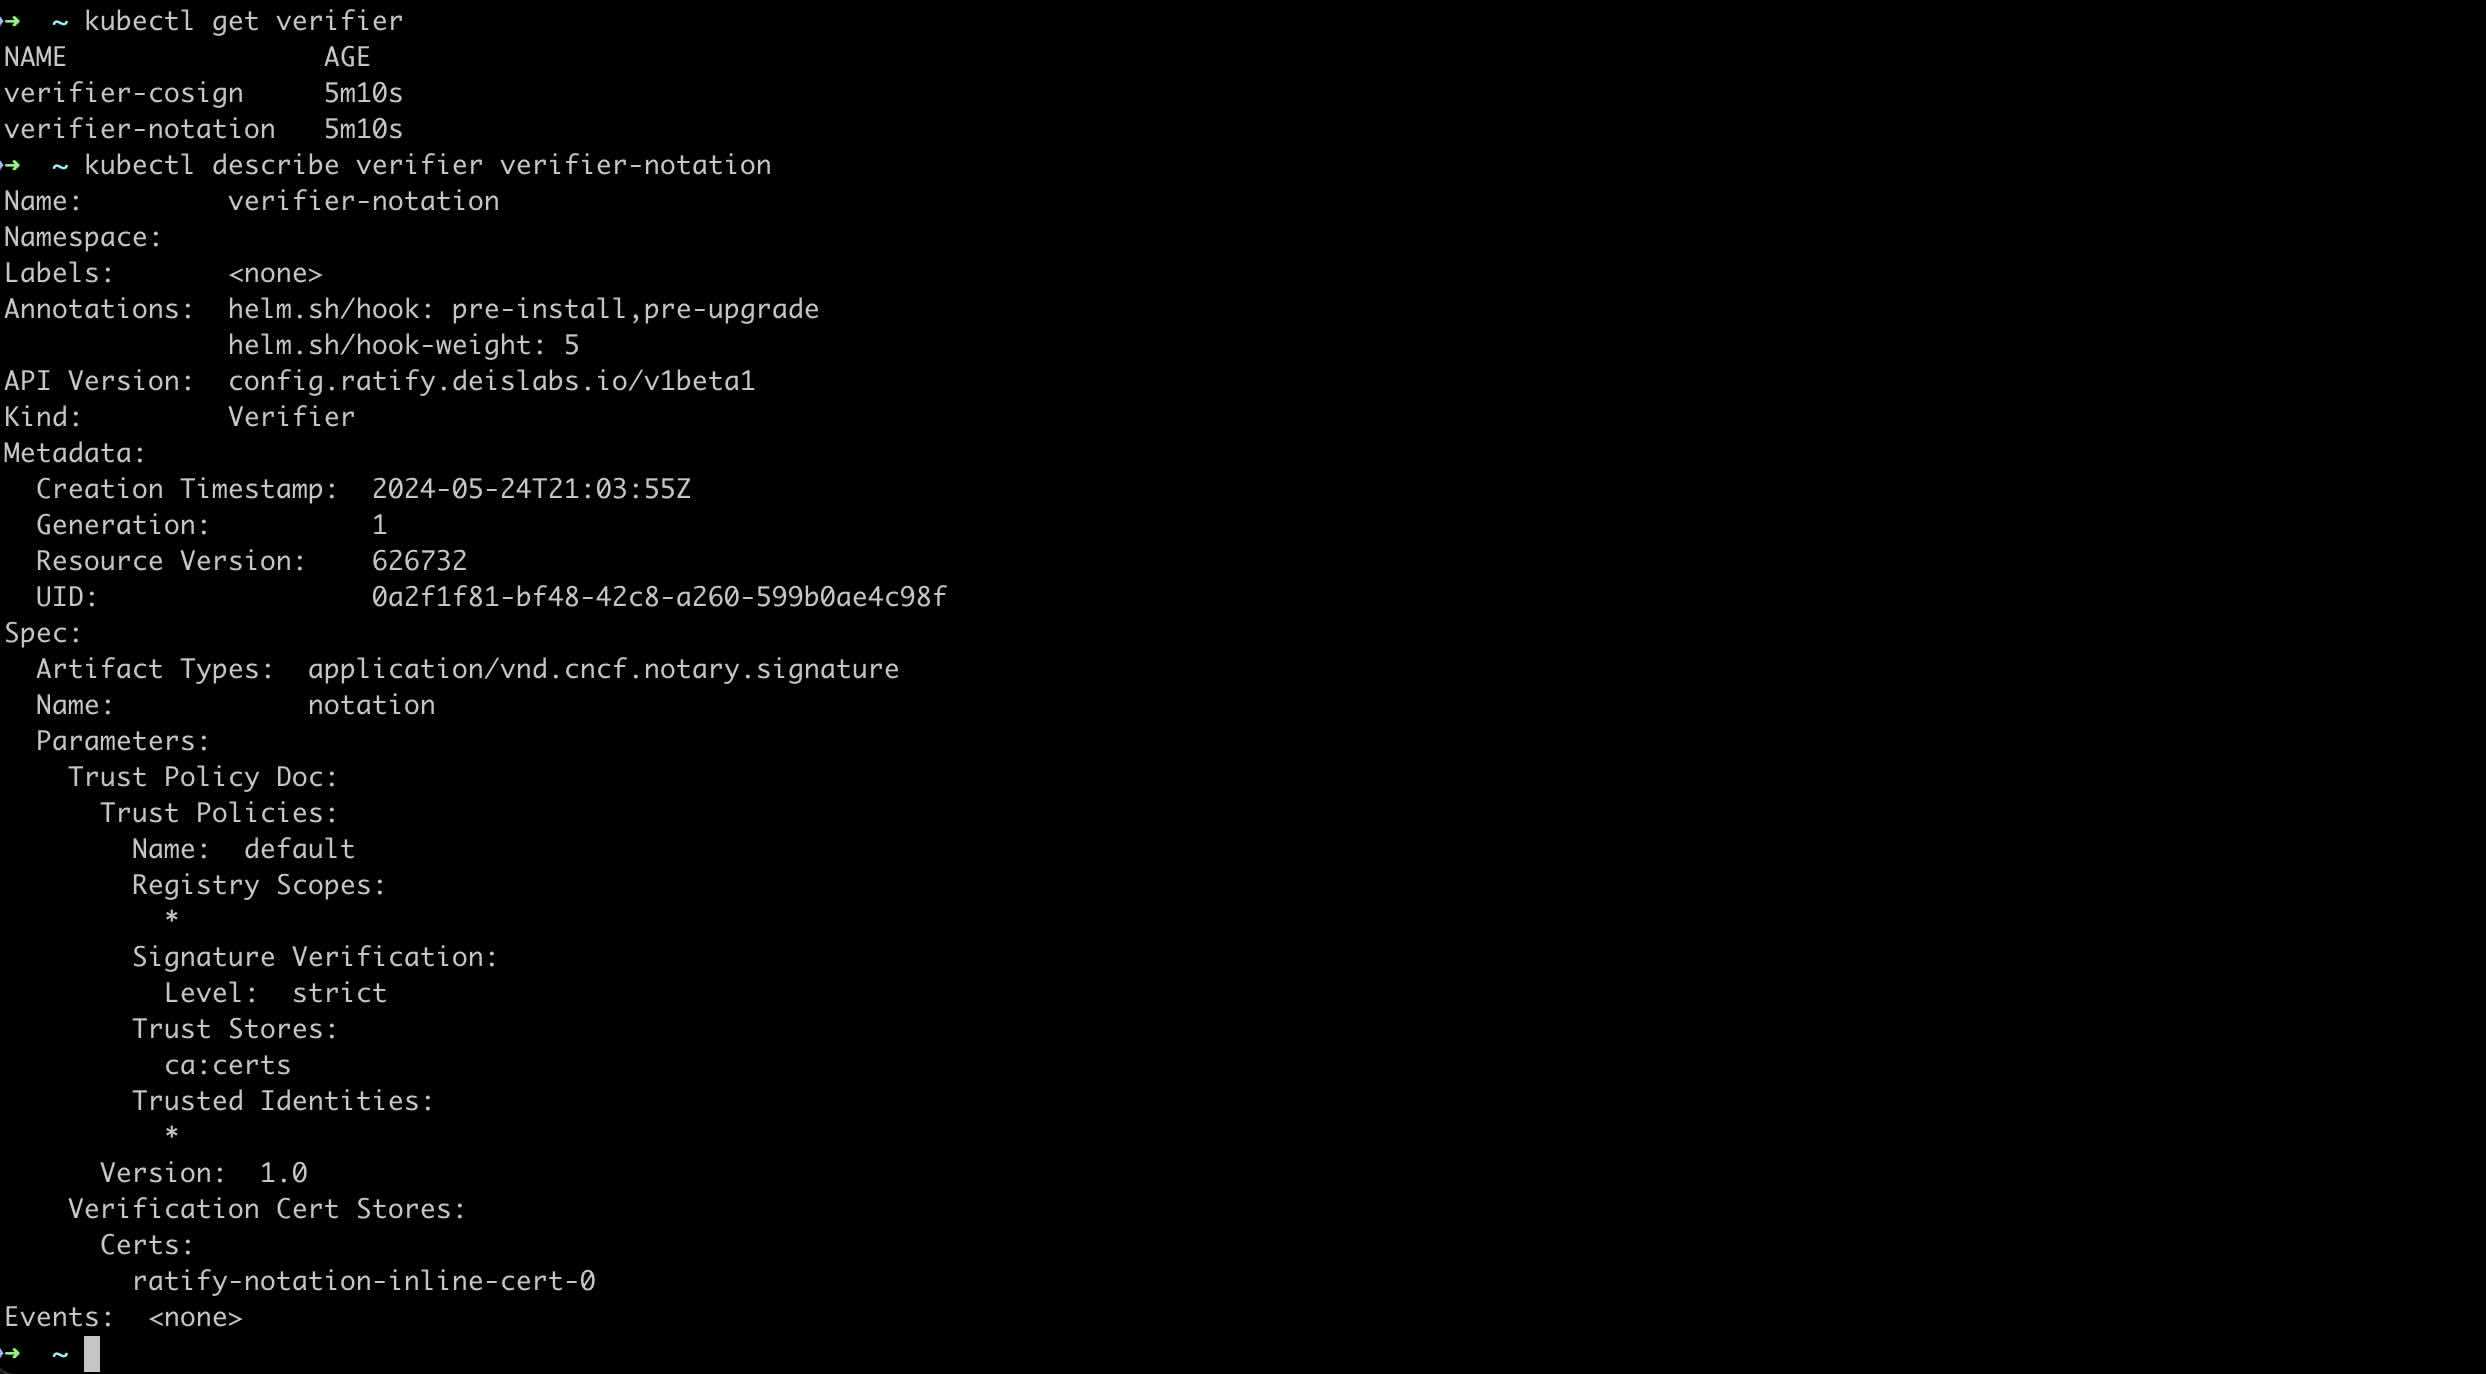
When we look at the Notation verifier, we can see that it works with artifact metadata of the type “application/vnd.cncf.notary.signature” attached with the container images.
Now, to test the relevant policy, let’s try deploying an unsigned sample container image to the kubernetes environment using the task below.
    - task: AzureCLI@2
      displayName: 'Deploy the $(orderAPIImageName) container'
      inputs:
        azureSubscription: 'DevOpsPoC'
        scriptType: 'bash'
        scriptLocation: 'inlineScript'
        inlineScript: |
          cat <<EOF | kubectl apply -f -
          apiVersion: v1
          kind: Pod
          metadata:
            name: busybox
          spec:
            containers:
            - name: busybox
              image: busybox
          EOF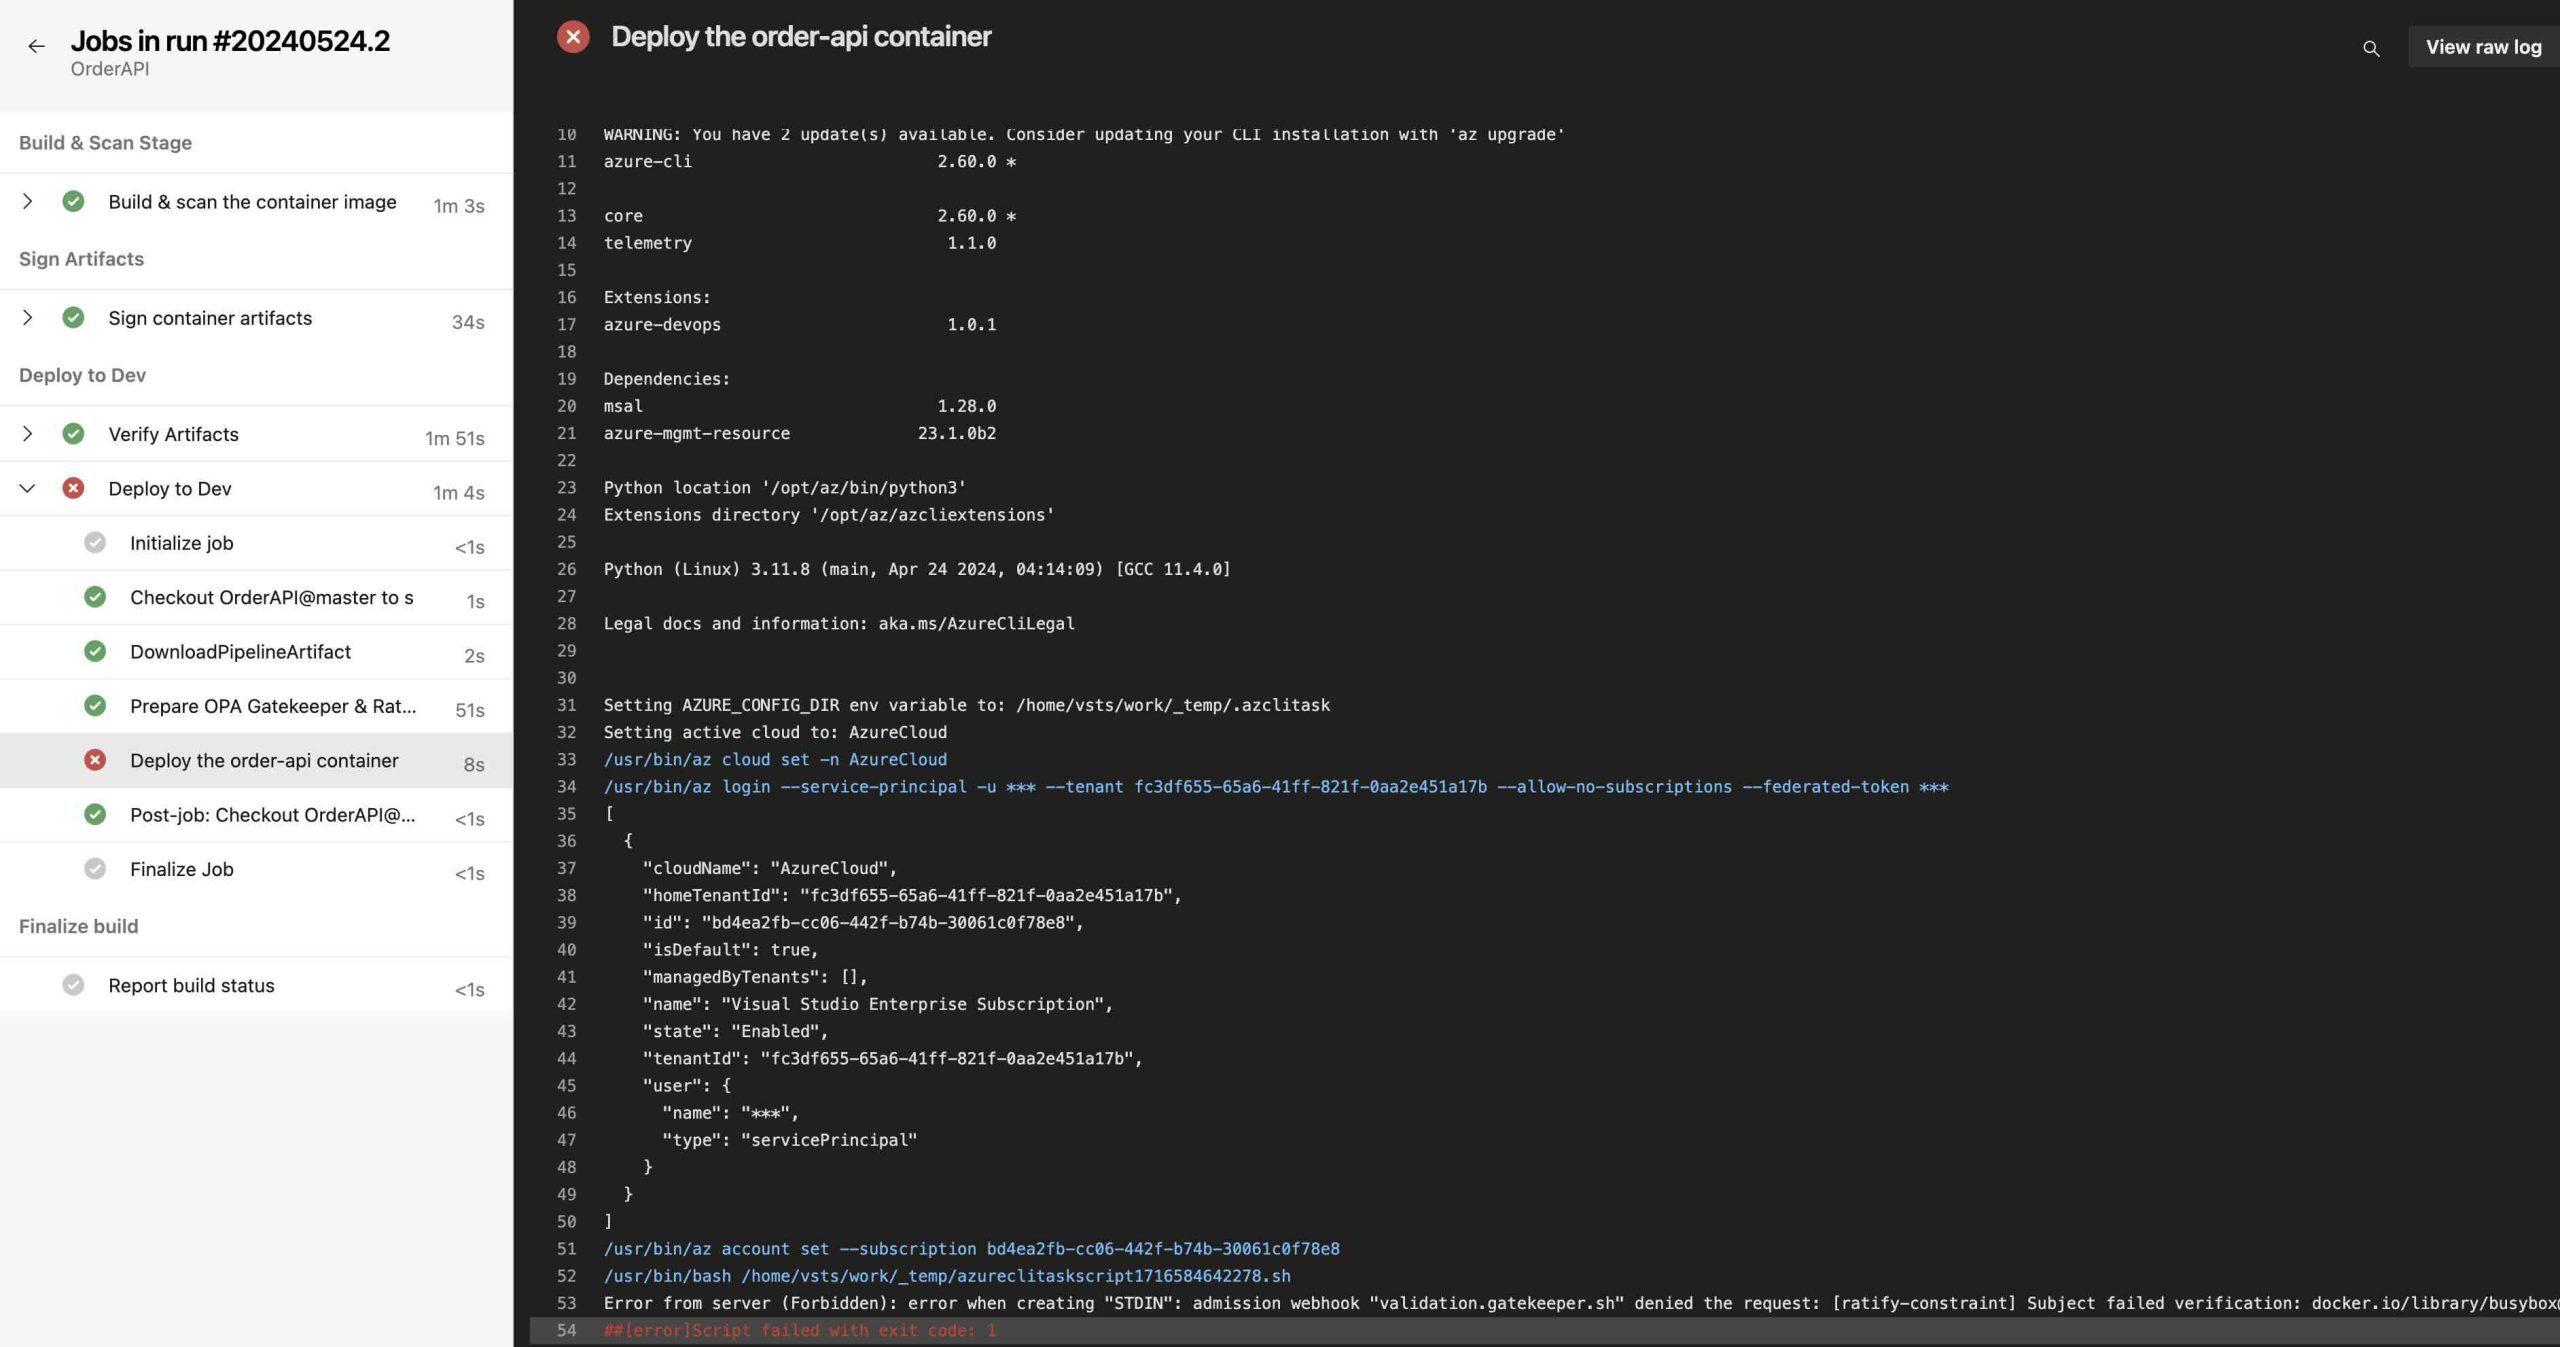
As we can see, the deployment has failed, based on the feedback that Gatekeeper received from Ratify, because the container image was not signed by the CA certificate that we created.
Validation of SBOM
Now, let’s integrate the SBOM verifier, which is one of Ratify ‘s external plugins. To do this, we need to customize the Ratify installation as shown below.
          helm upgrade --install ratify ratify/ratify --version 1.12.1 \
              --namespace gatekeeper-system \
              --set featureFlags.RATIFY_CERT_ROTATION=true \
              --set logger.level=debug \
              --set-file notationCerts={$(Agent.BuildDirectory)/../../.config/notation/localkeys/order-api.io.crt} \
              --set oras.authProviders.azureManagedIdentityEnabled=true \
              --set azureManagedIdentity.clientId=\"YOUR_CLIENT_ID\" \
              --set azureManagedIdentity.tenantId="YOUR_TENANT_ID" \
              --set sbom.enabled=true \
              --set sbom.notaryProjectSignatureRequired=true \
              --set sbom.disallowedPackages[0].name="EasyNetQ" \
              --set sbom.disallowedPackages[0].version="6.3.1"
At this point, as an example scenario, we enable the SBOM verifier using the “sbom.enabled” parameter and specify that container images containing the “EasyNetQ” package with the version “6.3.1” should not be allowed to run in the kubernetes environment. Additionally, if we recall from the first part of the article, we signed the SBOM document for supply chain security. By providing the “sbom.notaryProjectSignatureRequired” parameter, we specify that the signature we created for the SBOM document must also be verified. Lastly, we will use the same ConstraintTemplate and Constraint manifests for the SBOM verifier.
Now, since Ratify ‘s SBOM verifier plugin expects the SBOM document in SPDX-JSON format, let’s go back to the task where we create the SBOM document with Trivy in the first part of the article and update the “–format spdx” parameter to “–format spdx-json“.
Next, let’s update the task we used in the previous step to deploy an unsigned sample container image as shown below, and include a task in the job to retrieve the logs from the Ratify pod in order to see the details of the applied policy.
    - task: AzureCLI@2
      displayName: 'Deploy the $(orderAPIImageName) container'
      inputs:
        azureSubscription: 'DevOpsPoC'
        scriptType: 'bash'
        scriptLocation: 'inlineScript'
        inlineScript: |
          cat <<EOF | kubectl apply -f -
          apiVersion: v1
          kind: Pod
          metadata:
            name: $(orderAPIImageName)
          spec:
            containers:
            - name: $(orderAPIImageName)
              image: $(acrName).azurecr.io/$(orderAPIImageName):1.0.0
              ports:
              - containerPort: 80
          EOF
    - task: AzureCLI@2
      displayName: 'Policy Evaluation Summary'
      condition: succeededOrFailed()
      inputs:
        azureSubscription: 'DevOpsPoC'
        scriptType: 'bash'
        scriptLocation: 'inlineScript'
        inlineScript: |
          kubectl logs deployment/ratify -n gatekeeper-system --since=1m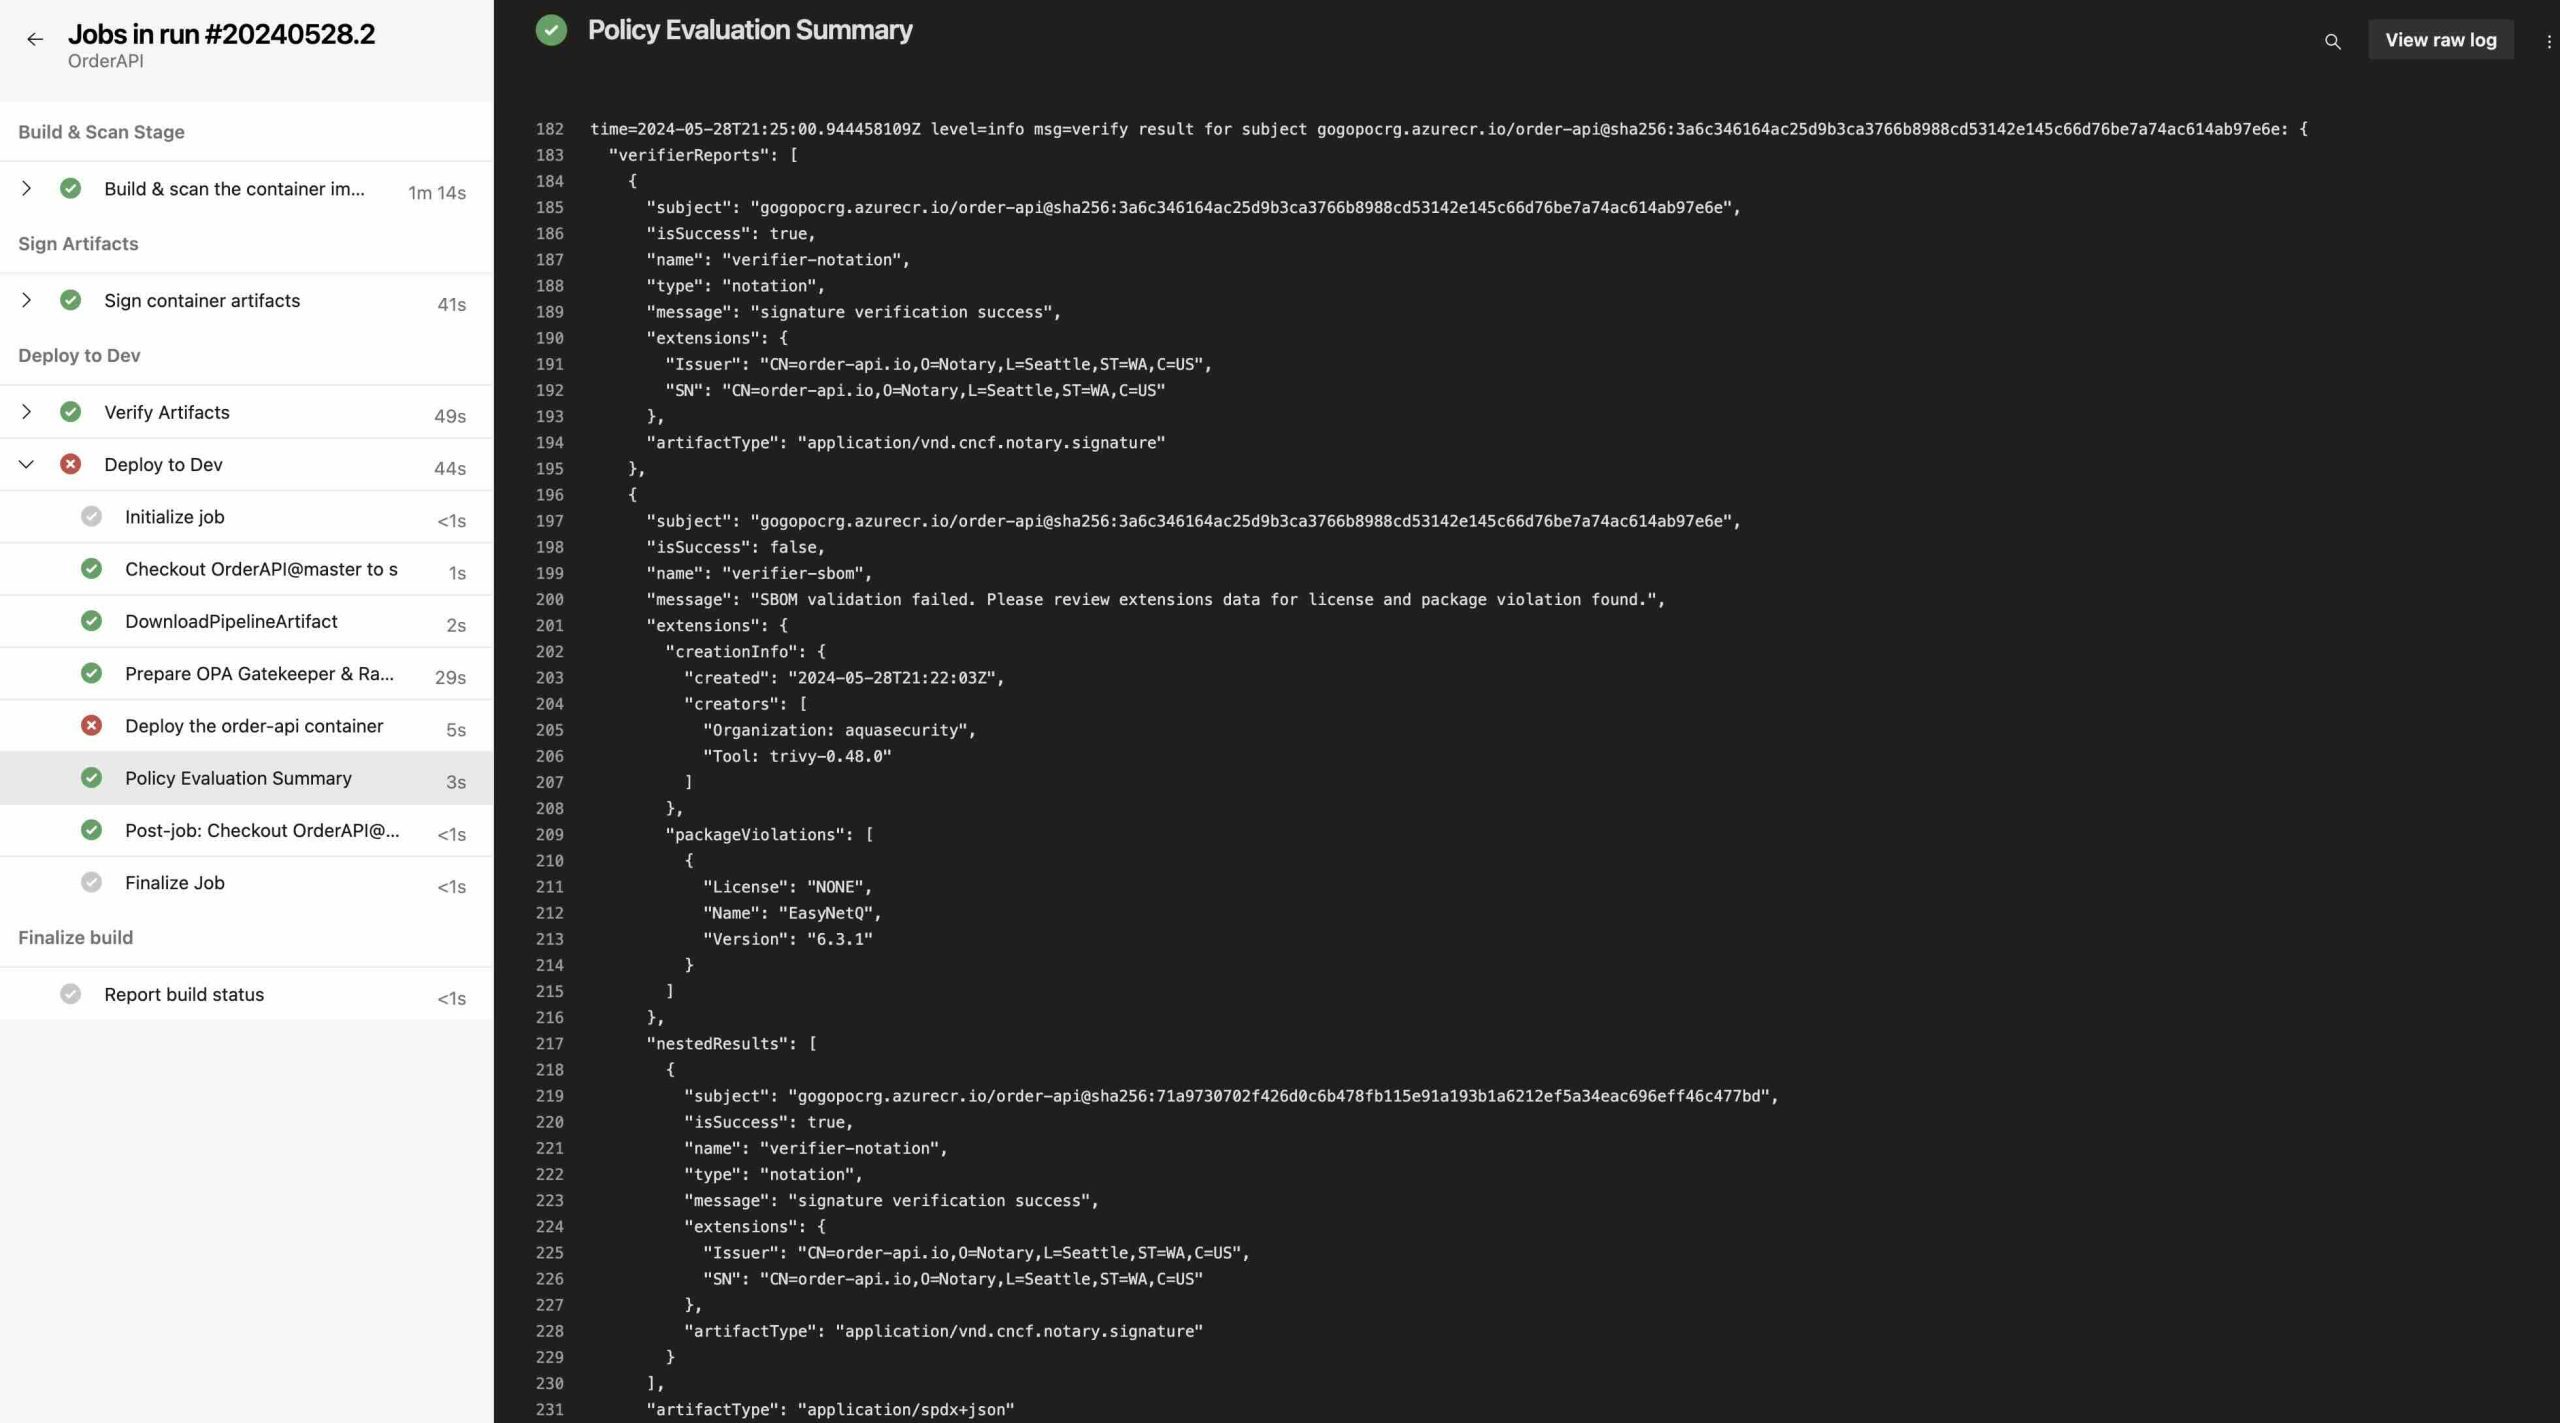
When we rerun the pipeline, we can see that the deployment to the “Dev” environment has failed again, and we can check the applied policies that caused the failure in the “verifierReports” array. When we look at the first report, we can see that the signature verification stage was successful, but the SBOM verification failed due to the use of the “EasyNetQ” package with the version of “6.3.1” within the application.
In this way, as an organization, we can have a centralized control mechanism within our software supply chain and ensure the control of specific packages that we do not want in our environments. Additionally, if these open-source packages used within applications have licensing models that are not allowed by the organization, we can also control them with the “–set sbom.disallowedLicenses={“MPL”}” parameter.
We can access the manifest of the SBOM verifier, which is enabled with the installation of Ratify, as follows and make any desired changes to it as shown below.
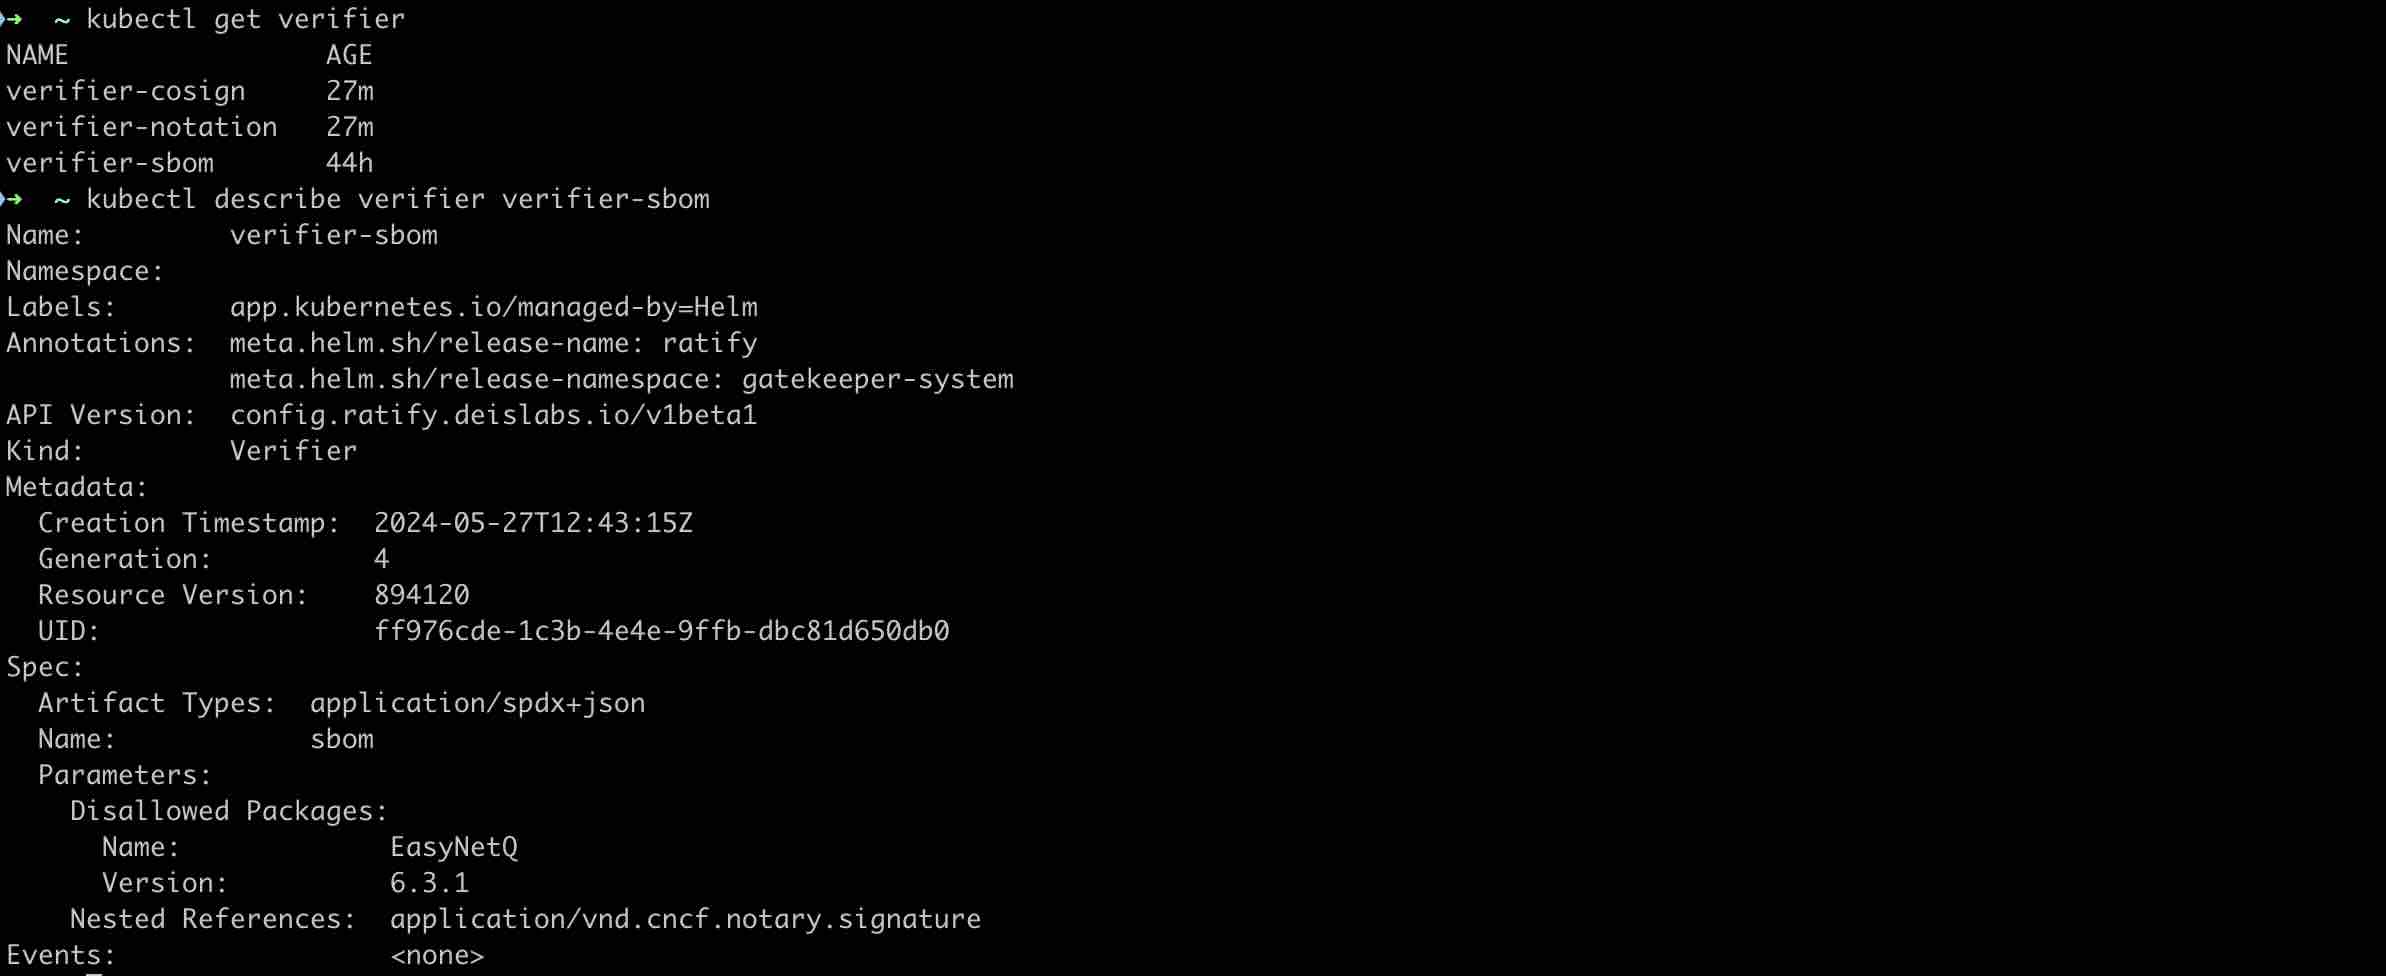
At this point, we can see that the “EasyNetQ” package with version “6.3.1” is listed under “Disallowed Packages” and that this verifier works with artifact metadata of the type “application/spdx+json” attached with the container images.
Validation of Vulnerability Scan Reports
Up to this point, we have automated the verification processes of the signatures of the supply chain artifacts and the SBOM document, that we have. created during the CI processes, through policies. Now, let’s take a look at how we can verify the results of our container vulnerability scanning using policies.
At this point, we will use the Vulnerability Report verifier, which is again another external plugin of Ratify. This verifier expects the vulnerability scan results to be in SARIF format and attached with the relevant container image as an artifact of type “application/sarif+json“.
Similarly, to use this plugin, we need to configure Ratify and the relevant policy. As an example scenario, let’s assume that we want all containers to be deployed to the kubernetes environment to have vulnerability scan results created within 24 hours and not contain any vulnerable packages at “HIGH” or “CRITICAL” severity levels.
          helm upgrade --install ratify ratify/ratify --version 1.12.1 \
              --namespace gatekeeper-system \
              --set featureFlags.RATIFY_CERT_ROTATION=true \
              --set logger.level=debug \
              --set-file notationCerts={$(Agent.BuildDirectory)/../../.config/notation/localkeys/order-api.io.crt} \
              --set oras.authProviders.azureManagedIdentityEnabled=true \
              --set azureManagedIdentity.clientId=\"36929c64-3fae-485c-82bd-b743cddfee56\" \
              --set azureManagedIdentity.tenantId="fc3df655-65a6-41ff-821f-0aa2e451a17b" \
              --set sbom.enabled=true \
              --set sbom.notaryProjectSignatureRequired=true \
              --set sbom.disallowedPackages[0].name="EasyNetQ" \
              --set sbom.disallowedPackages[0].version="6.3.1" \
              --set vulnerabilityreport.enabled=true \
              --set vulnerabilityreport.notaryProjectSignatureRequired=true \
              --set vulnerabilityreport.maximumAge="24h" \
              --set vulnerabilityreport.disallowedSeverities="{"high","critical"}"

          kubectl apply -f https://deislabs.github.io/ratify/library/default/template.yaml
          kubectl apply -f https://deislabs.github.io/ratify/library/default/samples/constraint.yaml
          kubectl apply -f https://raw.githubusercontent.com/deislabs/ratify/23b143d07a53fd61557703c9836e486353959530/library/vulnerability-report-validation/template.yaml
          kubectl apply -f https://raw.githubusercontent.com/deislabs/ratify/v1.1.0/library/vulnerability-report-validation/samples/constraint.yaml
At this point, after the SBOM configuration, we enable the verifier with the “vulnerabilityreport.enabled” parameter, and tell that the vulnerability scan results must be created within 24 hours using the “vulnerabilityreport.maximumAge” parameter. Additionally, we specify that the containers should not have any vulnerable packages at “HIGH” or “CRITICAL” severity levels with the “vulnerabilityreport.disallowedSeverities” parameter.
After configuring Ratify to create the relevant verifier, we define its own Gatekeeper Constraint Template and Constraint which includes the policy logic of this verifier.
Let’s also take a quick look at the Rego policy of this verifier.
apiVersion: templates.gatekeeper.sh/v1beta1
kind: ConstraintTemplate
metadata:
  name: vulnerabilityreportvalidation
spec:
  crd:
    spec:
      names:
        kind: VulnerabilityReportValidation
      validation:
        openAPIV3Schema:
          type: object
          properties:
            issuer:
              type: string
  targets:
    - target: admission.k8s.gatekeeper.sh
      rego: |
        package vulnerabilityreportvalidation

        # This template defines policy for vulnerability report validation.
        # It checks the following:
        # - If there are any system errors
        # - If there are errors for any of the images
        # - There is at least one vulnerability report that was verified
        # - Only considers the latest vulnerability report
        # - The latest vulnerability report is valid (isSuccess = true)
        # - The latest vulnerability report has a valid notary project signature (if require_signature = true)

        import future.keywords.if
        import future.keywords.in
        import future.keywords.every

        default require_signature := false # change to true to require notary project signature on vulnerability report

        # Get data from Ratify
        remote_data := response {
          images := [img | img = input.review.object.spec.containers[_].image]
          images_init := [img | img = input.review.object.spec.initContainers[_].image]
          images_ephemeral := [img | img = input.review.object.spec.ephemeralContainers[_].image]
          other_images := array.concat(images_init, images_ephemeral)
          all_images := array.concat(other_images, images)
          response := external_data({"provider": "ratify-provider", "keys": all_images})
        }

        violation[{"msg": msg}] {
          general_violation[{"result": msg}]
        }

        # Check if there are any system errors
        general_violation[{"result": result}] {
          err := remote_data.system_error
          err != ""
          result := sprintf("System error calling external data provider for vulnerability report verification: %s", [err])
        }

        # Check if there are errors for any of the images
        general_violation[{"result": result}] {
          count(remote_data.errors) > 0
          result := sprintf("Error validating one or more images for vulnerability report verification: %s", remote_data.errors)
        }

        # Check if the success criteria is true
        general_violation[{"result": result}] {
          subject_validation := remote_data.responses[_]
          subject_result := subject_validation[1]
          not process_vuln_reports(subject_result)
          result := sprintf("Subject failed vulnerability report verification: %s", [subject_validation[0]])
        }

        process_vuln_reports(subject_result) if {
          # collect verifier reports from vulnerabilityreport verifier
          vuln_results := [res | subject_result.verifierReports[i].type == "vulnerabilityreport"; res := subject_result.verifierReports[i]]
          count(vuln_results) > 0
          # calculate the timestamp between current time and creation time
          timestamp_diff_results_map := {diff_in_ns: i | diff_in_ns := time.now_ns() - time.parse_rfc3339_ns(vuln_results[i].extensions["createdAt"])}
          count(timestamp_diff_results_map) > 0
          # extract time difference durations into separate array to find global minimum
          timestamp_diff_results_arr := [key | timestamp_diff_results_map[key]]
          smallest_timestamp_diff := min(timestamp_diff_results_arr)
          # validate latest report
          process_vuln_report(vuln_results[timestamp_diff_results_map[smallest_timestamp_diff]])
        }

        process_vuln_report(report) if {
          report.isSuccess == true
          valid_signatures(report)
        }

        valid_signatures(_) := true {
          require_signature == false
        }

        valid_signatures(report) := true {
          require_signature
          count(report.nestedResults) > 0
          some nestedResult in report.nestedResults
          nestedResult.artifactType == "application/vnd.cncf.notary.signature"
          nestedResult.isSuccess
        }
At this point, Gatekeeper utilizes Ratify as an external data source to obtain the results of the relevant Vulnerability Report verifier and ensures that it contains an up-to-date security report. It also optionally verifies the signature of the relevant artifact.
Let’s rerun the relevant pipeline and take a look at the results. If we recall from the first part of this article, the Order API, which we are using as a sample, had a total of 70 different CVEs.
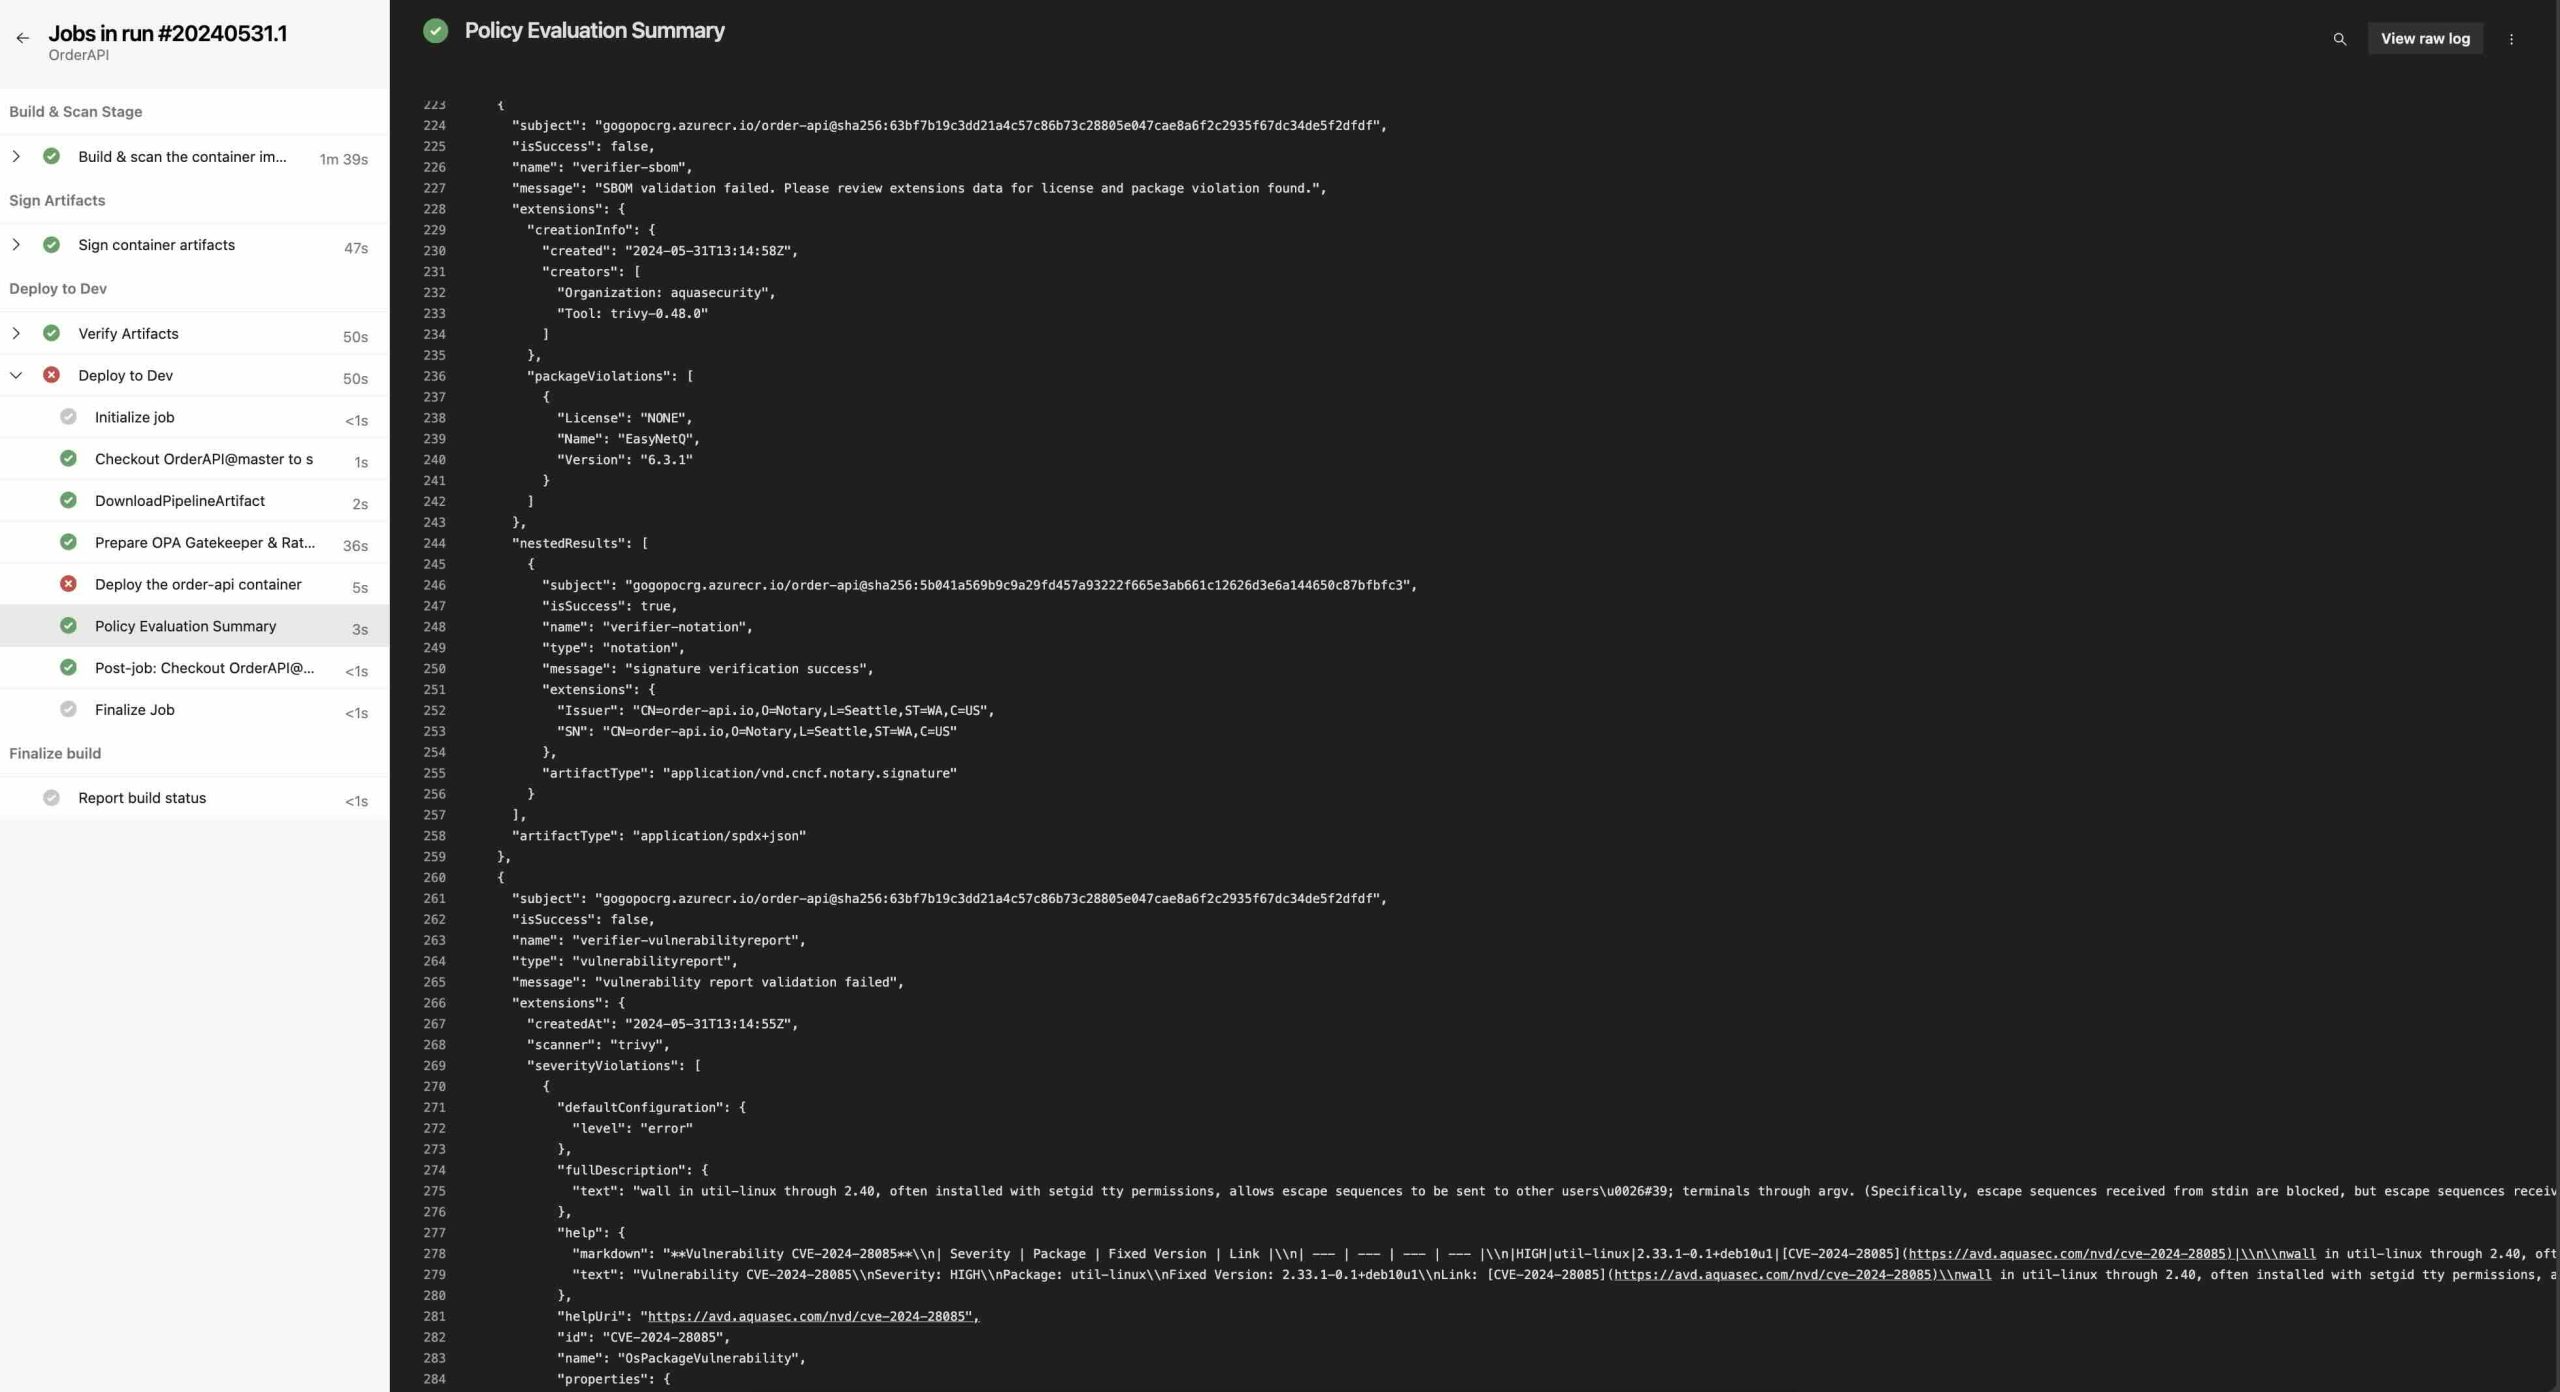
The pipeline failed as expected, and when we look at the “verifierReports” array, we see that the verification failed again due to the “EasyNetQ” package, as we did not modify the policy we created for SBOM. Additionally, this time we can see that the Vulnerability Report verifier also failed due to the Order API container image is having security vulnerabilities at “HIGH” and “CRITICAL” levels.
Let’s Wrap It Up
In this second part of the article, we took a look at how to configure various security and governance policies declaratively using OPA Gatekeeper and Ratify in a kubernetes environment and the way we can have automated governance to enforce these policies during the deployment of containerized applications to enhance software supply chain security.
We touched upon how Gatekeeper enables us to define various policies declaratively using the Rego language, and how Ratify can support these processes as an external data provider in the container security supply chain space.
In summary, we’ve seen the importance of implementing all these steps, including automated governance, and integrating them into SDLC processes to ensure software supply chain security. This helps minimize potential security risks that organizations may encounter and contributes to creating a trustworthy software development environment.
References
https://ratify.dev/docs/what-is-ratify
https://kubernetes.io/blog/2019/08/06/opa-gatekeeper-policy-and-governance-for-kubernetes/
https://open-policy-agent.github.io/gatekeeper/website/docs/howto/
Be First to Comment