It is also important that the applications we develop are capable of providing 24/7 reliable service and also need to have a shorter response time and higher user experience.

As we know, we use many technologies and architectures to bring these capabilities to our applications. With the microservice approach, we develop scalable, resilient and lightweight applications, and we try to use different caching technologies to minimize response times.
Well, while we are trying to bring some capabilities to our applications in an architectural aspect, why do we block our codes and threads in some cases?
We shouldn’t forget that as much as we try to bring capabilities to our application in an architectural aspect, things we do in code aspect is also important as well.
In some cases, unlike the logic of the procedural programming paradigm, I mean, instead of following the flows in the code lines sequentially, we should act in event-based programming approach and make our applications reactive.
Our biggest friend is Reactive Extensions (Rx)!
Let’s recall Rx briefly.
Briefly, we can say it is a powerful library that allows us to develop push-based, asynchronous and more responsive applications using observable streams.
Rx allows us to handle complex business logic in a simpler form and also asynchronously. In addition, as we know Rx isn’t a new concept and it has the Observer design pattern concept in it itself.
In general, we can list the usage scenarios as follows.
- Event-based operations. Especially to be able to handle complex business logic more easily and to be responsive against the requests.
- To be able to consume asynchronous streams continuously.
- Concurrent programming.
In this article context, I will try to cover the scenario how we can handle asynchronous and event-based interactions in our applications in the simplest way without blocking our codes and threads.
Observers
Before going to create a sample application, I want to mention about the “IObservable<T>” and “IObserver<T>” interfaces which are keystones of Rx.
This superb duo is similar to the interfaces “IEnumerable<T>” and “IEnumerator<T>“. The difference is, they work with a push-based approach instead of a pull-based one. Thus, we can develop more responsive applications that handle events by subscribing the related source instead of asking if there is data in a source.
We can think of the “IObservable<T>” interface as a resource we want to observe. It contains the “Subscribe(IObserver<T> observer)” method. As we understand it, “IObserver<T>” is our observer.
Let’s write a simple code now.
using System;
using System.Reactive.Linq;

namespace ReactiveNumbers
{
    class Program
    {
        static void Main(string[] args)
        {
            IObservable<long> numbers = Observable.Interval(TimeSpan.FromSeconds(1));

            numbers.Subscribe(num =>
            {
                Console.WriteLine(num);
            });

            Console.ReadKey();
        }
    }
}
If we look at the console application above, we have created an “IObservable<long>” source that will be triggered every second. Then, by subscribing to this source, we have provided the data get printed on the console screen as long as there is data available.
The console output will be as follows.
% dotnet run
0
1
2
3
4
5
6
7
8
9
...
Subject
Let’s assume that our company requested us to develop a real-time chat application. In addition, they also want that the chat messages are persistent and this process shouldn’t affect the end-user response times.
In this context, let’s use the SignalR library for real-time operations.
Well, first we need to create an ASP.NET Core Web API project as follows. Then, add “SignalR” and “System.Reactive” libraries to the project via NuGet.
dotnet new webapi -n MyChat
dotnet add package SignalR
dotnet add package System.Reactive
Now let’s create a folder called “Models” and define an event model called “ChatMessageReceivedEvent” in it.
namespace MyChat.Models
{
    public class ChatMessageReceivedEvent
    {
        public string Message { get; set; }
    }
}
We will publish this event when we receive a chat message over the socket. Thus, we will try to develop a non-blocking, event-based chat application.
Now, let’s create another folder called “Handlers” and define an interface, which we will implement Rx, as follows.
using System;
using MyChat.Models;

namespace MyChat.Handlers
{
    public interface IChatEventHandler
    {
        void Publish(ChatMessageReceivedEvent eventMessage);
        void Subscribe(string subscriberName, Action<ChatMessageReceivedEvent> action);
        void Subscribe(string subscriberName, Func<ChatMessageReceivedEvent, bool> predicate, Action<ChatMessageReceivedEvent> action);
    }
}
With the “Publish” method we have defined, we will send an event to the Rx stream. Then, with the “Subscribe” method, we will attach an action to the Rx stream.
Now, let’s perform the implementation operation under “Handlers/Implementations” folder path as follows.
using System;
using System.Collections.Generic;
using System.Reactive.Linq;
using System.Reactive.Subjects;
using MyChat.Models;

namespace MyChat.Handlers.Implementations
{
    public class ChatEventHandler : IChatEventHandler, IDisposable
    {
        private readonly Subject<ChatMessageReceivedEvent> _subject;
        private readonly Dictionary<string, IDisposable> _subscribers;

        public ChatEventHandler()
        {
            _subject = new Subject<ChatMessageReceivedEvent>();
            _subscribers = new Dictionary<string, IDisposable>();
        }

        public void Publish(ChatMessageReceivedEvent eventMessage)
        {
            _subject.OnNext(eventMessage);
        }

        public void Subscribe(string subscriberName, Action<ChatMessageReceivedEvent> action)
        {
            if (!_subscribers.ContainsKey(subscriberName))
            {
                _subscribers.Add(subscriberName, _subject.Subscribe(action));
            }
        }

        public void Subscribe(string subscriberName, Func<ChatMessageReceivedEvent, bool> predicate, Action<ChatMessageReceivedEvent> action)
        {
            if (!_subscribers.ContainsKey(subscriberName))
            {
                _subscribers.Add(subscriberName, _subject.Where(predicate).Subscribe(action));
            }
        }

        public void Dispose()
        {
            if (_subject != null)
            {
                _subject.Dispose();
            }

            foreach (var subscriber in _subscribers)
            {
                subscriber.Value.Dispose();
            }
        }
    }
}
If we look at the above code block, we have used the “Subject” class instead of the “IObservable<T>“. Because this superb class implements both “IObservable<T>” and “IObserver<T>” and acts as a proxy.
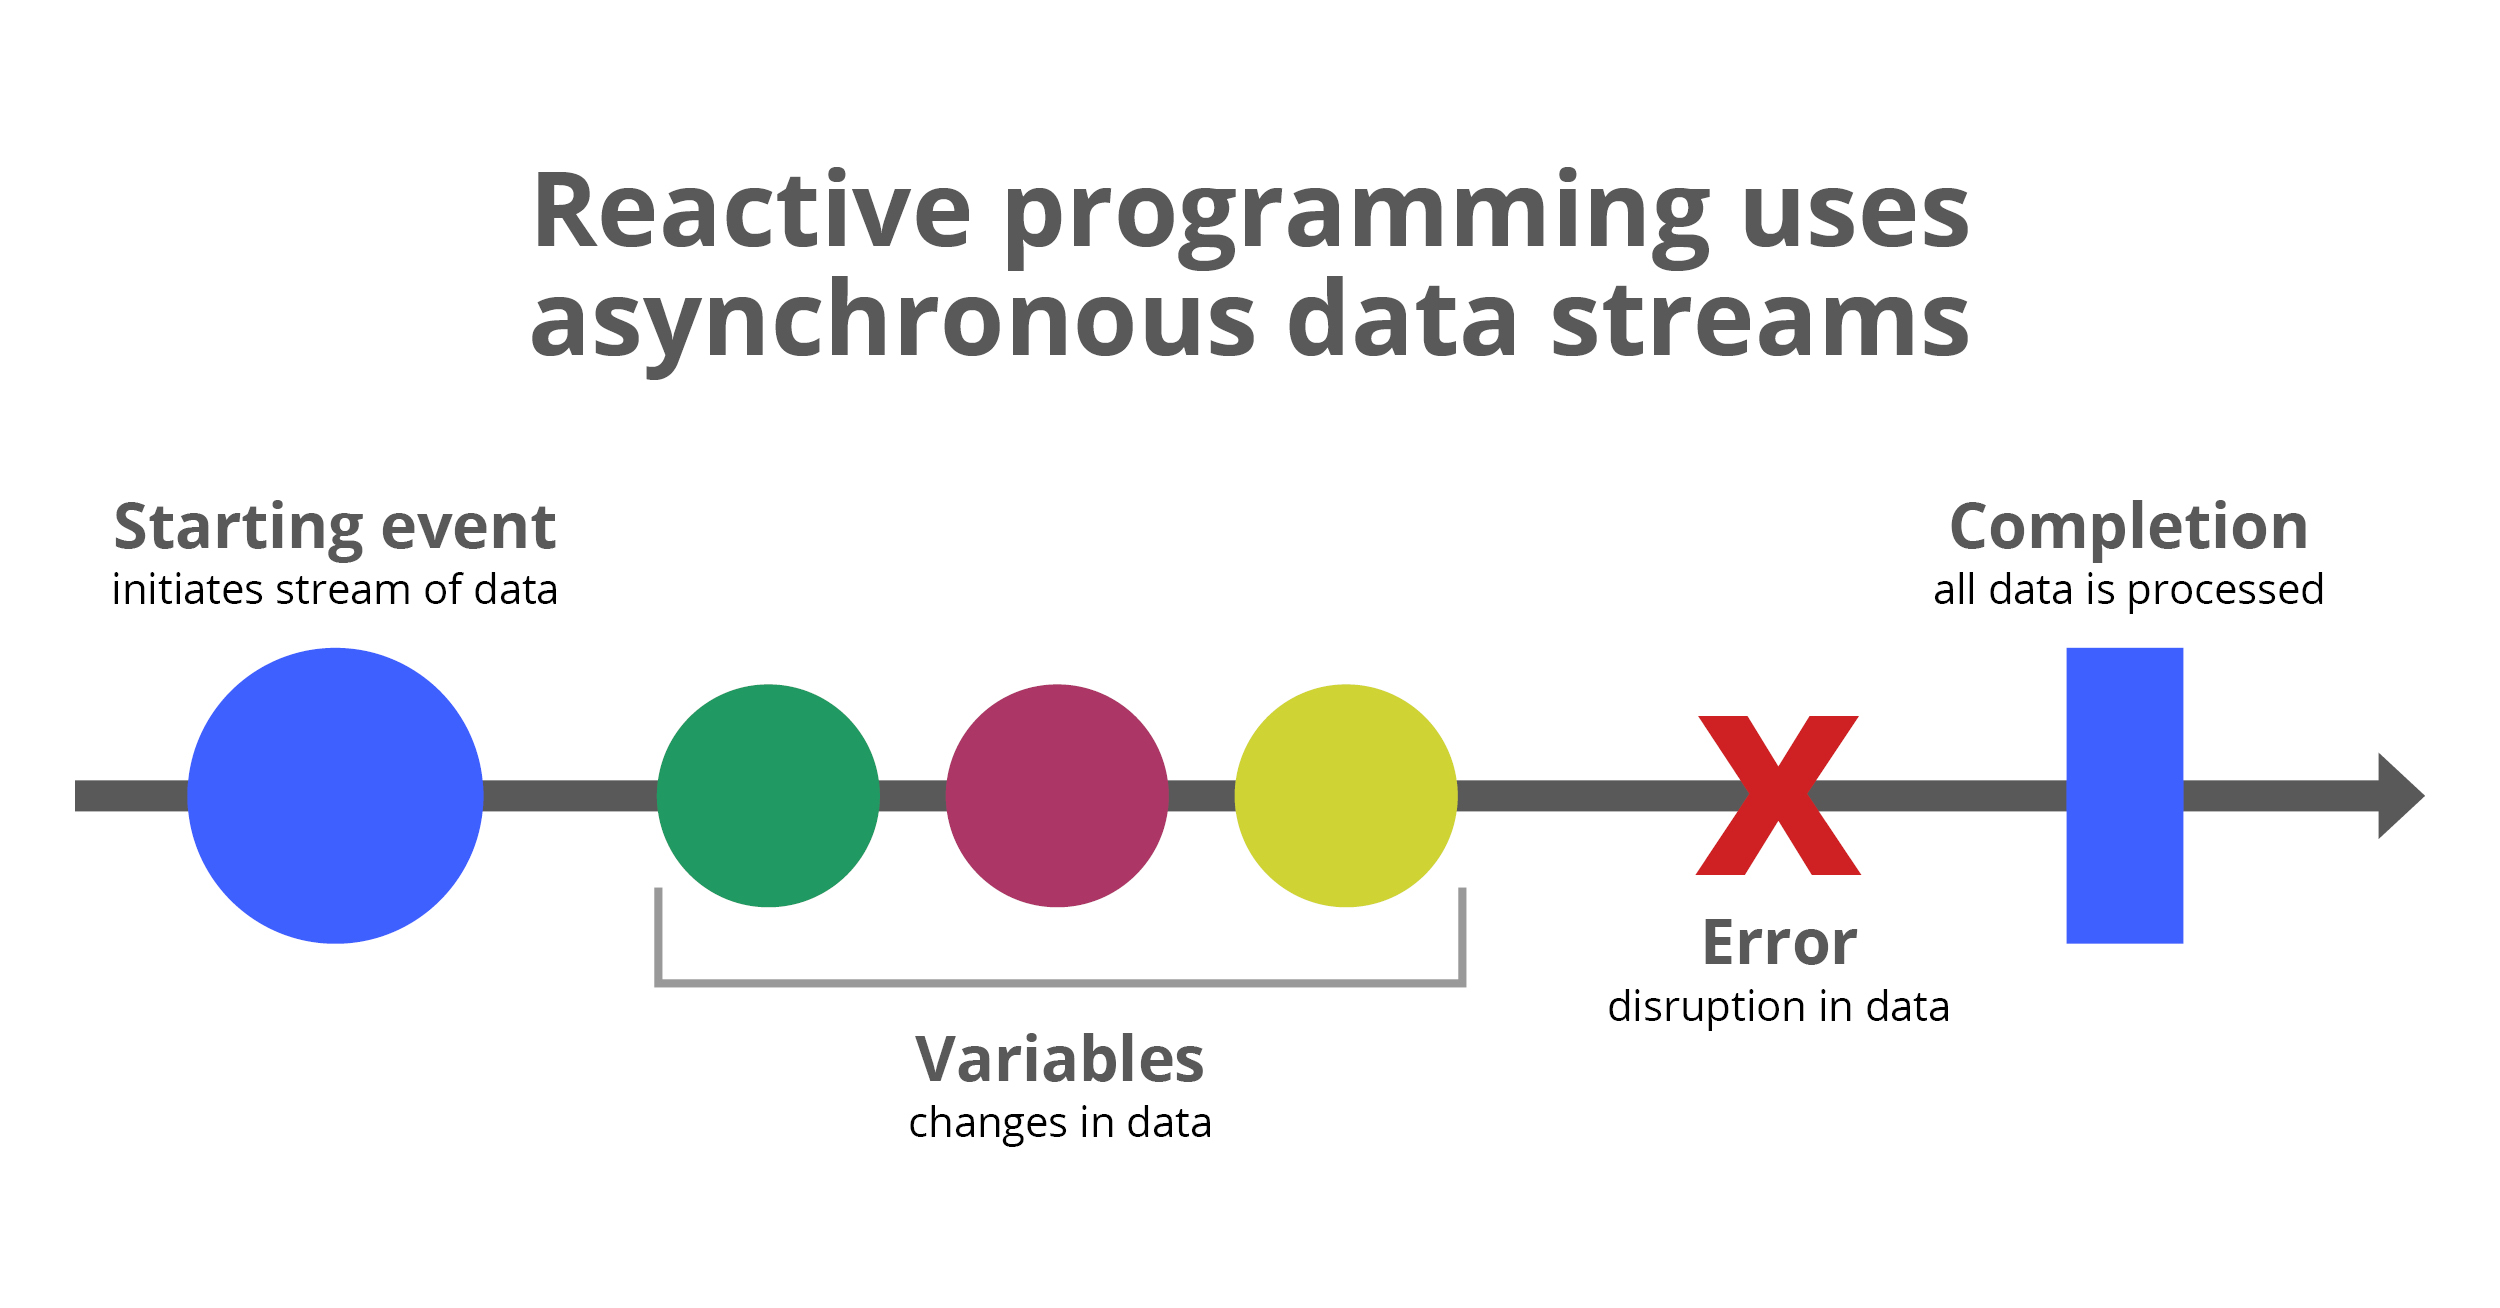
In the “Publish” method, we have implemented the “OnNext” method, which is an observable contract. This method is taking place in the “Subject” class and will notify all subscribers when a new event occurs in the stream.
If we visualize this flow, it will look like the following shape.
In the “Subscribe” method, we are performing the subscribe operation to Rx stream. My favorite part of the Rx is that it also supports Linq operations.
In order to perform the unsubscribe operation, the subscribe operation returns an “IDisposable“. With the “Dispose” method, we perform unsubscribe operations of the subscriber we have added to the dictionary. You can find detailed information on this topic from here.
Now we can pass to the chat part.
For this, let’s create a folder called “Hubs” and define a class “ChatHub” inside it. Then implement it as follows.
using System.Threading.Tasks;
using Microsoft.AspNetCore.SignalR;
using MyChat.Handlers;
using MyChat.Models;

namespace MyChat.Hubs
{
    public class ChatHub : Hub
    {
        private readonly IChatEventHandler _chatEventHandler;

        public ChatHub(IChatEventHandler chatEventHandler)
        {
            _chatEventHandler = chatEventHandler;
        }

        public async Task SendMessage(string sender, string message)
        {
            await Clients.All.SendAsync("chat", sender, message);

            _chatEventHandler.Publish(new ChatMessageReceivedEvent
            {
                Message = message
            });
        }
    }
}
Here, we have simply defined the “SendMessage” method, that we will use for the chat operation over the socket by inheriting the “Hub” class of the “SignalR” library.
In addition, we turn the messages, which will be sent by the end-user, into an observable stream via “IChatEventHandler” to be able to make messages persistent without affecting the end-user’s response time.
When a message is published, the “OnNext” method in the Rx stream will be called and all related subscribers will be notified of this event.
Now, in order to save the chat messages to the database, let’s attach a consumer to the Rx stream called “ChatHistoryConsumer” under the “Handlers/Implementations” path as follows.
using System.Threading;
using System.Threading.Tasks;
using Microsoft.Extensions.Hosting;
using MyChat.Models;

namespace MyChat.Handlers.Implementations
{
    public class ChatHistoryConsumer : BackgroundService
    {
        private readonly IChatEventHandler _eventHandler;

        public ChatHistoryConsumer(IChatEventHandler eventHandler)
        {
            _eventHandler = eventHandler;
        }

        protected override Task ExecuteAsync(CancellationToken stoppingToken)
        {
            _eventHandler.Subscribe(subscriberName: typeof(ChatHistoryConsumer).Name,
                                    action: async (e) =>
                                    {
                                        if (e is ChatMessageReceivedEvent)
                                        {
                                            await PersistChatMessagesToDBAsync((ChatMessageReceivedEvent)e);
                                        }
                                    });

            return Task.CompletedTask;
        }

        private async Task PersistChatMessagesToDBAsync(ChatMessageReceivedEvent e)
        {
            await System.Console.Out.WriteLineAsync($"Chat message received and persisted: {e.Message}");
        }
    }
}
Here, we have implemented the “ExecuteAsync” method by inheriting the “BackgroundService” class in order to run “ChatHistoryConsumer” class as a background task.
Then, in the “ExecuteAsync” method, we have performed the subscription operation for the “ChatMessageReceivedEvent“.
Now, let’s change the “Startup” class as follows.
using Microsoft.AspNetCore.Builder;
using Microsoft.AspNetCore.Hosting;
using Microsoft.Extensions.Configuration;
using Microsoft.Extensions.DependencyInjection;
using Microsoft.Extensions.Hosting;
using MyChat.Handlers;
using MyChat.Handlers.Implementations;
using MyChat.Hubs;

namespace MyChat
{
    public class Startup
    {
        public Startup(IConfiguration configuration)
        {
            Configuration = configuration;
        }

        public IConfiguration Configuration { get; }

        // This method gets called by the runtime. Use this method to add services to the container.
        public void ConfigureServices(IServiceCollection services)
        {
            services.AddRazorPages();
            services.AddControllers();
            services.AddSignalR();
            services.AddSingleton<IChatEventHandler, ChatEventHandler>();
            services.AddHostedService<ChatHistoryConsumer>();
        }

        // This method gets called by the runtime. Use this method to configure the HTTP request pipeline.
        public void Configure(IApplicationBuilder app, IWebHostEnvironment env)
        {
            if (env.IsDevelopment())
            {
                app.UseDeveloperExceptionPage();
            }

            app.UseHttpsRedirection();
            app.UseStaticFiles();

            app.UseRouting();

            app.UseAuthorization();

            app.UseEndpoints(endpoints =>
            {
                endpoints.MapRazorPages();
                endpoints.MapHub<ChatHub>("/hubs/chat");
            });
        }
    }
}
At this point, we have enabled Razor Pages and SignalR in order to test chat application. Then, we have performed the required service injection operations.
Now let’s prepare a simple UI to test application.
First we need to follow this first step to include required SignalR javascript packages to the project.
Then, let’s create a folder called “Pages” and create a Razor Page called “Chat” inside it.
@page

<style>
input[type=text] {
  width: 100%;
  padding: 12px 20px;
  margin: 8px 0;
  box-sizing: border-box;
}
</style>

<div>
    <h2>Chat Test</h2>
    <div>
        <ul id="messageList"></ul>
    </div>
</div>
<div>
    <div>Sender: <input type="text" id="sender"/></div>
    <div>Message: <input type="text" id="message""></div>
    <div><input type="button" id="sendMessage" value="Send" /></div>
</div>

<script src="/lib/signalr/signalr.js"></script>
<script src="/lib/signalr/chat.js"></script>
Let’s create the SignalR javascript client called “chat.js” under “wwwroot/lib/signalr” folder path as follows.
const connection = new signalR.HubConnectionBuilder()
    .withUrl("https://localhost:5001/hubs/chat")
    .build();

document.getElementById("sendMessage").addEventListener("click", event => {
    const message = document.getElementById("message").value;
    const sender = document.getElementById("sender").value;

    connection.invoke("SendMessage", sender, message).catch(err => console.error(err.toString()));
    event.preventDefault();
});

connection.on("chat", (sender, message) => {
    const recMessage = sender + ": " + message;
    const li = document.createElement("li");

    li.textContent = recMessage;
    document.getElementById("messageList").appendChild(li);
});

connection.start().catch(err => console.error(err.toString()));
Here, we have prepared a simple UI that will connect to the “ChatHub“, which we have created before, over the socket and can send messages.
Now we can test it.
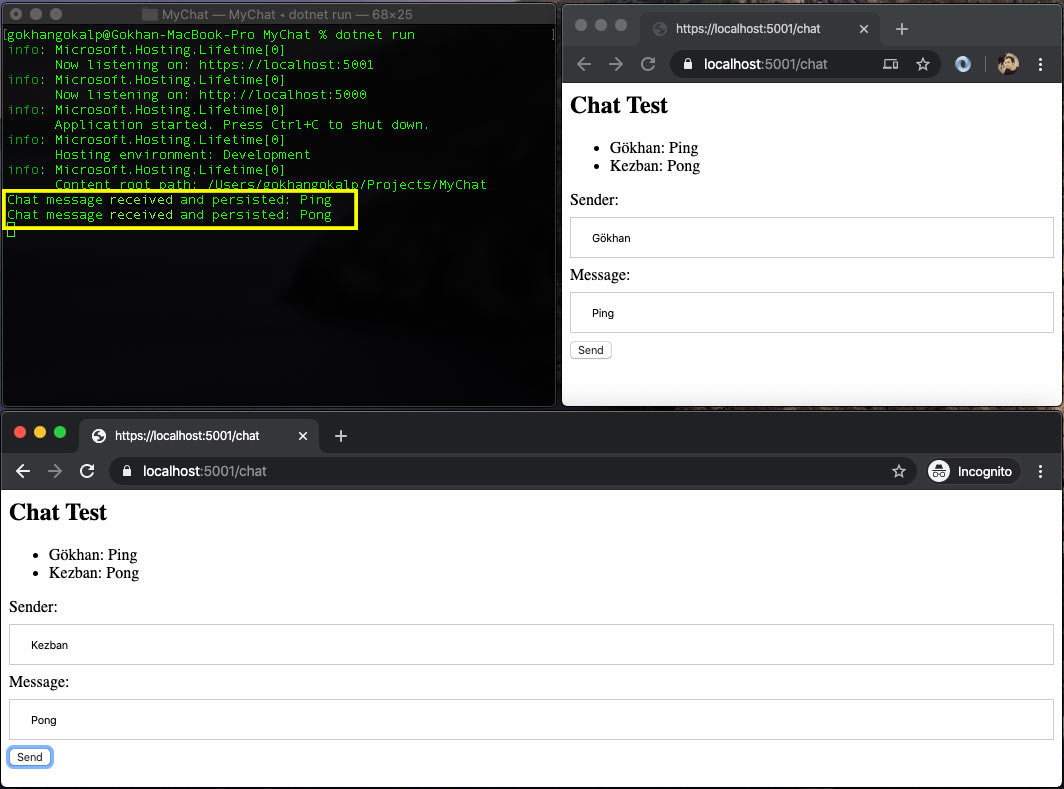
In order to test, let’s run the application with the “dotnet run” command and send chat messages through two different browsers as follows.
If we look at the console screen above, the observer, which we have created, has performed the persistence operations of the chat messages in a non-blocking and asynchronous way while we were chatting.
A good advantage of the Rx approach is, that when a new feature is requested, it allows us to add this feature without complicating the business logic. For example, we can assume that chat messages filtering feature is requested from us against the bad words. All we have to do is to add another observer to the Rx stream.
GitHub: https://github.com/GokGokalp/dotnetcore-reactive-extensions
References
docs.microsoft.com/en-us/dotnet/api/system.iobservable-1?view=netframework-4.7.2&WT.mc_id=DT-MVP-5003382
dotnetcorecentral.com/blog/reactive-extensions-in-net-core/
docs.microsoft.com/en-us/previous-versions/dotnet/reactive-extensions/hh242974%28v%3dvs.103%29?WT.mc_id=DT-MVP-5003382


thanks for sharing
Merhaba,
Bu örneği normal mvc ile nasıl yapabiliriz?
This can be simplified and made generic with an event aggregator